Home
High Fidelity is an open-source software where you can create and share virtual reality (VR) experiences. You can create and host your own VR world, explore other worlds, meet and connect with other users, attend or host live VR events and much more.
The High Fidelity metaverse provides built-in social features, including avatar interactions, spatialized audio and interactive physics. Additionally, you have the ability to import any 3D object into your virtual environment. No matter where you go in High Fidelity, you will always be able to interact with your environment, engage with your friends, and listen to conversations just like you would in real life.
What can I do?
You have the power to shape your VR experience in High Fidelity.
- EXPLORE by hopping between domains in the metaverse, shop the Marketplace, attend events and check out what others are up to!
- CREATE personal experiences by building avatars, domains, tablet apps, and more for you and others to enjoy.
- SCRIPT and express your creativity by applying advanced scripting concepts to entities and avatars in the metaverse.
- HOST and make immersive experiences to educate, entertain, and connect with your audience.
- SELL your creations to others and make money in the metaverse using the High Fidelity Marketplace.
- CONTRIBUTE to our endeavor by browsing our source code on GitHub.
Explore
High Fidelity is a metaverse where you can connect and create with others. We invite you to explore VR worlds created in High Fidelity and interact with other users. You can visit your friend’s VR world, meet people, attend events and even go for a class on avatar creation. It’s an immersive and interactive experience with realistic visuals and audio.
If its your first time using High Fidelity, you’ll start your journey a local space by yourself, where you can experiment with the controls and learn about the product. When you are ready, try exploring other domains using the GoTo and socialize with people around the metaverse. If you’ve visited High Fidelity before, you will return to the location where you last visited.
Throughout this chapter, learn how to make the most of your exploration:
Get Started with High Fidelity
We know that getting started with a new application can be difficult: installing the software and learning the controls is never any fun. Hopefully, this section will help you become familiar with our application, so that you can begin making friends and exploring the metaverse.
In This Section
Install High Fidelity
High Fidelity has two different installers. The Client Installer comes with everything you need to view and interact with High Fidelity’s content and users. However, you are unable to host content using this installer. The Client + Sandbox Installer has everything the client installer does, but it also enables you to host your own content and share it with the world.
On This Page
Minimum System Requirements
In order to run High Fidelity in either VR or Desktop mode, ensure that your computer meets these minimum system requirements:
- Windows 10, 64-bit or MacOS High Sierra (10.13)
- 8GB+ RAM i5
- A wide range of Nvidia, AMD, and Intel graphics cards are supported
In addition, your network must have enough internet bandwidth to run High Fidelity:
- If you are using Interface only to explore the metaverse, then you must have internet speeds of at least 10 Mbps download/2 Mbps upload.
- If you are hosting a domain on your Sandbox, you need to add 10 Mbps upload for each user you want to concurrently visit your domain.
Note
We also run on Linux devices; however, we do not publish an installer for Linux machines. To use High Fidelity on Linux, you will need to build the application from our code base. For more information, see our Linux Build Guide.
Download High Fidelity Installer
You can download High Fidelity through Oculus store, Steam, or High Fidelity’s website:
If you intend to use High Fidelity in VR mode with a HMD, ensure that Steam VR is also installed on your system before launching High Fidelity.
Install High Fidelity
Once you’ve downloaded the installer, you’re ready to install High Fidelity. The process will be different based on your operating system:
To install on Windows, simply double-click on the downloaded installer file to open it. Run through the prompts on the installer. Once you finish the install process, Interface will open, and you will be able to log in and begin exploring the metaverse.
At this time, the High Fidelity installer for Mac is unsigned, so you will need give the OS permission to install and the application.
- Open the downloaded installer dmg file.
- Agree to the License Agreement.
- Drag High Fidelity to the Applications folder.
- Open System Preferences > General.
- Next to the warning indicating that Interface is blocked, click ‘Open Anyway’.
- Confirm that you want to open the application.
At this point, Interface will open and you will be able to log in and begin exploring the metaverse.
Upgrade High Fidelity
High Fidelity is always changing, as we work to improve performance and add features that will enhance your experience in the metaverse. If a new version has been released, you will be prompted to upgrade your installation the next time you run High Fidelity. At any time, you can also download the latest release from our website.
You cannot upgrade if Sandbox or the Console is running in the background of your computer. Be sure to quit these applications before upgrading.
- For Windows, locate the High Fidelity app in your system tray. Right-click on the icon and select ‘Quit’. Alternatively, end the ‘server-console’ background process using the Task Manager.
- For OS X, locate the High Fidelity icon in the menu bar. Click on the icon and select ‘Quit’.
For more information on the latest releases, see our Release Notes.
Perform a Clean Install
If you’re facing problems when you load Interface and Sandbox, you can try performing a clean install. A clean install removes multiple files and settings that you may need once you install High Fidelity again.
Note
Ensure that you back up the following files before a clean install: Favorites, Wearables, Sandbox, and Entities. These settings will be deleted during the clean install.
- Click on the Start menu and type “Add or Remove Programs” in your Windows search bar.
- Uninstall any versions of High Fidelity that are visible (Including any Steam installs).
- Once High Fidelity is uninstalled, browse to your %Program Files% directory. Delete all folders related to High Fidelity. If you installed through Steam, these folders will be located at
C:/Program Files(x86)/Steam/steamapps/common.
Warning
The next 3 steps will permanently delete your Sandbox content. If you wish to keep this content, copy %AppData%/Local/High Fidelity/assignment-client to another location on your computer before proceeding. Repeat for %AppData%/Roaming/High Fidelity/assignment-client.
- Browse to your local %AppData% folder (usually
C:/Users/<your_username>/AppData/Local). If you do not see the folder, make sure you can view hidden folders. In File Explorer, click View and make sure “Hidden Items” is checked. Delete all folders related to High Fidelity. - Browse to your roaming %AppData% folder (usually
C:/Users/<your_username>/AppData/Roaming). Delete all folders related to High Fidelity. - Re-install High Fidelity using the steps above. To restore your Sandbox content, copy the
assignment-clientfolders you backed up back to their respective locations.
- Open your Applications folder and delete the High Fidelity folder.
- Open the
<username>/.configfolder. This is a hidden folder than is accessible by going to Go > Home. Press the keyboard shortcutCommand + Shift + .(period). - Delete the
highfidelity.iofolder. - Open the
~/Libraryfolder by holding the Option key and clicking the ‘Go’ menu while in the Finder. The Library option should appear in the menu. - Browse to
~/Library/Application Supportand delete the High Fidelity folder. - Empty the Trash.
- Re-install High Fidelity using the steps above.
See Also
Understand the Architecture
High Fidelity’s architecture shows how different parts of the system work together to give you the best VR experience.
On This Page
Architecture Overview
High Fidelity’s architecture consists of the following components that work together and send data to each other for your VR experience.
- The High Fidelity Interface runs your personal experience in the metaverse. With it, you can visit VR worlds, meet people, attend live events and more.
- The Domain Server is the server that hosts a domain. The domain server hosts the content in the domain, and manages the domain-wide settings, such as audio spatialization, user permissions, and running scripts.
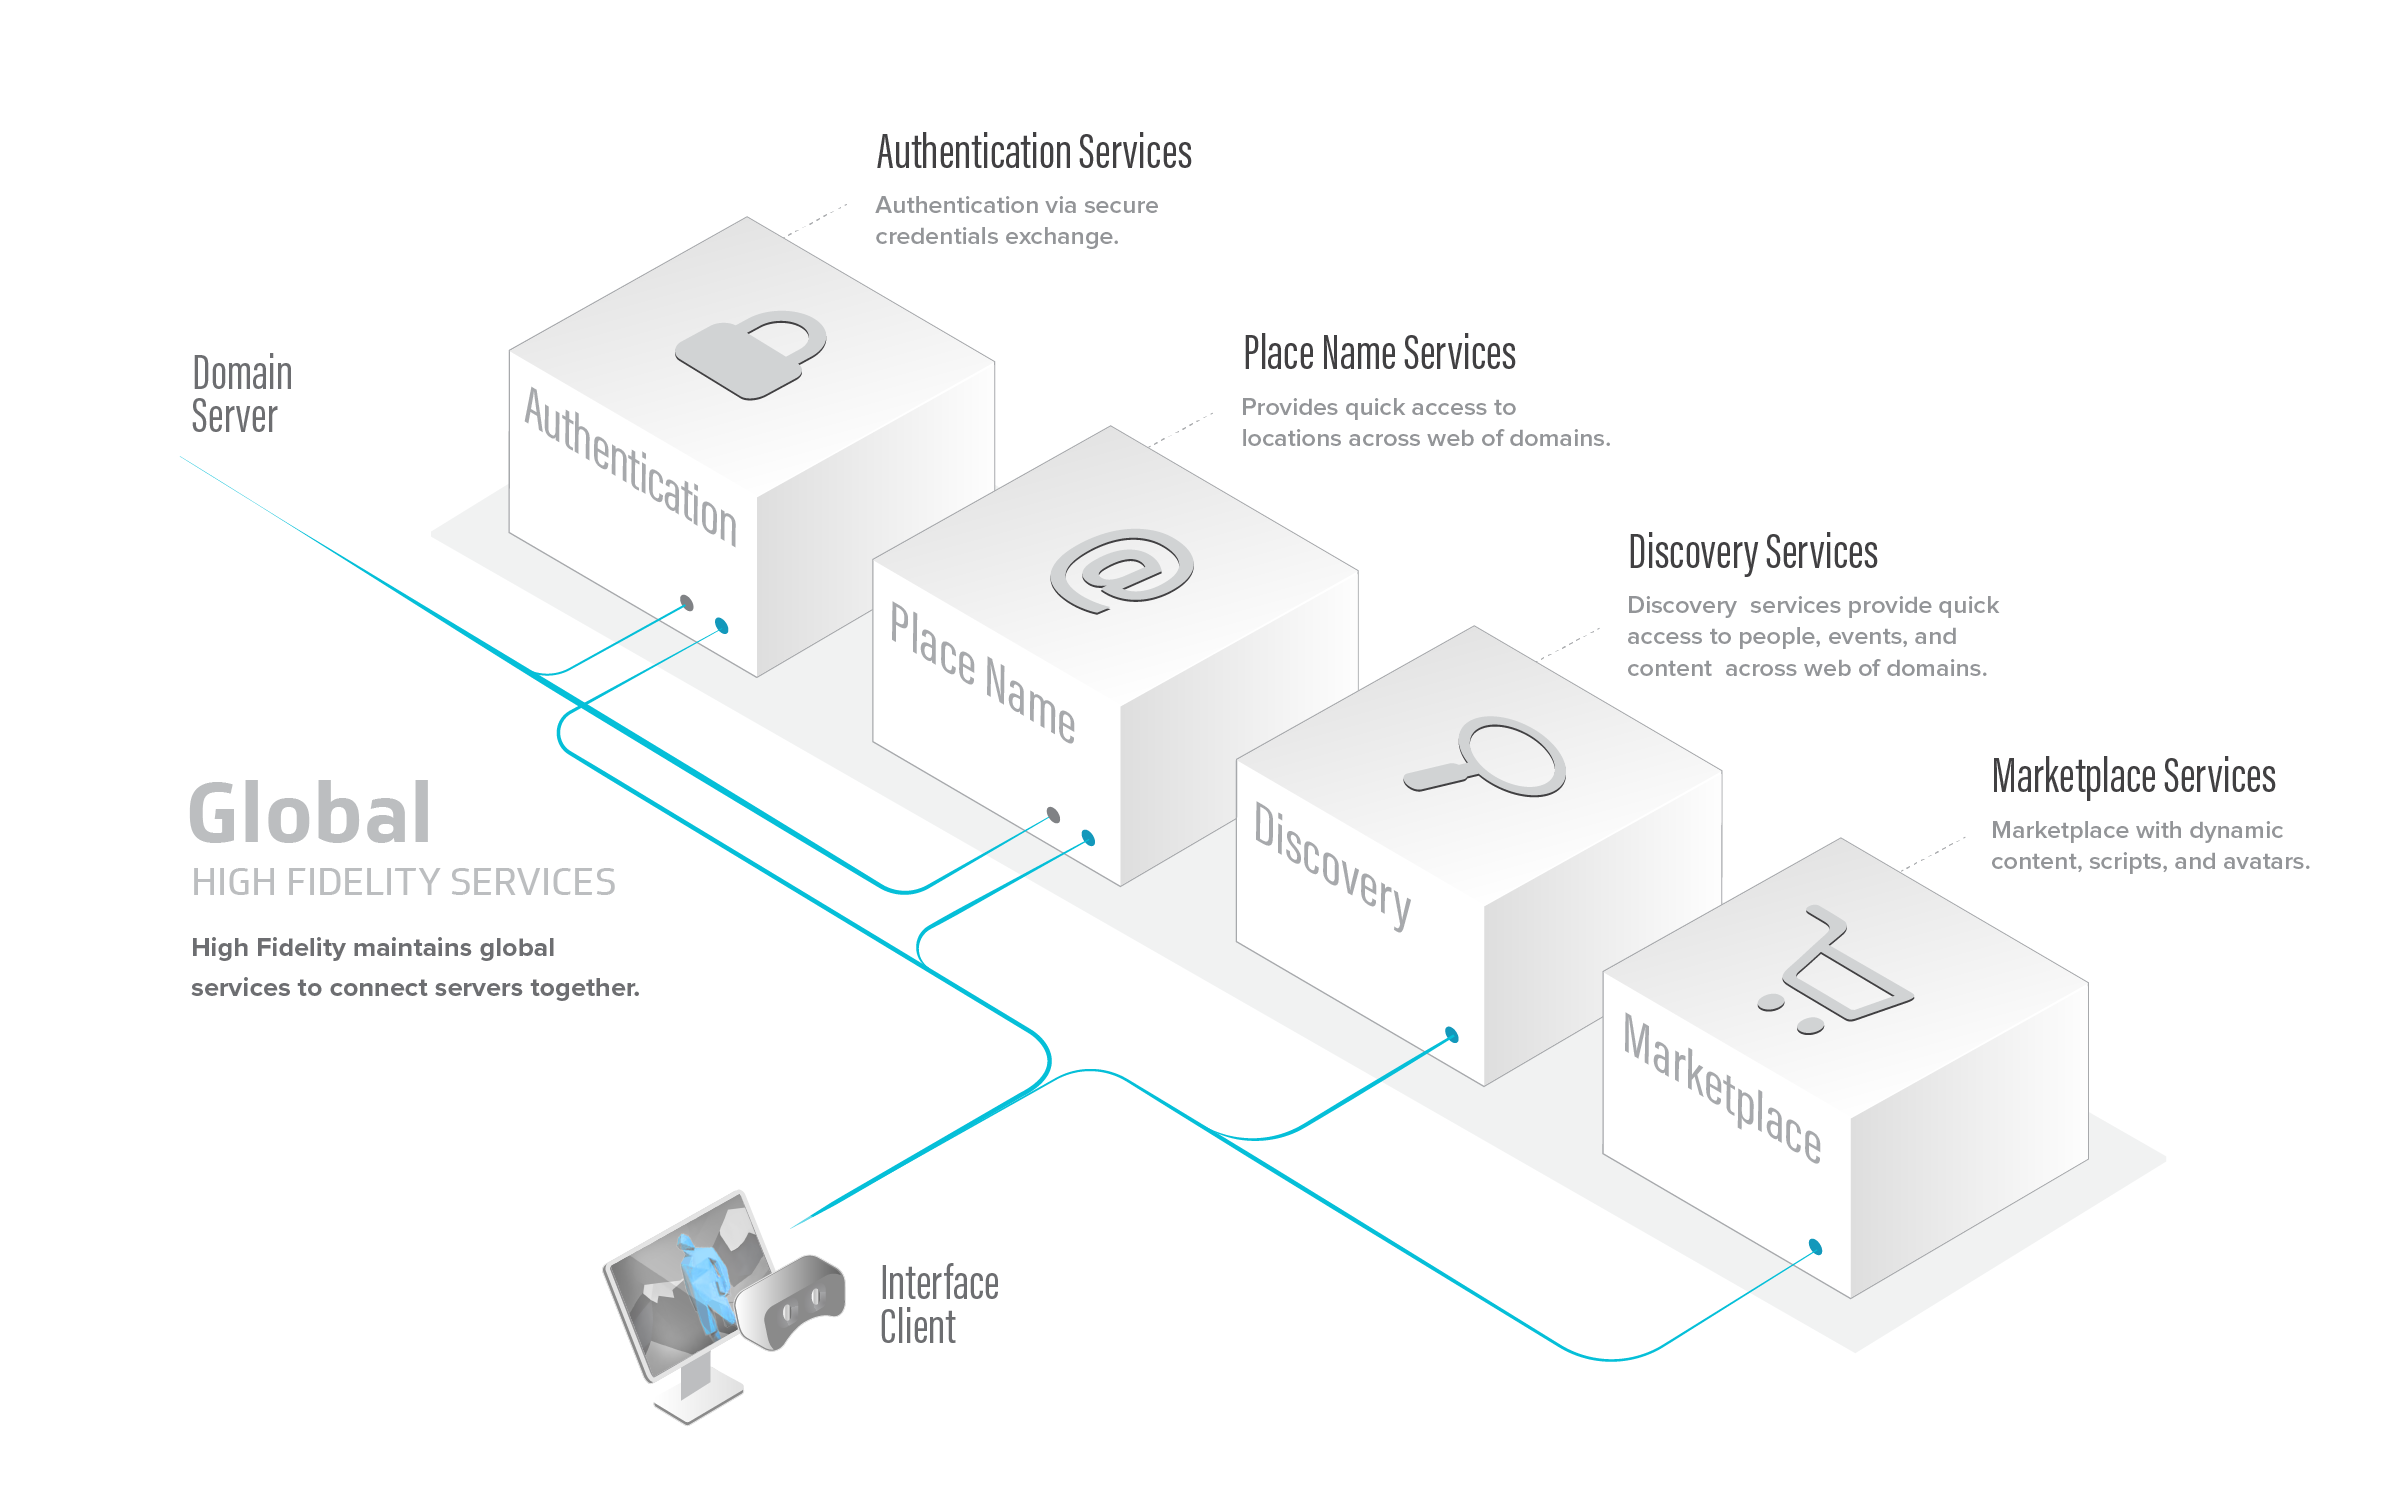
- The Global Services connect all of the servers together. These services are maintained by High Fidelity so that you can sign in, move seamlessly between places, and purchase items on the Marketplace.
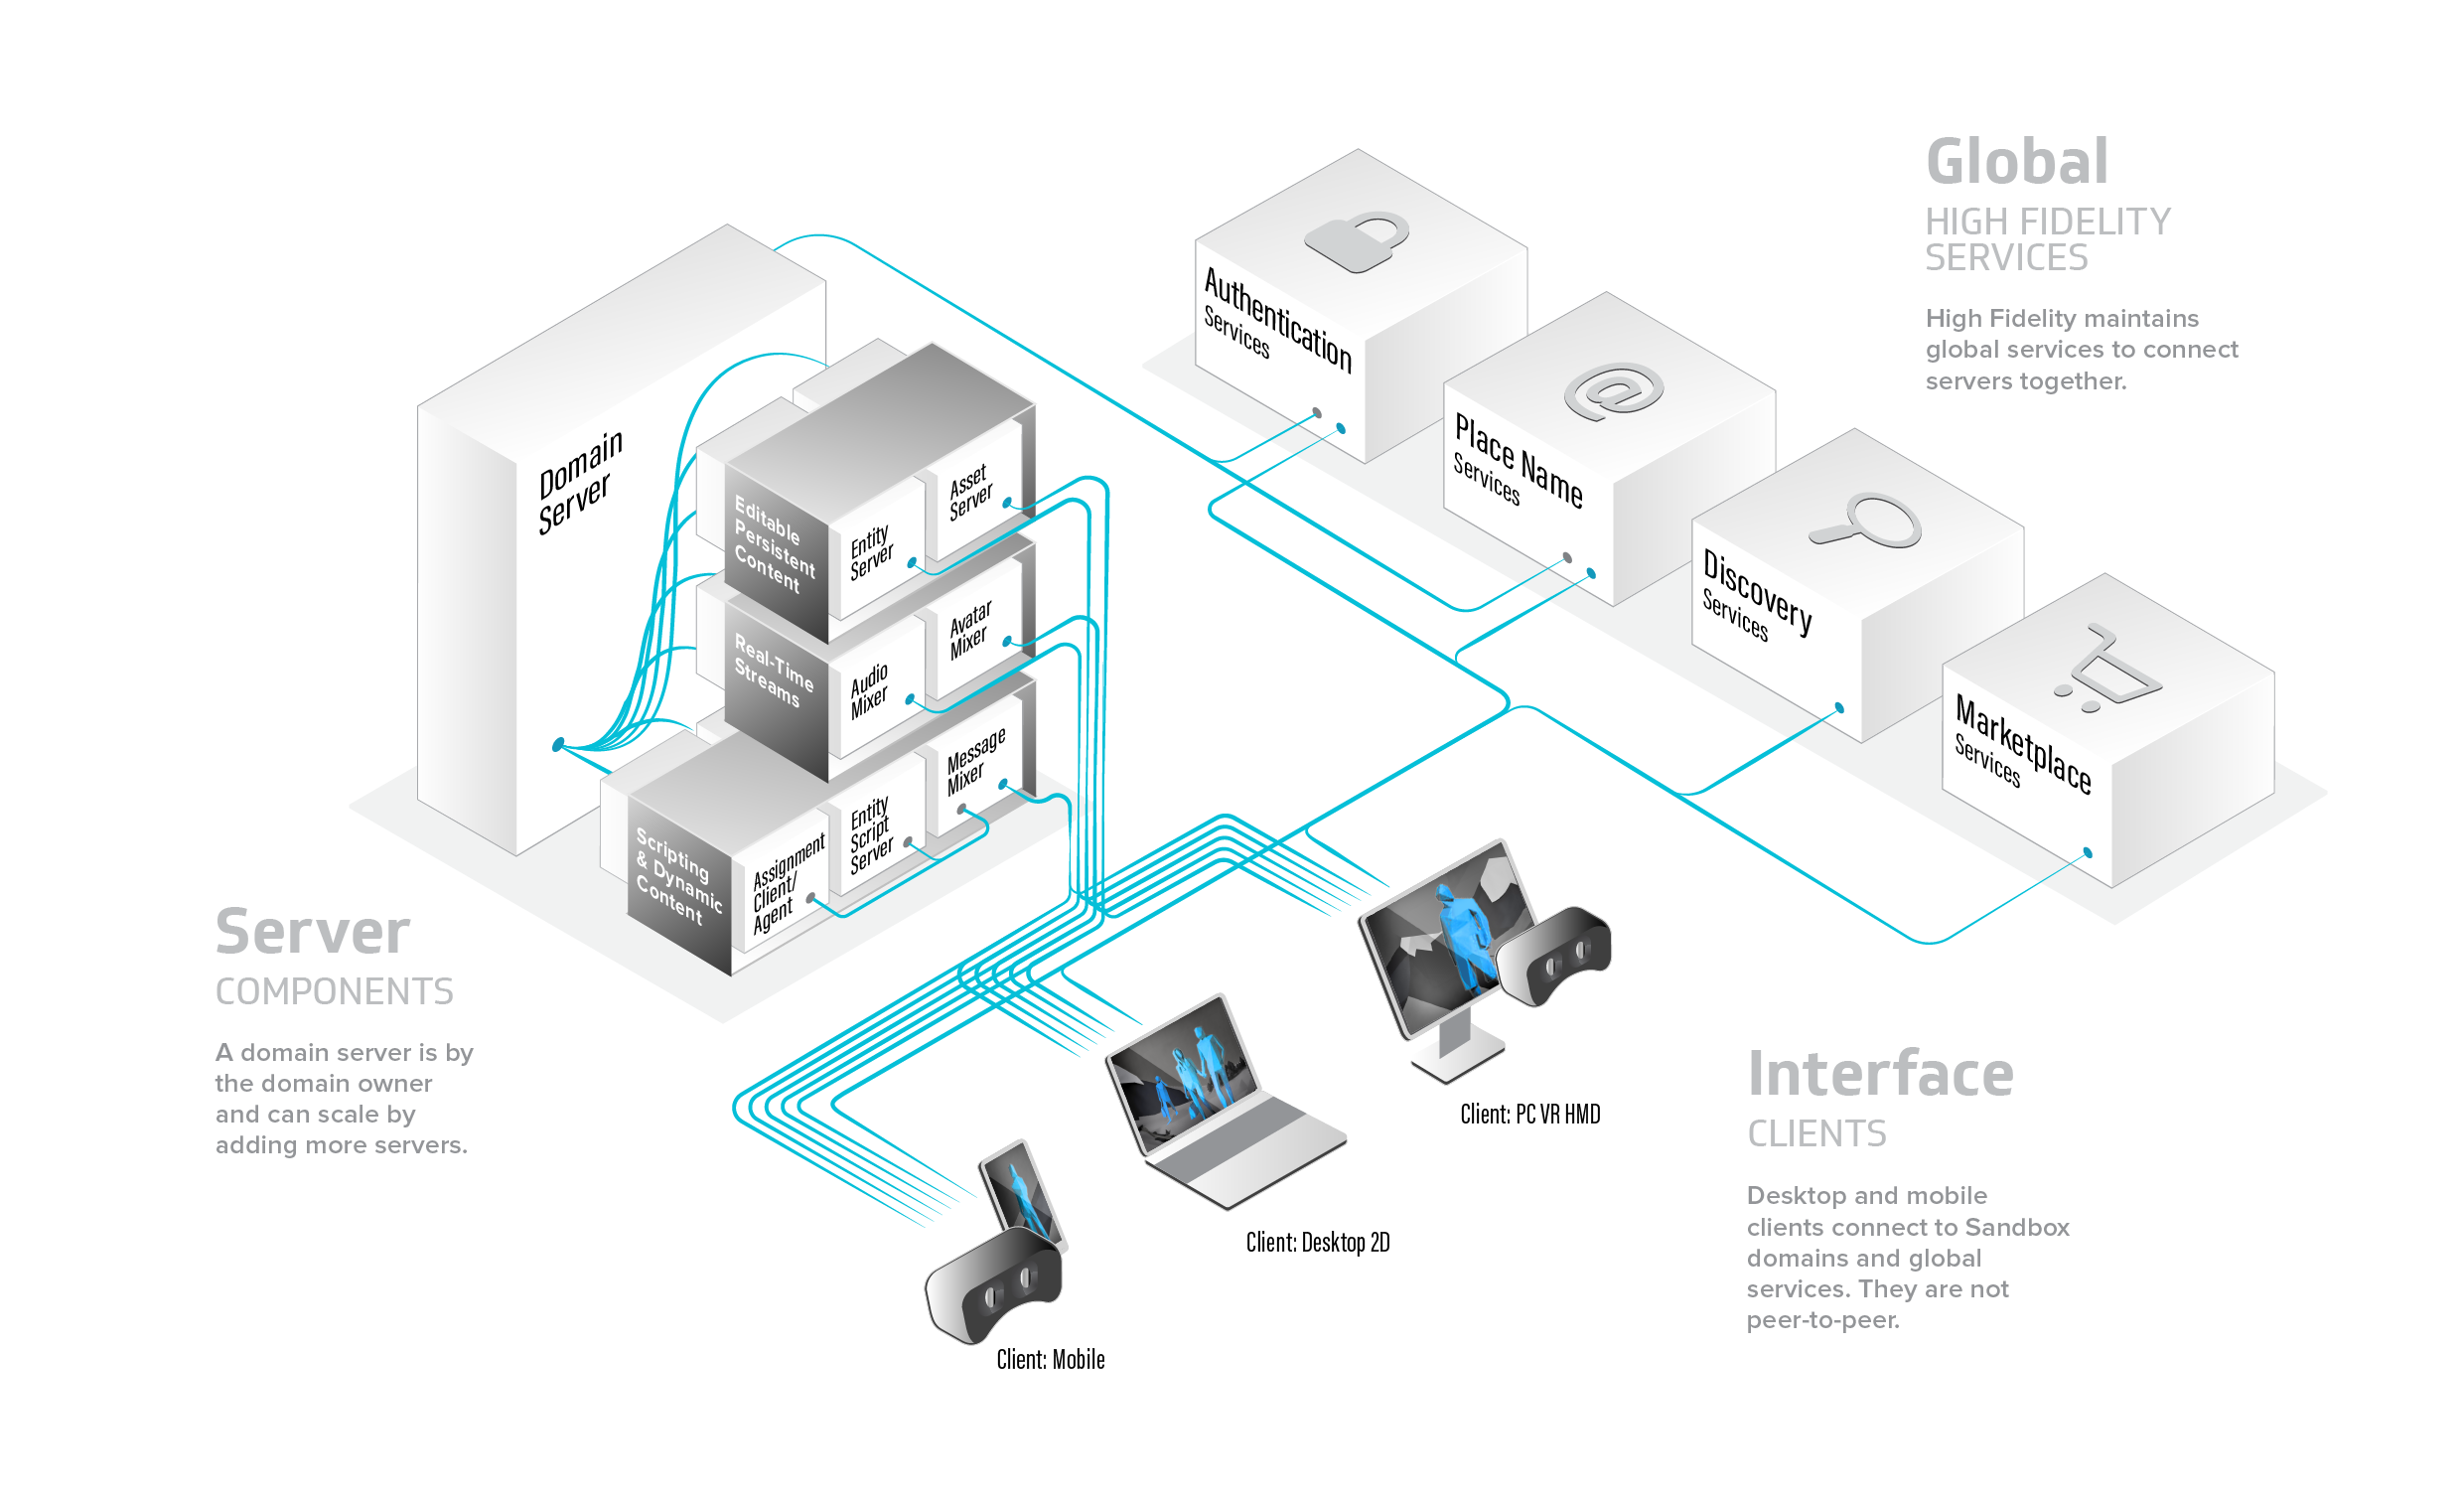
High Fidelity Interface
The High Fidelity Interface (or simply ‘Interface’) is the main user interface for High Fidelity. It is used to explore the metaverse and engage with people from around the world. When you enter a domain, your Interface connects with the domain server that is hosting the virtual world, alongside any global services.
You can download and use the Interface on your computer or your Android phone using the Client-Only Installer.
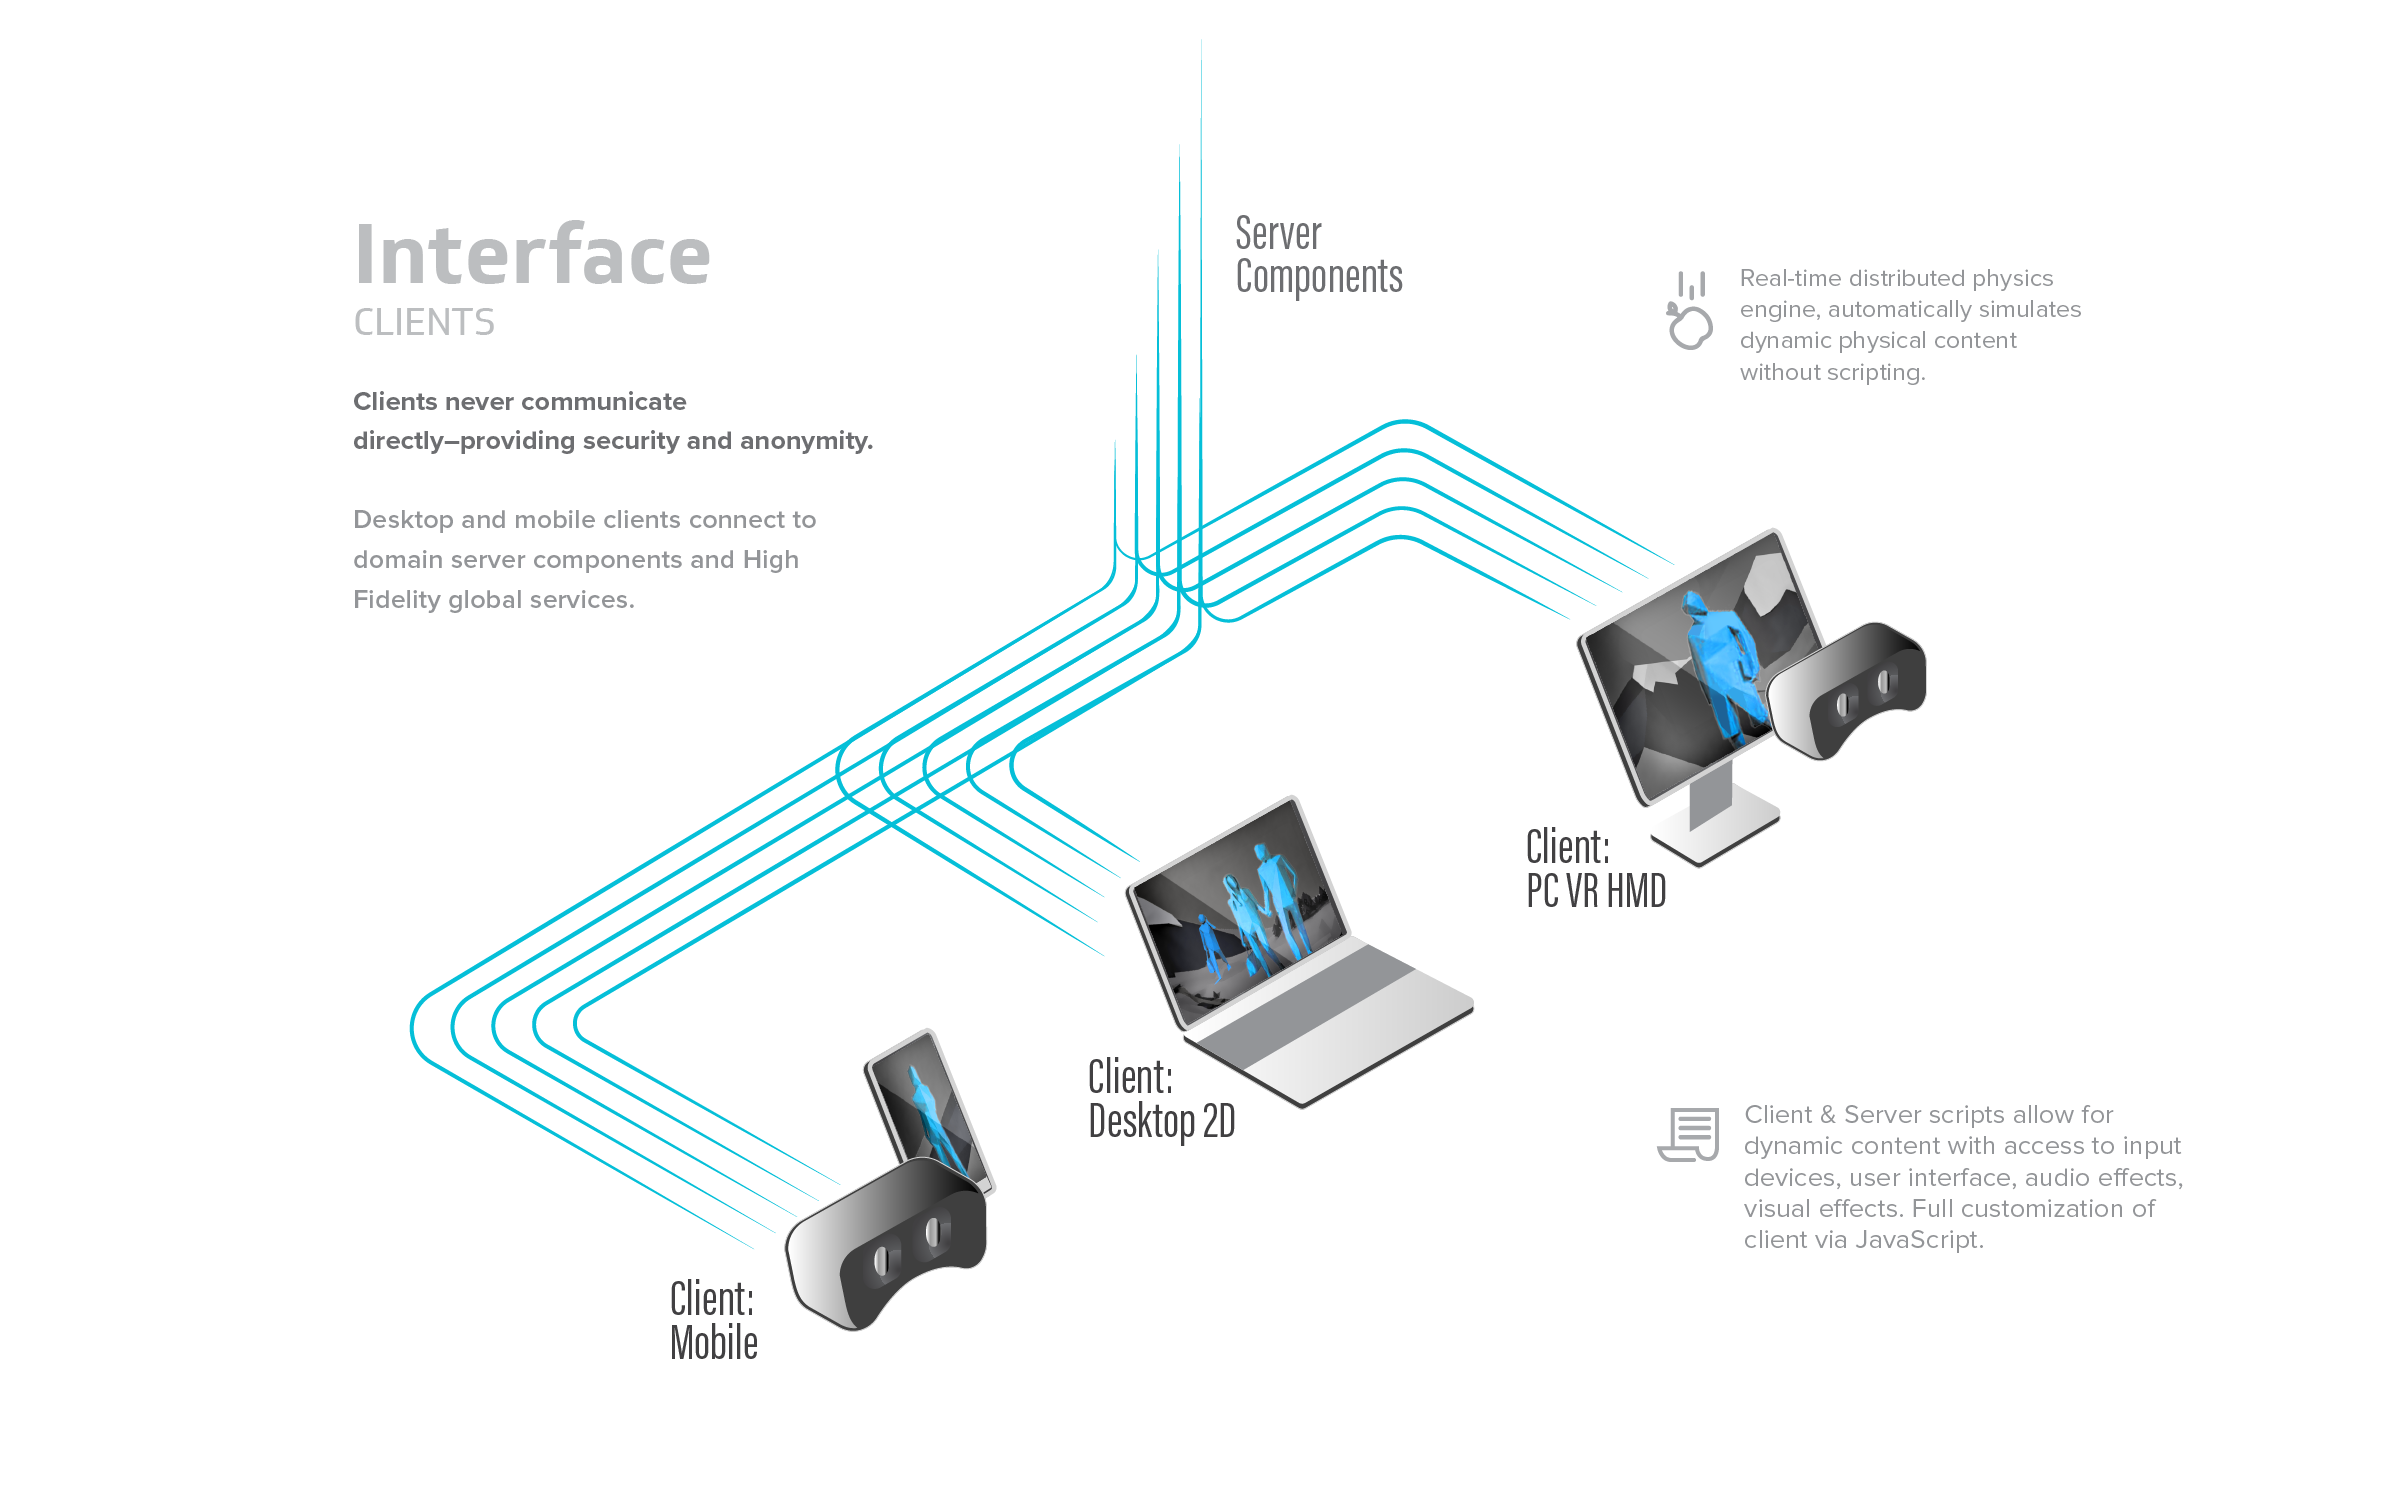
Your VR experience won’t be realistic without some physics. High Fidelity includes a physics engine that simulates behaviors of objects according to the Newtonian laws of physics. When an object falls to the ground and bounces, or when two or more objects collide, their movements are computed by the physics engine.
Each Interface runs its own physics engine, and the entity server coordinates the results to produce a consistent simulation across the entire domain.
Domain Server
A domain is a spatial simulation in High Fidelity that you can visit. It is computed by a stack of programs on one or more computers. You need a domain’s place name to visit a domain, just like you would need a web address to visit a website.
You can set up your own domain and host it on your local machine or on a cloud server to make it available to other users. Your domain’s server stack is a set of components that simulate and manage different aspects of the domain such as audio, entities, and avatars. Everything that you see, hear, and do in your domain is managed by the server stack.
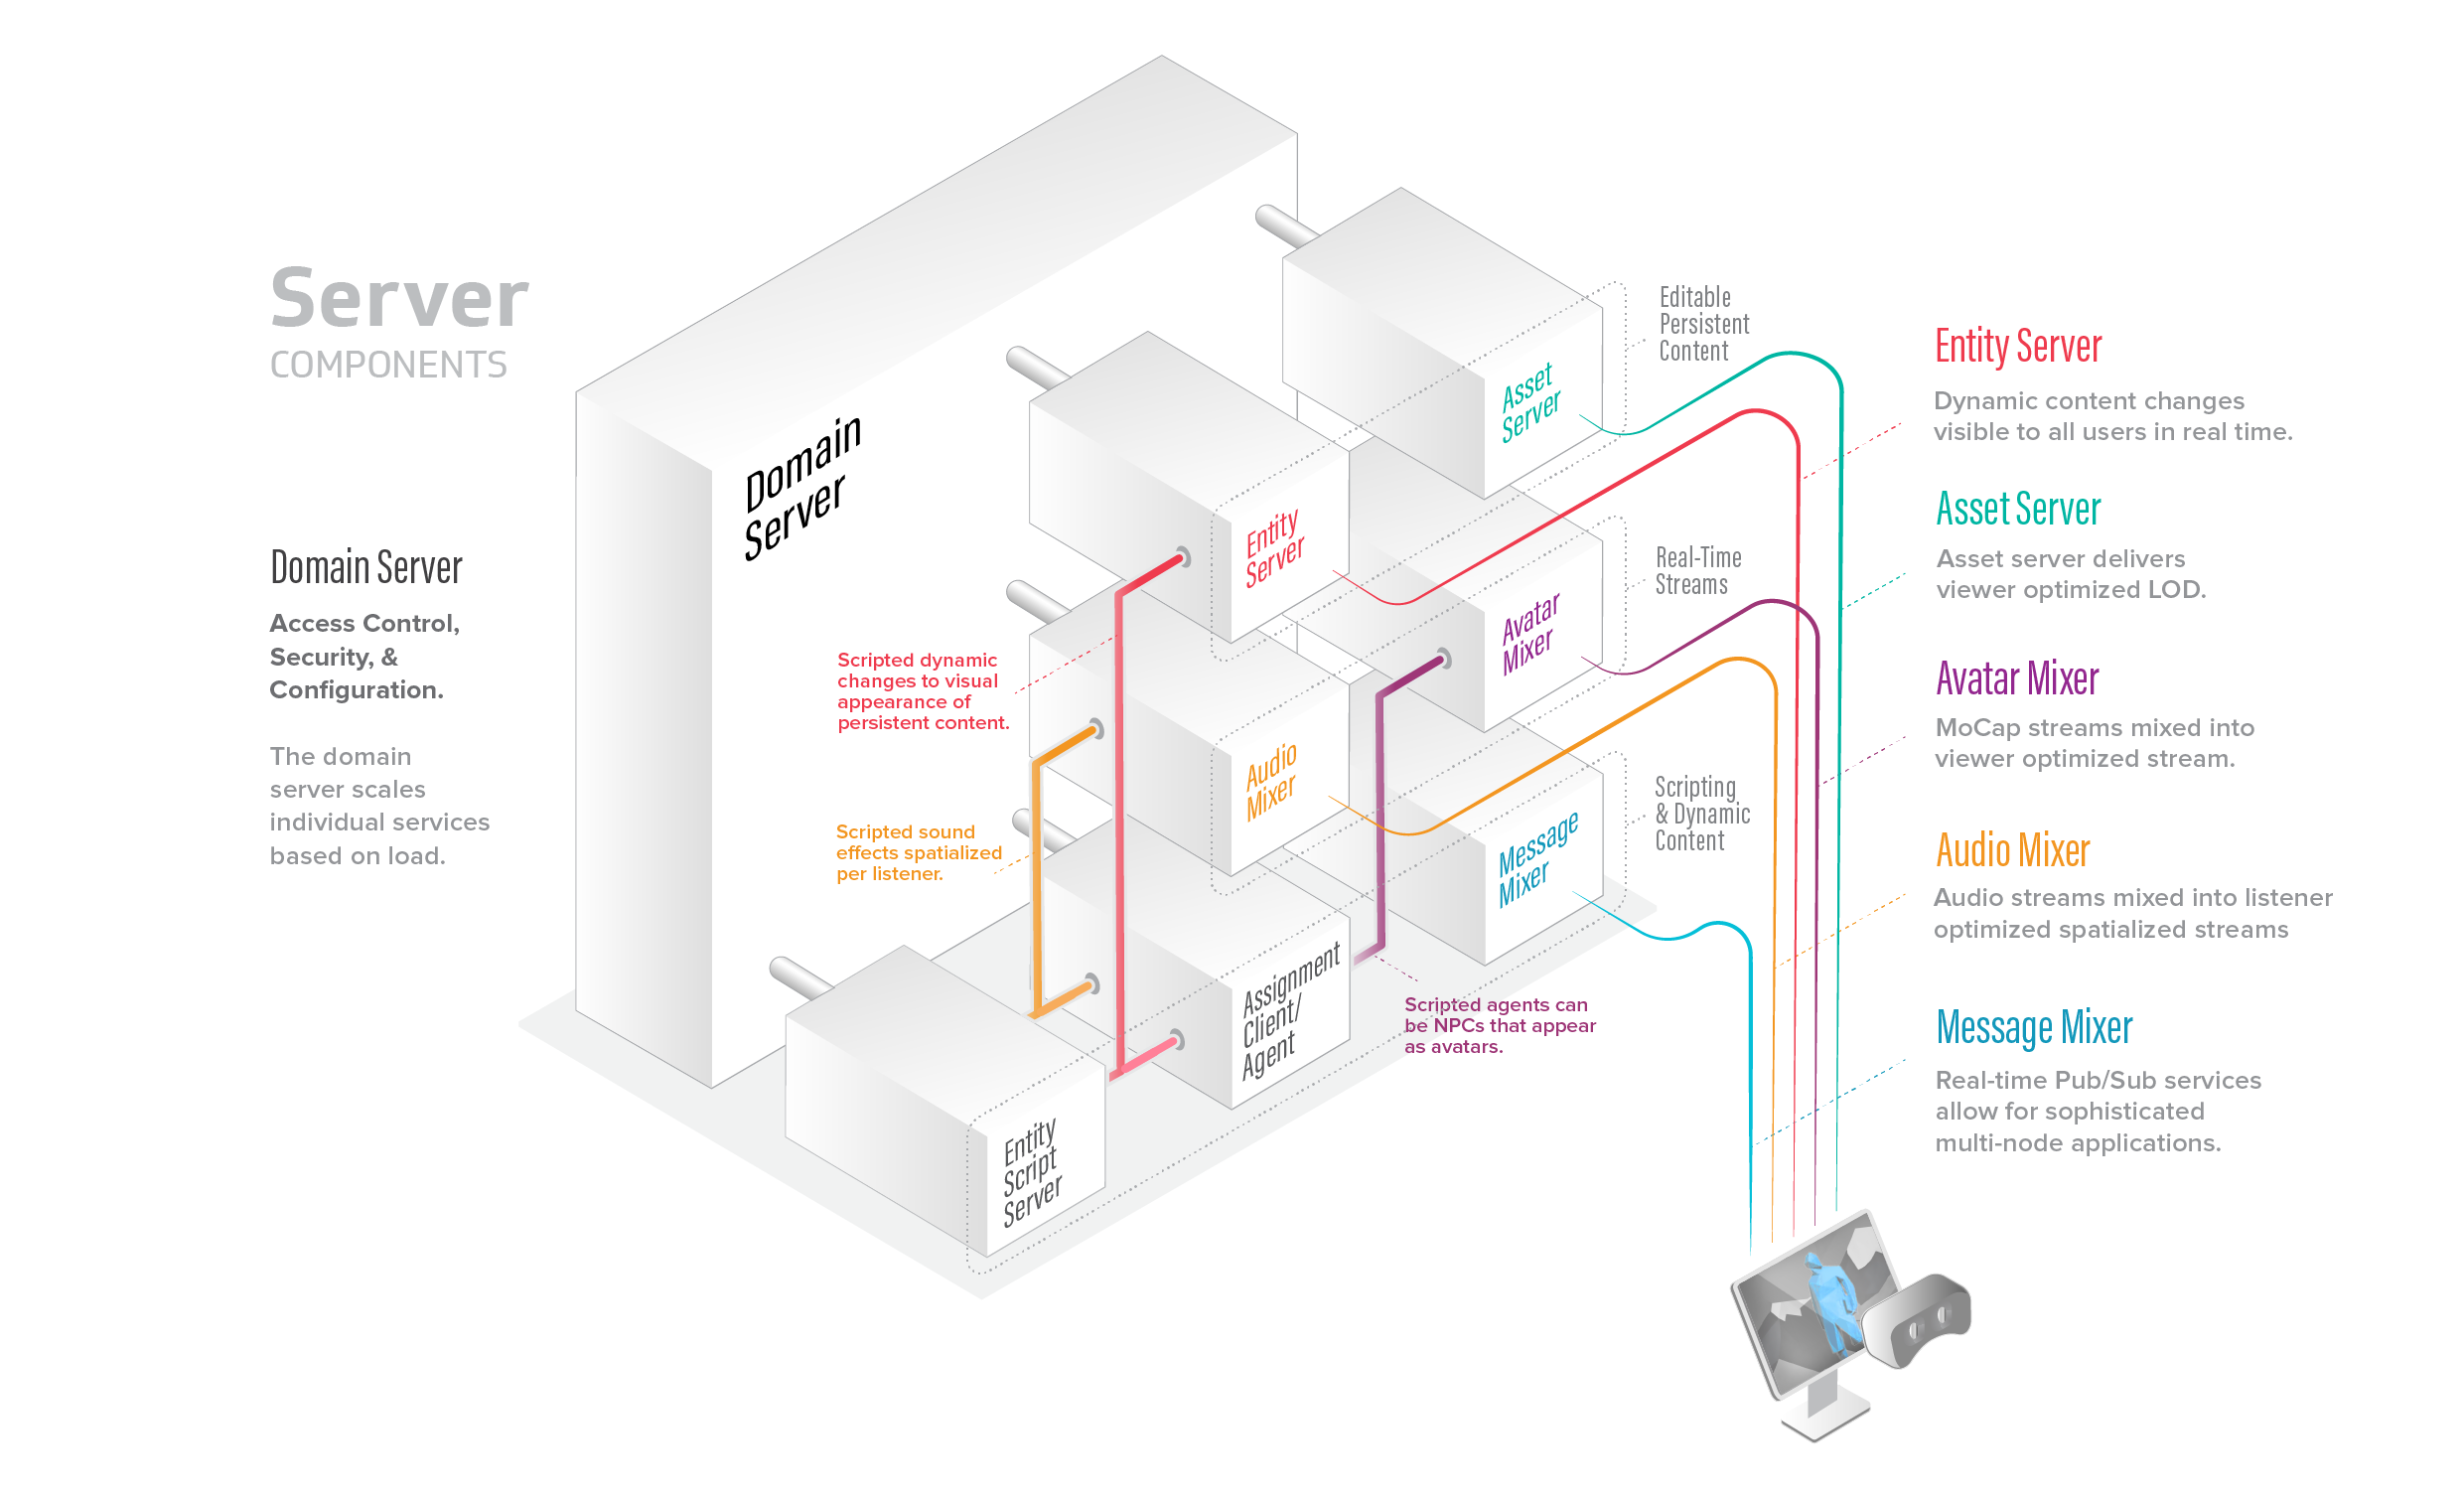
The Domain Server is at the top of this stack and its job is to give out assignments to the other components. These components are called Assignment Clients, because from the perspective of the domain server, they are clients that take on different roles.
The server stack is not only controlling, managing and computing your domain as you see it, but also how it is seen by anyone visiting your domain. This means that the domain server hands out simulation assignments and provides their IP addresses to connecting Interface clients. The domain server is a single executable that spawns assignment clients that become the different mixers as requested. Each assignment client can function as one of the six types mentioned. The domain server determines which assignment client functions as which mixer.
Assignment clients control and manage various aspects of a domain. They also communicate directly with the Interface clients connected to a domain. There are six types of assignment clients:
| Assignment Client | Description |
|---|---|
| Avatar Mixer | This mixer is in charge of your virtual presence in any domain. It keeps track of where you are, which avatar you’re wearing, and how you move around the domain. For example, it tracks how you move your head while wearing a Head Mounted Display (HMD). |
| Audio Mixer | Mixes all sounds, whether it’s voice or environmental. And it does this not just for avatars, but also for all the entities in a domain. The Audio mixer can customize a stereo mix for you based on your position relative to the audio source. |
| Entity Server | Tracks all entities and their properties in a domain, from their description and position, to any behaviors attached to them in a script. If an entity is modified, the change is communicated to the entity server, which in turn relays the information to all clients currently visiting the domain. |
| Asset Server | Provides copies of the models, audio files, scripts, and other media used by the domain. It functions like a Web server, but using protocols tuned to High Fidelity’s architecture. |
| Agent | Executes user-written JavaScript programs. If you’ve written a script to get your avatar to clap, or create a bowling alley, the Agent will execute it. It can see entities, avatars, and send audio. |
| Messages Mixer | Provides communication between scripts running in different programs connected to the domain, which could be Interfaces or Agents. |
Note
Sandbox manages all these components on the domain server, five dedicated assignment clients, and as many agent assignments clients as needed. However, it is possible to spread the assignment clients over multiple computers, and even to divide each function among a hierarchy of assignment components, which may be on different computers. For instance, multiple audio mixers could be used to mix the audio in different geographic regions of the domain.
Global Services
High Fidelity maintains global services to connect different servers together.
See Also
Set Up Your Audio Devices
When you log into High Fidelity for the first time, we will automatically detect your computer’s default audio devices, and use those for High Fidelity. Usually, your computer will automatically detect a plugged in headset and you will not need to configure your audio devices any further.
However, some audio setups do require additional configuration. If you need to change your audio settings, read on to find out more.
On This Page
Audio “At a Glance”
Your basic audio settings are displayed in the top-left corner of your Interface window. This is called the “Audio Level Meter” and can be turned on or off in your Audio settings (from the Tablet or HUD, click Audio).
Change your Input or Output Device
High Fidelity’s 3D spatialized audio is guaranteed to enhance your experience in the metaverse, whether you are in Desktop mode or using VR equipment. By default, we will select the default audio devices that your operating system or headset has detected. If you want to use a different headset or audio setup than the default, you can change your computer’s default device. If you need to use a different device for High Fidelity than other applications on your computer, then you can change your device in the application.
- An audio input device is any device that captures sound and generates a signal that can be accessed by other devices. Examples of audio input devices include a USB microphone or a microphone headset that is plugged into your computer, or your sound card’s “Stereo Mix” or “What U Hear” device (think of these sound card devices as if they were microphones being held up to your speakers while they output sound).
- An audio output device is any device that receives information from audio files and converts it into audible sound signals. Examples of audio output devices include your desktop computer speakers, headphones, or huge speakers in a movie theater.
If you are using a headset with a microphone, then your input and output devices will likely be the same device. However, if you are using external speakers or some other open mic setup, then these devices may be different. In these cases, we encourage you to enable acoustic echo cancellation for improved audio quality.
To change your audio devices:
- From the Tablet or HUD, click Audio.
- Choose your desired input device.
- Choose your desired output device.
You can use bluetooth headsets, such as AirPods with High Fidelity. However, note that there are limitations to using them, and they may not work in all environments. If using WiFi, ensure you’re using a 5Ghz WiFi connection. On a 2.4Ghz connection, you may experience audio breakup and occasional disconnects.
Unfortunately, bluetooth audio devices do not currently support stereo input. Therefore, you have two options:
- Use the bluetooth headset as an output device only, and use another microphone for input. This allows you to take advantage of the stereo audio.
- Use the bluetooth headset’s built-in microphone. In this case, you will only experience mono sound, rather than High Fidelity’s stereo audio.
Acoustic echo is the process by which sounds from your speakers get picked up and transmitted by your microphone, resulting in an echoing effect. This is common when you use High Fidelity with a laptop’s built-in microphone and speakers (i.e. an “open mic”), rather than a detached headset.
“Acoustic echo cancellation” is a technology which improves voice quality by preventing the echo that results in open mic setups. By default, acoustic echo cancellation is turned on, and you can turn it off in the Audio app.
Note
Acoustic echo cancellation will not run when using input devices with high sample rates (greater than 96khz) or more than 2 channels.
For best performance with open mic setups, ensure that you:
Disable any processing and effects on the input and output devices. This includes:
- On Mac: Turn off ‘Ambient noise reduction’ (System Preferences > Sound > Input > Use ambient noise reduction)
- On Windows: Turn off all ‘Enhancements’ (Control Panel > Sound > Recording tab > click on your device > Properties button > Enhancements tab)
On Mac devices, set the balance of the output device to either the left or the right (System Preferences > Sound > Output > Balance)
Lower the microphone’s physical gain setting to approximately 3/4 of the maximum
Lower the speaker’s physical volume level to approximately 3/4 of the maximum
If you are not using your laptop’s audio devices, move and point the microphone away from the speakers
The acoustic echo cancellation technology picks up the sounds around you and attempts to identify the echoing sounds as you use it. This means that it will improve and become more accurate over time. So don’t despair if you hear a little bit of echoing…it will lessen as the technology learns your voice and the voices of the people around you!
To speed up this “learning” process, you can:
- Avoid turning your avatar while talking
- Leave your microphone muted while another person talks for 10 seconds at a time
Test Your Audio Devices
Audio is an integral part of social VR experience, so of course, we want to make sure that your devices are working correctly and that everyone can hear you! There’s nothing more annoying than walking up to a group of friends in a virtual world, only to realize that they haven’t heard a word you said! The good news is that you can test your audio setup to make sure that both your input and output devices are working correctly.
Note
The ‘Test Your Voice’ feature does not automatically mute your voice! We recommend muting yourself prior to checking your voice input if you do not want others to hear your microphone check.
- From the Tablet or HUD, click Audio.
- Click ‘Test Your Voice’ to test your input device. Speak into your mic, and the sound will be played right back at you through the selected output device. Make any adjustments to your input device to achieve your desired sound.
- Click ‘Test Your Sound’ to test your output device. Adjust the headset and/or application volume until the sound is a comfortable volume.
Adjust In-World Volume
There are three different types of “sounds” in High Fidelity:
- People: The sound you hear when people in the domain are talking through their microphones
- Environment: The ambient sounds in the domain, running as scripts in the background
- System Sound: The sound your computer makes as you interact with the application window (such as the “clicking” you hear when you hover over an icon)
To change the volume of all of these at once, simply change the volume of your headset or output device.
To change one or more of these sound types independently of the others:
- From the Tablet or HUD, click Audio.
- Choose ‘Desktop’ or ‘VR’ depending on the mode you are in.
- Scroll down to ‘Choose Output Device’.
- Adjust the sliders to the desired volume levels for each of the sound types.
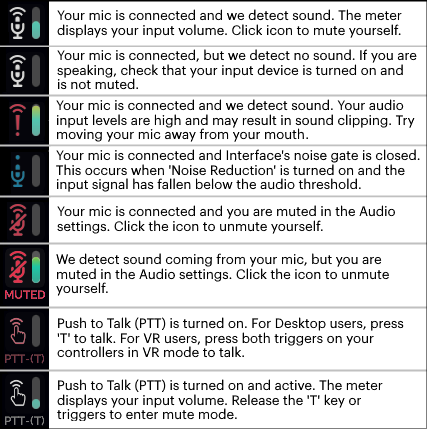
Enable Push to Talk (PTT)
‘Push to Talk’ is like having a walkie talkie in your hand. You need to press a button to have others hear you in the environment. When you’re not pressing the button, you are muted and will not be heard.
To turn on ‘Push to Talk’:
- From the Tablet or HUD, click Audio.
- Choose ‘Desktop’ or ‘VR’ depending on the mode you are in.
- Toggle ‘Push to Talk’ on.
In Desktop mode, press and hold the “T” key on your keyboard to talk. When using an HMD in VR mode, press and hold the grip triggers on your controllers to talk. This feature works only when you are focused on the Interface window.
Adjust High Fidelity Audio Settings
There are a number of settings you can configure to customize your audio experience in High Fidelity. To change these, open your Tablet or HUD and go to Audio.
| Setting | Description |
|---|---|
| Mute microphone | Mute or unmute your microphone. |
| HMD Mute Warning (VR) | Enable to receive a warning when your microphone is muted when wearing a HMD device. |
| Noise reduction | Enable to turn on noise reduction. This removes outside noise from audio signals. |
| Audio level meter | By default, the audio level meter is visible on the top left corner of your screen. Uncheck this box to hide the meter. |
| Echo Cancellation | Enable or disable acoustic echo cancellation. |
| Stereo input | Enable or disable stereo input. Stereo reproduces sound using two or more audio channels. This means that you will hear sound from various directions, like how you would in the real world. |
Adjust OS Audio Settings
Many device settings, such as input levels, boost, gains, and enhancements, cannot be set in High Fidelity. These settings can only be adjusted at the operating system level or with a device’s external software. If you experience issues with audio that cannot be resolved with any of the above settings, then try adjusting your operating system’s device settings:
Update the driver software for your audio devices:
- On Mac: Apple handles all driver updates on your computer. To check for updates, click on the Apple icon in the top-left corner of the screen and select ‘Software Update’.
- On Windows: Open the Device Manager and select the arrow next to Sound, audio and game controllers. Right-click on your audio device and select ‘Update driver’.
Adjust microphone levels and/or boost:
- On Mac: Go to System Preferences > Sound > Input.
- On Windows: Go to Control Panel > Sound > Recording. Choose your microphone and click ‘Properties’.
Adjust other advanced sound settings:
- Go to Control Panel > Sound
- Go to Settings > System > Sound
- Go to Control Panel > Hardware and Sound > Adjust System Volume
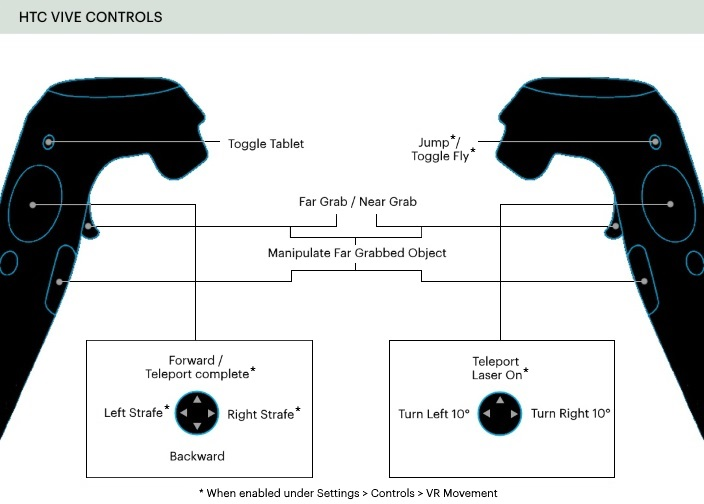
Use Your VR Equipment
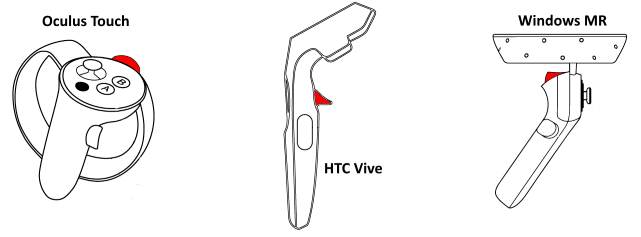
To get the best and most immersive experience in High Fidelity, we encourage you to use VR equipment, such as the Oculus Rift or HTC Vive. With these HMD devices and hand controllers, you will be able to interact with people in 3D, track body movements, and engage with the objects around you. We support the following VR equipment:
| Head Mounted Displays | Hand Controllers |
|---|---|
| Oculus Rift (CV1 and S) | Oculus Touch |
| HTC Vive | HTC Vive |
| Windows MR | XBox One Controller |
On This Page


Comfort Mode
Motion sickness is a real problem for many people when they put on a HMD and enter VR. This happens because your eyes experience movement in VR, while your body stands still. If you experience motion sickness and discomfort using VR equipment, you are not alone.
“Comfort mode” is designed to decrease the effects of motion sickness while using High Fidelity. This mode:
- Disables sharp turns
- Decreases your field of vision by darkening the edges of the screen
- Adds a ground plane and grid
All of these features were developed to help you orient yourself when moving around in VR.
To enable comfort mode, go to Menu > Settings > Controls on your tablet. Use the slider to adjust how much of the environment you see in VR.
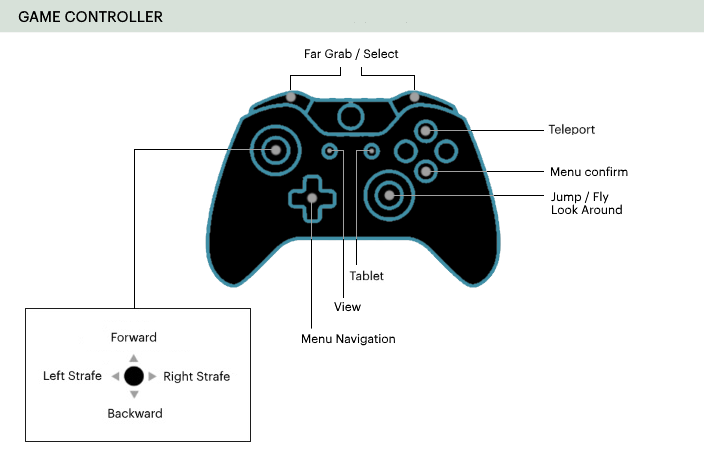
Change How You Move in VR
You can change many avatar movement settings in VR such as jumping, flying, and leaning behavior. To do so:
- In Desktop mode, go to Settings > Controls in the menu bar.
- In VR mode, open your Tablet and go to Menu > Settings > Controls.
| Setting | Description |
|---|---|
| VR Movement > Teleporting | Enables teleport controls to move seamlessly between positions within a domain. |
| VR Movement > Walking | Enables walking controls to move within a domain. |
| VR Movement > Strafing | Enables strafing controls (to walk sideways). |
| VR Movement > Jumping and flying | Enables jump and fly controls. |
| VR Movement > Movement Direction | This setting controls which direction you move in:
|
| VR Movement > Dominant Hand | Select ‘Left’ or ‘Right’. Teleport and turn controls move to the controller in the dominant hand. |
| VR Movement > Rotation Mode | This setting controls how you turn in VR:
|
| VR Movement > Control Scheme Selection | This setting determines how you control your walking speed:
|
| VR Movement > Avatar leaning behavior | This setting controls if and when your avatar leans in VR mode.
|
| User real world height (in meters) | You can change your real world height for better tracking in VR mode. |
Motion Capture Using Vive Trackers
You can enhance your High Fidelity experience using full body motion capture (mocap). High Fidelity currently supports mocap using HTC Vive Trackers.
Vive trackers need to be strapped to the body part you wish to track. You can replace the HMD and hand controllers with trackers if you only need to track the movement of your head and hands.
You can set up different mocap systems:
| Mocap System | Equipment Needed | Recommended Straps |
|---|---|---|
| Head | HMD or 1 Vive Tracker | Head strap for Vive Tracker |
| Hands | Hand controllers or 2 Vive Trackers | Hand strap for Vive Tracker |
| Head + Hands + Feet | 2 Vive Trackers + HMD + 2 Hand Controllers | Foot straps |
| Head + Hands + Feet + Hips | 3 Vive Trackers + HMD + 2 Hand Controllers | Hip Strap: Drill a hole in the back of a thick leather belt and attach the tracker using a 1/4” screw. |
| Head + Hands + Feet + Hips + Chest | 4 Vive Trackers + HMD + 2 Hand Controllers | Chest straps |
| Head + Hands + Feet + Hips + Shoulders | 5 Vive Trackers + HMD + 2 Hand Controllers | Shoulder straps |
Note
You can replace the HMD and hand controllers with trackers if you only need to track the movement of your head and hands.
Strap your Vive trackers to your body as shown in the image.
Connect your trackers, HMD, and controllers to SteamVR.
In Interface, pull up your HUD or Tablet and go to Menu > Settings > Calibration.
Configure your mocap system by:
- Selecting the right device for your head and hands. If you’re using a head tracker instead of an HMD, click ‘Use HTC Vive Devices in Desktop Mode’.
- Selecting the body position of any additional trackers.
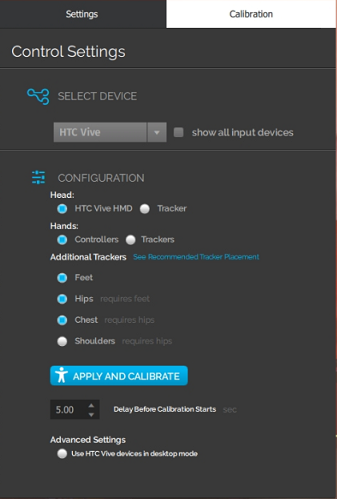
Click ‘Apply and Calibrate’.
Stand in a T-Pose until the timer counts down to zero:
- Feet together
- Arms out
- Head looking straight ahead.
Check to see that each tracker is tracking the corresponding joint on your avatar.
You can also calibrate your trackers without using your tablet. Once you apply your configuration, stand in a T-Pose and hold the following four buttons together for 1 second: Left Trigger, Right Trigger, Left Menu Button, Right Menu Button. You can press the same buttons together for a second to remove your calibration from the trackers.
Note
When you setup your Vive, you choose which way to point the arrow as your reference. During calibration, it is important that you face the same direction. If you can not remember the arrow’s direction, press the Vive System Menu Button and look on the ground for a marker. This is important to make sure your joints are oriented correctly.
| Issue | Troubleshooting Steps |
|---|---|
| My calibration failed |
|
| My sensor is jiggling a lot | Make sure the straps on the sensor are tightened. |
| My sensor keeps losing tracking |
|
Note
Remember to charge your trackers when you aren’t using them so that you don’t have to deal with a low battery tracker negatively impacting your performance.
Explore in Desktop Mode
Desktop users are restricted to using their keyboard and mouse to do things in High Fidelity. On this page, you can find all of the shortcuts so that you can enjoy your experience in High Fidelity to the fullest.
Note
The shortcuts below are for Windows and Linux computers. If you’re running on a Mac, use the same commands, substituting the Command key for the Ctrl key.
On This Page
Movement Controls
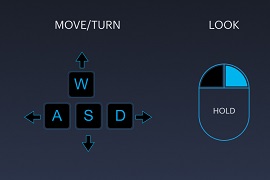
| Action | Key |
|---|---|
| Walk Forward | W or UP ARROW |
| Walk Backward | S or DOWN ARROW |
| Run | Hold SHIFT while using any shortcut to walk |
| Side Step to the Left | Q or Right Click + A or SHIFT + LEFT ARROW |
| Side Step to the Right | E or Right Click + D or SHIFT + RIGHT ARROW |
| Turn Left | A or LEFT ARROW |
| Turn Right | D or RIGHT ARROW |
| Jump | SPACE or PGUP |
| Fly | Hold SPACE or PGUP |
| Fly Down | C or PGDN |
In-World Controls
| Action | Key |
|---|---|
| Handshake | X |
| Toggle Privacy Shield | CTRL + N |
| Open Tablet | TAB (when ‘Desktop becomes toolbar’ is not checked) |
| Select Item | Left Click |
| Grab Item | Left Click |
| Inspect Item | Right Click |
| Open Browser | CTRL + B |
| Toggle ‘Away from Keyboard’ | ESC |
| Toggle ‘Mute Mic’ | CTRL + M |
| Toggle ‘Show Statistics’ | / |
| Screenshot | P |
| Push to Talk | T |
Camera Controls
| Action | Key |
|---|---|
| First Person View | 1 |
| Third Person View | 3 |
| Mirror View | 2 |
| Pan In/Out | With mouse, use mouse wheel. On trackpad, drag two fingers up or down. |
| Take Screenshot | P |
Avatar Sizing Controls
| Action | Key |
|---|---|
| Decrease Avatar Size | - |
| Increase Avatar Size | + |
| Reset Avatar Size | = |
Create and Edit Mode
These controls work when the Create app is open.
| Action | Key |
|---|---|
| Undo | CTRL + Z |
| Redo | CTRL + Y |
| Delete Entity | DEL |
| Focus on Selected Entity | F |
| Align Grid to Bottom of Selected Entities | G |
| Duplicate Entity | CTRL + Left Click + Drag |
| Parent Entity | CTRL + P |
| Unparent Entity | CTRL + SHIFT + P |
| Copy Entity | CTRL + C |
| Paste Entity | CTRL + V |
| Toggle Global/Local Translation | T |
Adjust Your Settings
You can adjust various settings in High Fidelity so that it runs to your preferences. Many of these settings are changed using the HUD (in Desktop mode) or Tablet (in VR mode).
On This Page
The Tablet and HUD
In VR, all of your settings are found in your Tablet. The Tablet also gives you easy access to any apps that you install. Pull up the tablet by clicking the menu button on your controller.
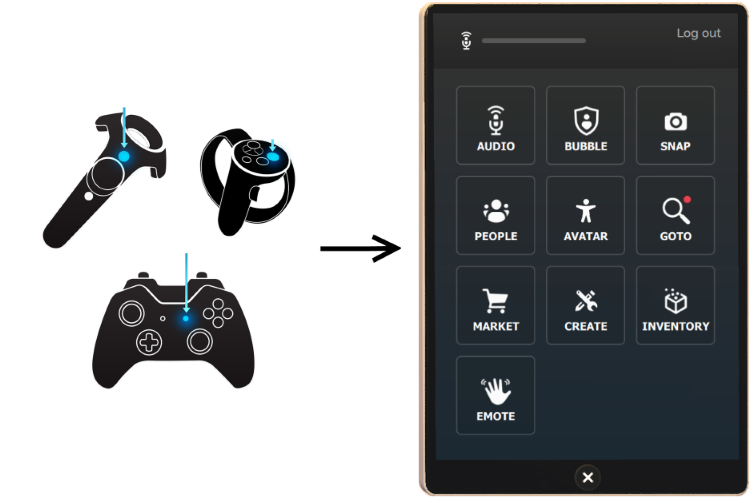
In Desktop Mode, you have the option to use either the Tablet or a smaller version called the “Heads-up Display” or HUD. It contains the exact same options as the Tablet (settings, apps, etc), but it takes up less space on your screen. To enable the HUD, first enable the Developer menu by going to Settings > Developer Menu. Then, go to Developer > UI > Desktop Tablet Becomes Toolbar.

Enter or Exit VR Mode
You can enjoy High Fidelity with or with VR equipment such as head mounted displays (HMD), hand controllers and audio headsets. Our Desktop mode contains many of High Fidelity’s features such as audio, basic movements and gestures, and the ability to travel to different domains.
Keep in mind, however, that the most immersive and powerful experience is when you use VR equipment. Only then will you be able to interact with people in 3D, track body movements, and easily engage with the objects around you. Once you have set up your VR equipment, you can easily switch between VR mode and Desktop mode. To switch to VR mode, use one of the following methods:
- From the HUD, click Enter VR.
- Click the Display menu, then select your VR device.
To exit from VR mode, remove your headset, click Exit VR on the HUD or press ESC on your keyboard.
Set Your Perspective
You can choose how you view things around you by changing your perspective. To change your perspective:
- In Desktop mode, go to View in the menu on the top left corner.
- In VR mode, open your Tablet and go to Menu > View.
| Setting | Description |
|---|---|
| First Person | Select this setting if you want to change your perspective in High Fidelity to first person. In this view, you will not see yourself, only the environment around you. |
| Third Person | Select this setting to change your perspective to third person. In this view, you will see yourself, as well as the environment around you. |
| Selfie | Select this to change your perspective to look at yourself. In this view, you will see yourself and the space behind you. |
| Independent Mode | Select this to change what you see through scripting instead of avatar’s movements. |
| Entity Mode | Select this to set your perspective to a specific entity, allowing you to move with entity as it moves. |
Other Miscellaneous Settings
Here are some other settings you may like to change to optimize your experience.
You can modify general settings such user interface and privacy settings in High Fidelity.
- In Desktop mode, go to Settings > General in the menu on the top left corner.
- In VR mode, open your Tablet and go to Menu > Settings > General.
You can make changes to the graphics in High Fidelity.
- In Desktop mode, go to Settings > Graphics in the menu on the top left corner.
- In VR mode, open your Tablet and go to Menu > Settings > Graphics.
| Setting | Description |
|---|---|
| Graphics Settings | Choose the graphics settings for your computer tier. In general, a lower graphics setting sacrifices artistic details and rendering effects for increased performance and optimization. Custom lets you configure the world detail, rendering effects, refresh rate, and resolution yourself. |
| World Detail | Control the level of detail visible to you in High Fidelity by moving this slider. |
| Rendering Effects | Choose the level of rendering effects that are present in High Fidelity. Local lights, fog, bloom, and shadows are all examples of rendering effects. |
| Refresh Rate | Choose the frequency that High Fidelity updates its graphics buffers. Most mid-range computers run well on ‘Interactive’. |
| Resolution | Adjust the resolution using the slider. This affects how clear High Fidelity appears on your monitor or screen. |
You can change your account security settings in High Fidelity.
- In Desktop mode, go to Settings > Security in the menu on the top left corner.
- In VR mode, open your Tablet and go to Menu > Settings > Security.
| Setting | Description |
|---|---|
| Account | Enable to stay logged in (in the current device) even if you exit High Fidelity. |
| Secure Transactions | Change your security picture. |
See Also
Get Our Android App
An unreleased version of High Fidelity is currently available to download for Daydream-enabled Android devices. As an unreleased application, it does not have the full functionality of the desktop or VR version of High Fidelity. However, you can explore a number of worlds, attend events, change avatars, and connect with friends directly from your phone.
Note
The app is designed for Daydream-ready phones only. Keep in mind, it cannot be used in Daydream View and is only available as a 2D application.
On This Page
Visit Different Worlds
High Fidelity has many virtual places where you can interact with other users and participate in various activities or events. We have modified several of High Fidelity’s most popular virtual worlds to make them more accessible to Android users.
Find these domains by going to the Home tab in the menu.
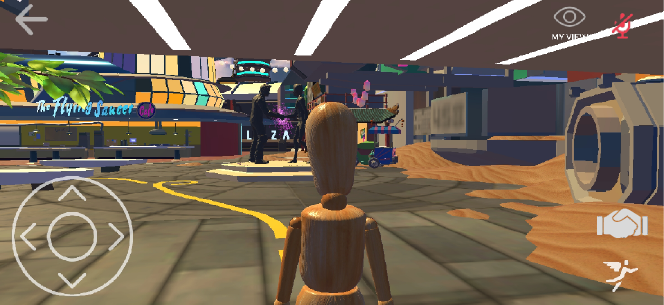
Movement Controls
| Action | Controls |
|---|---|
| Walking | When exploring a virtual world, use the arrows in the bottom left corner to turn and/or walk. |
| Turning | Drag your finger left or right across the screen to make your avatar turn. |
| Look up/down | Drag your finger up or down to change the angle of the camera. |
| Flying | Press the button on the bottom right with the winged avatar to fly (the longer you hold it, the higher you go!). |
In-World Controls
| Action | Controls |
|---|---|
| View | Switch to a bird’s eye view camera by pressing the My View button on the top right corner of the screen. |
| Mute | Your avatar in muted by default when you open the app. Press the mic button on the top right corner to unmute. |
Avatar Controls
| Action | Controls |
|---|---|
| Change Your Avatar | Change your avatar to one available in the list in the Avatar tab in the menu. |
| Set Display Name | Set your display name in the Avatar tab in the menu |
Discover and Make Friends
| Action | Controls | |
|---|---|---|
| Handshake | Add people to your Connections by shaking their hand. Press the handshake button which is above the flight button in the bottom right corner of your screen. | |
| Connections List | Open the People tab in the menu to view your Connections. | |
Additional functionality such as opening the Tablet, using the Create Tools app, adding wearables, etc. are not yet available.
See Also
Personalize Your Experience
Before you even enter High Fidelity, there are many ways to personalize your experience and make it your own. You can customize everything from the hardware you use, to the way the app works, to how you appear to others.
In This Section:
Change Your Avatar
When you first use High Fidelity, you will be wearing the default avatar, Woody. Your avatar is a representation of you in the metaverse. You can control how your avatar moves and speak to other users in-world using it.
On This Page:
Use Your VirtualYou Avatar
VirtualYou: 3D Avatar Creator is High Fidelity’s mobile app developed with the help of our friends at Wolf3D. In just a few easy steps, you can create a 3D avatar that looks like you in less than five minutes. The app creates your avatar based on a selfie that you take from your phone’s camera. You can then select customize your hair, face and body attributes, and choose your outfit. Download the app from the Apple or Google Play stores.
At the end, log in to High Fidelity to upload your new avatar to your account.
To wear your VirtualYou avatar:
- In Interface, pull up your Tablet or HUD and go to Inventory.
- Click on the ‘Items’ tab.
- Locate your VirtualYou avatar and click ‘Wear’.
Buy an Avatar from the Marketplace
We and our users have designed multiple avatars that are available for your use in the Marketplace.
To get an avatar from the Marketplace:
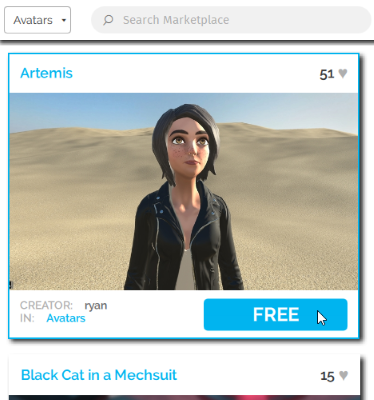
- In Interface, pull up your Tablet or HUD and go to Market.
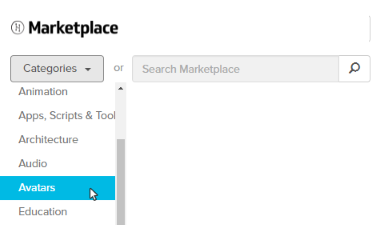
- Search for avatars, or look for avatars under ‘Categories’.
- You’ll see a list of avatars of different designs available. Click on any one you like and click the price to buy.
- After completing your purchase, click ‘Wear’ to switch to your new avatar.
Use Your Own Custom Avatar
You can use an avatar that you created. Learn more about how you can create your avatar here.
Note
All avatars must be hosted in the cloud before they can be used with High Fidelity. Examples of cloud storage options include Amazon S3, Google Cloud Storage, GitHub, or Microsoft Azure. Alternatively, you can add your avatar to the Marketplace to sell to other users.
Once you have your avatar’s .fst file, you can upload it.
- In Interface, pull up your tablet or HUD and click on Avatar.
- In the Avatar window, click the link icon next to your current avatar.
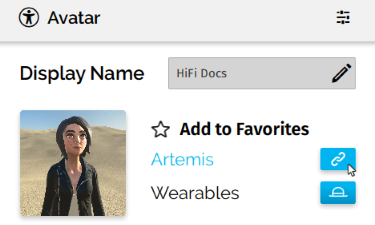
- Enter the .fst file’s URL and click ‘Confirm’.
- If you want to access this avatar later without loading the .fst file information again, you can click on ‘Add to Favorites’ to save the current avatar information.
See Also
Put On Wearables
You can customize your avatar’s appearance by adding wearables, such as a pirate’s hat, a pair of sunglasses, or even a pair of trousers that you designed. Like avatars, you can buy wearables from the Marketplace or use your imagination to create your own.
Buy a Wearable from the Marketplace
We and our users have designed many wearables that are available for your use in the Marketplace.
In Interface, pull up your Tablet or HUD and go to Market.
Search for a specific wearable, or browse all wearables by selecting the ‘Wearables’ category.
Click on any one you like and click the price to buy.

After completing your purchase, click ‘Wear’ to put on your new wearable.
If your wearable looks good, then you’re done! If you want to adjust its position, then continue:
Click Avatar on Tablet or HUD to open the Avatar app.
In the Avatar window, click the hat icon next to ‘Wearables’.
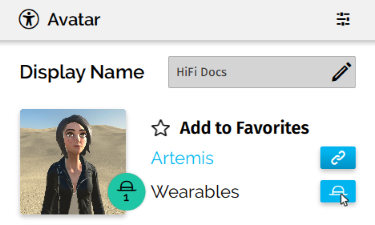
From the ‘Wearable’ dropdown list, choose the wearable you purchased.
Select the joint you’d like to use for your wearable. For example, a hat would be on your head, and fairy wings would be on your spine.
Fine tune the placement using the ‘Position’ and ‘Rotation’ options.
Check ‘Is soft’ if the item is rigged with your skeleton. This allows the item to move and bend with the avatar as it moves.
Click ‘Save’.
Wear Your Own Wearable
You can put on a wearable that you created. All wearables must be hosted in the cloud before they can be used with High Fidelity. Examples of cloud storage options include Amazon S3, Google Cloud Storage, GitHub, or Microsoft Azure. Alternatively, you can upload your custom wearable to the Marketplace and sell to other users.
Once you know the URL for your wearable’s FBX file, then put it on your avatar:
In Interface, pull up your tablet or HUD and click on Avatar.
In the Avatar window, click the hat icon next to ‘Wearables’.
Click ‘Add custom’ at the top of the window.
Enter the .fbx file’s URL and click ‘Confirm’.
Select the joint you’d like to use for your wearable. For example, a hat would be on your head, and fairy wings would be on your spine.
Fine tune the placement using the ‘Position’ and ‘Rotation’ options.
Check ‘Is soft’ if the item is rigged with your skeleton. This allows the item to move and bend with the avatar as it moves.
Click ‘Save’.
See Also
Install Tablet Apps
You can enhance your experience in High Fidelity by installing tablet apps from the Marketplace. These apps enable you to get more out of High Fidelity. Do you want to record your avatar dancing, take selfies, or finger paint? Or are you looking to livestream to YouTube or make your avatar clap? Our Marketplace has a number of apps that can help you customize your experience in-world.
If you can’t find an app for what you’d like to do, you can create your own and upload it to our Marketplace for your personal use or to sell to others.
On This Page:
Install Tablet Apps
We and many users have created tablet apps that are available in High Fidelity’s Marketplace. To find and install an app:
- In Interface, pull up your HUD or Tablet and go to Market.
- Search for a specific app, or browse all apps by selecting the ‘Apps, Scripts, & Tools’ category.
- Click the app of your choice to purchase it and click the price of the item. Once you’ve purchased your app, you can view it in the Inventory app or ‘Recent Activity’.
- After completing your purchase, click ‘Install App’ to start using the app in High Fidelity.
- Once the app is installed, click ‘Open App’ to launch. You can also access the app through your HUD or Tablet.
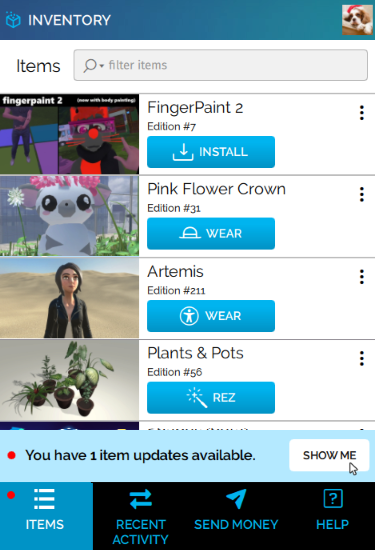
Update an App
When an app has an update available, a notification will pop up in the top right corner of the Interface when you open High Fidelity. Additionally, a red dot will appear on the Inventory icon of your HUD or Tablet to indicate an update is available to download.
To update your app:
- In Interface, pull up your HUD or Tablet and go to Inventory.
- In the Inventory app, click the notification that says “You have X item updates available.”
- Scroll to the app you’d like to update and click on the menu.
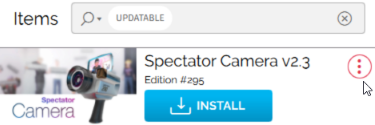
- Click the ‘Update’ button, then ‘Update for Free’.
Note
You can also visit the Item Listing page, where you’ll see an 'Update For Free' button.
- If you decide not to update an item, the old product will still be valid and listed in Inventory.
- Once you update an item, the previous version of the product will no longer be available.
- If you purchased multiple instances of an item, you need to individually update each instance of an item in your Inventory.
- When you update a product with the old version already in-world, it will remain intact until it is replaced manually with the updated version. If you attempt to import an entities JSON which contains the old version, the system will ignore the item, and not automatically replace it in-world. It is up to the end-user to replace the old instances with the new.
Our Marketplace Apps
We’ve listed some of the apps we created and how you can use them.
The Spectator Camera is a camera you can use to record or livestream what you and your friends do in High Fidelity. It is only available in HMD mode, and requires a recording software such as Open Broadcaster Software (OBS) to work correctly. Check out their official overview guide for more details.
Use the instructions above to install the Spectator Camera app.
Note
While using the Spectator Camera, Interface's framerate might be affected. This is because Interface is rendering not only what you see, but what the Spectator Camera sees as well.
To use the Spectator Camera app:
- In Interface, pull up your HUD or Tablet and go to Spectator.
- Turn on your Spectator Cam by moving the slider. You’ll see the camera appear in-world. By default, the app’s display shows you what you see in VR through your HMD. This is to show you what you’re recording without having to take off your HMD.

- To record yourself, switch your display from your HMD’s view to the camera view. This lets you record videos of yourself, such as your avatar dancing or trying on different wearables.
- Enable switching views with your controllers in the Spectator app on your HUD or Tablet.
- Rift: If you’re using Oculus Touch controllers, click the left thumbstick to switch views.
- Vive: If you’re using HTC Vive controllers, press on the center of the thumb pad to switch views.
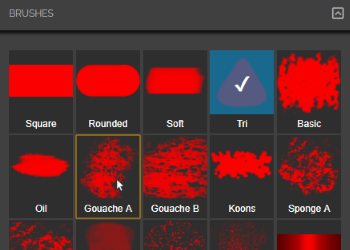
The Fingerpaint app lets your paint your environment, your own avatar, or even another user’s avatar. Use the instructions above to install the Fingerpaint app.
To use the Fingerpaint app:
- In Interface, pull up your HUD or Tablet and go to Body Paint.
- First, click ‘Options’ to select what you would like to paint on - the world around you, your avatar, or another user’s avatar (with their permission).
- Click ‘Palette’ to select a color for your paint.
- Click ‘Brushes’ to select the settings for your brush, such as stroke width, type of brush, and special effects.
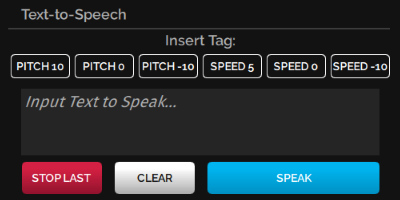
The Text to Speech app synthesizes the text you type into speech. You can use this app if you don’t wish to use your voice, have microphone issues, or have disabilities.
Use the instructions above to install the Text to Speech app.
Note
Currently, the Text to Speech app only works on Windows, since it relies on Microsoft's Text-to-Speech API built on Windows.
To use the Text to Speech (TTS) app:
- In Interface, pull up your HUD or Tablet and go to TTS.
- In the app, select the Pitch and Speed of your choice.
- Type in the text you’d like your avatar to speak.
- Hit ‘Speak’ to hear your text. Hit ‘Stop Last’ to stop your avatar from speaking.
See Also
Travel Between Worlds
High Fidelity is made up of many virtual places that let you participate in activities and interact with the people around you. Many of these places are beautifully detailed worlds that are interesting to explore at any time, while others were built to host events and engage with the people around you.
On This Page:
GoTo App
The GoTo app lets you travel between different places in the High Fidelity metaverse. Many of our places are created by users just like you.
To go and explore new places:
- In Interface, pull up your tablet or HUD and go to GoTo.
- If you know where you want to go, enter the domain address or place name. As you type, the matching places will show up. Otherwise, browse the open places under ‘Featured’ and ‘Places’.
- Click on a place name to go to the place. If you have permissions, you will be transported to that location automatically.
Note
The places that show up in the GoTo menu are user-created domains that are open to the public. However, note that the domain owner has full control over the security of their domain and has the ability to ban specific users from a domain. In the rare circumstance that you have been banned, a place may show up in the GoTo menu, but you will be unable to connect to it if you try to travel there.
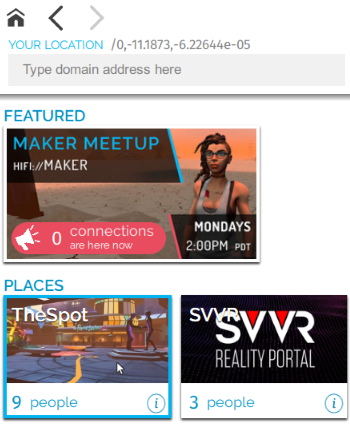
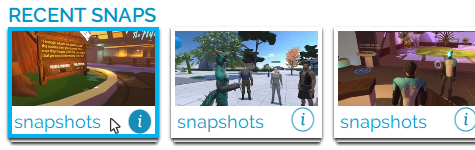
The GoTo app also shows you a visual feed of snapshots that people have taken and shared in the metaverse. Clicking on a snap will take you directly to the place where the picture was taken.
Visit a Friend
Once you’ve made a friend, you can see where they are and even teleport directly to them.
- In Interface, open your tablet or HUD and go to People.
- Click ‘Connections’ and find the friend you want to visit.
- Select their name then ‘Visit’.
See Also
Interact with Your Environment
In High Fidelity, your experiences are shaped the world around you. When you enter a domain, all of the space around you is built with entities, or the building blocks of your environments. The walls of your room, the tree in the distance, or the animated butterfly that flew past are all entities.
Just like in the real world, you can interact with your environment by grabbing items or colliding with objects.
On This Page:
Grab Objects
You can grab objects in High Fidelity using your mouse or hand controllers. You can grab an entity, hold it, throw it, and drop it depending on the entity’s properties.
- In Desktop mode, click and hold the left mouse button to grab and hold an entity.
- In VR mode, reach out towards the object and press the Grab button. The location of this button depends on the controllers you are using.
Note
Some entities cannot be grabbed. For example, a domain owner will not give you permission to grab and move a wall in their building. When creating your own entities, you can set the Grabbable property to define whether or not it can be grabbed by others.
Collisions
You can collide (or run into) objects and other avatars in High Fidelity. Likewise, objects can collide with one another. We use physics to govern how entities behave when they collide with each other or with avatars.
Without this collision property set, objects will move straight through other entities and avatars. As you interact with your environment, take note on which objects have collisions enabled based on whether or not you can walk through them.
When creating your own entities, you can set the Collision property to turn on or off collisions.
Triggered Entities
Some entities have scripts (or triggers) that make them behave a certain way when you interact with it. For example, you can trigger a light switch to turn on or off when your hand passes through it, or make a pet walk when you grab its leash.
These triggers are scripted in the entities themselves by their creators. Because of this, the possible behavior is endless. We encourage you to explore and discover all of the cool ways you can interact with your surroundings.
See Also
Bank and Shop
If you want to buy items in High Fidelity, head on over to the Marketplace, where you can purchase more than 300 items built by digital artists and creators from around this world. High Fidelity uses their own cryptocurrency, High Fidelity Coin (HFC) to manage your transactions.
Buy High Fidelity Coin
Currently, you can buy High Fidelity Coins (HFC) using Ethereum, a blockchain app that trades ETH (Ether). The Bank of High Fidelity manages HFC and we gradually increase the number of coins in circulation as the economy grows. 100 HFC is equal to 1 USD.
To get HFC:
- Book an appointment at the Bank of High Fidelity.
- At the time of your appointment, visit the TradingRoom domain.
- We will provide you with a QR code that you can use to send ETH to the Bank of High Fidelity.
- Once we receive the ETH amount you sent, we will send you the appropriate amount of HFC to your account based on the current exchange rate. This can take up to one business day.
You can also receive HFC from gifts from your friends or as prizes at events in High Fidelity.
Cash Out Your HFC
As you acquire more HFC through Marketplace sales, prizes, or gifts, you may cash out your HFC for USD. The minimum amount of HFC that you cash out is $25 (or 2,500 HFC), and the maximum cashout value is $2000 (or 200,000 HFC) per calendar month. High Fidelity may, at its discretion, issue the occasional exception to the maximum cashout amount.
To cash out HFC:
- Book an appointment at the Bank of High Fidelity.
- At the time of your appointment, visit the TradingRoom domain to meet with the banker.
The transaction will go through PayPal. USD will be paid to the email account specified via the appointment booking form. Time to payment receipt will be based on PayPal rules and guidelines.
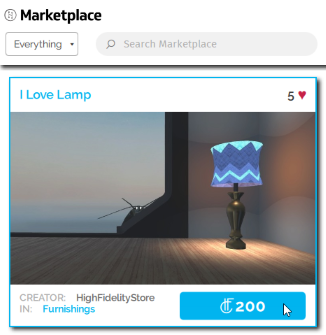
Shop the Marketplace
The Marketplace contains all types of items to enrich your VR experience, including avatars, buildings, apps, wearables, toys and so much more. Each item will have a cost associated with it - some items are free, while others can be purchased.
Browse our items in the Marketplace either on our website or by using the Market app.
To buy an item:
- In Interface, pull up your tablet or HUD and go to Market.
- Browse to the item you want to buy.
- Click on the item and then click the price to purchase the item.
You can locate all items that you purchase in the Inventory app.
Marketplace Items
All Marketplace items are certified, and when you purchase it, you receive a a certificate that documents its chain of ownership on the Marketplace. This certificate includes the terms of use, including the number of times you can rez or use the item you purchased.
In general:
- Purchased avatars can be worn only by the buyer.
- Purchased wearables can be worn by any avatar in the buyer’s account.
- Purchased apps, scripts, and tools can only be used by the buyer.
- Purchased models, environments, and skyboxes can only be rezzed in a single domain by the buyer.
- Certain models can be rezzed unlimited times in one domain. If previous copies don’t disappear after rezzing a second item, then you’re welcome to rez as many copies as you want.
- All other models can only be rezzed once per purchased item. If you would like to rez more than one of these items, then you will need to purchase multiple copies.
The item’s certificate will always give you more information about the item you purchased. To view an item’s certificate:
- In Interface, pull up your tablet or HUD and go to Inventory.
- On the Items tab, select your purchased item.
- Click on the item’s hamburger menu.
- Click ‘View Certificate’.
The Inventory App
The Inventory app provides an interface to manage your transactions, purchases, and HFC. From the Inventory app, you can:
- View your recent purchases, sales, gifts and other transaction history
- Change avatars, put on wearables and install/update apps
- Send HFC to your friends or anyone nearby
See Also
Give and Receive Gifts
Just like in real life, you can give money or presents to your friends in High Fidelity. You may wish to gift an item to a friend, send money to a connection, have a VIP zone in your domain, or play a poker game with your friends.
With the Commerce API, you can also award money or items using a coupon. A coupon is a way to send HFC or items to someone at a later time, even when you are not logged in to High Fidelity. For example, you can create a coupon to award the winner of a trivia game 250 HFC, or to give someone a soda when they buy something from a vending machine.
On This Page
Send HFC to Others
To send money to a connection or someone nearby:
- In Interface, pull up your tablet or HUD and go to Inventory.
- In the Inventory app, click ‘Send Money’.

Send money to one of your connections or even someone nearby in the same domain.
- If you want to send it to one of your connections, click ‘Connections; and choose the recipient from the list.
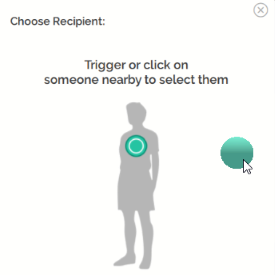
- If you want to send it to someone nearby, click ‘Someone Nearby’ and choose your recipient by triggering or clicking on someone nearby to select them.
Add the amount you wish to send. This amount should be less than or equal to your HFC balance.
You can add an optional public message. Click ‘Submit’.
A window pops up confirming that your money has been sent.
Send Purchased Items to Others
After you buy something from the Marketplace, you can give it to a connection or someone nearby. To do so:
- In Interface, pull up your tablet or HUD and go to Inventory.
- In the Inventory app, click ‘Items’.

- Scroll to the item you’d like to give and click on the menu.
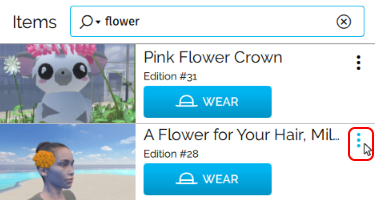
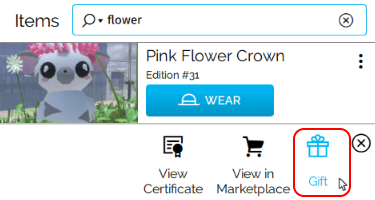
- Select ‘Gift’.
Send the item to one of your connections or even someone nearby in the same domain.
- If you want to send it to one of your connections, click ‘Connections’ and choose the recipient from the list.
- If you want to send it to someone nearby, click ‘Someone Nearby’ and choose your recipient by triggering or clicking on someone nearby to select them.
You can add an optional public message. Click ‘Submit’.
A window pops up confirming that your item has been sent.
Note
When you send an item to another user, it is removed from your Inventory.
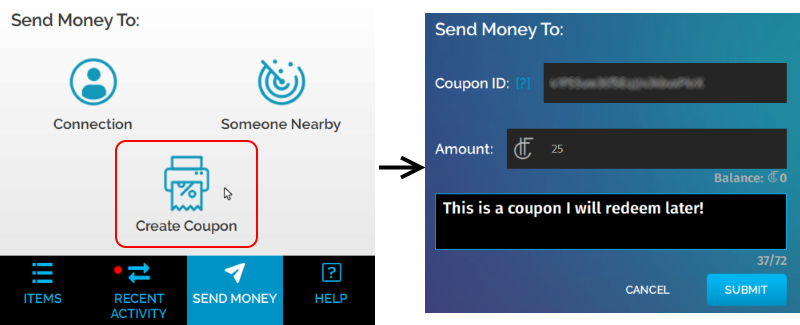
Create a Coupon
You can create a coupon when you want to send money or an item to someone at a later time, even when you are not logged in to High Fidelity.
Note
Currently, you can only use a coupon in a script. You will not be able to redeem a coupon anywhere in Interface.
In Interface, pull up your tablet or HUD and go to Inventory.
Choose whether you’d like to later send HFC or an item.
- If you want to send HFC, click ‘Send Money’.
- If you want to send an item, click ‘Items’ and scroll to the item you’d like to give. Click on the item’s menu and choose ‘Gift’.
Select ‘Create Coupon’.
Enter an optional public message explaining the purpose of the coupon.
The Tablet will now display a window with the ‘Authorization ID’ and ‘Coupon ID’. Copy both these values on your computer. Click ‘Close’.
Include the copied values in a script where another user receives the HFC or item.
Example: Use a Coupon to Hold a Raffle
Say you want to pre-authorize 10 of your High Fidelity Coins to be paid out to a user who wins a raffle that you host. In this example, curl is used to perform the redemption. But you can redeem a pre-authorized transfer using any script or tool that can perform HTTP PUT requests, such as High Fidelity Interface’s request JavaScript module or a simple PHP form on a website.
- Create a Coupon to get an ‘Authorization ID’ and ‘Coupon ID’ value pair associated with a 10-HFC Pre-Authorized Money transfer.
- Copy and paste the ‘Authorization ID’ and ‘Coupon ID’ to a text file on your computer.
- Click ‘Close’, then ‘I’m All Set’.
- Hold your raffle! In this example, a user with username steve has won the raffle.
- Use the following
curlcommand from the command line to dispense the money authorized in (1) to username steve:curl -X PUT -d authorization_id="<authorization ID from 1>" -d coupon_id="<coupon ID from 1>" -d username=steve https://highfidelity.com/api/v1/commerce/redeem
See Also
Create
High Fidelity enables people connected by interest, community, and friendship to come together and express their creativity with each other. We invite you to personalize your own experience by creating avatars and wearables, building immersive experiences, and developing apps to make the metaverse your own.
No matter your level of expertise, High Fidelity provides the tools you need to create anything you can imagine.
Throughout this chapter, learn how to create, build, and bring to life your own VR experience:
Create Tools
To build and create things in High Fidelity, you need to become familiar with the tools available to you. We’ve created our own custom tools (including the Create app and Shapes app). In addition, you can use many external tools to fine-tune your creations. These tools can help you create anything from a cool avatar or a baseball hat, to a magic themed domain.
The Create App
Use the Create app to create any type of entity. In Interface, pull up your HUD or Tablet and go to Create to get started. With the Create app, you can:
- Add any type of entity and import externally created models and materials.
- Edit entity properties, such as its appearance, position, and behavior.
- Expose a grid that assists you with the layout and placement of entities.
- Display the Entity List, which lists all the entities in the domain. When you’re using an HMD, the entity list will be an additional tab in the Create app. In Desktop mode, the Entity List is its own window.
Note
We have received reports that Interface may crash when using a laptop and external monitor with the Create app. If you experience the crash, we recommend that you either a) disable the Nahimic service on your laptop or b) always use the Create Tools on your primary monitor.
Entity List
The Entity List shows you all entities in the local domain. You can filter by entity type and by distance from the current location.
At the top of the Entity List, you can switch between ‘Local’ and ‘World’ view. When set to ‘Local’, the position, size, and rotation settings for entities are set in reference to the parent entity. When set to ‘World’, these settings are set in reference to the world’s default position.
When you select an entity in the Entity List, you can:
- Find an entity: You can double-click an entity on the list to view it in your domain. You will see the entity with a bounding box and arrows around it.
- Lock an entity: A locked entity cannot be edited. Select an entity and click the lock icon on the top of the window.
- Change visibility: You can hide or make an entity visible. Select an entity and click the eye icon on the top of the window.
- Name an entity: Name an entity when you select it on the list.
- Delete an entity: Delete an entity by clicking on the red bin icon on the top-right corner of the window.
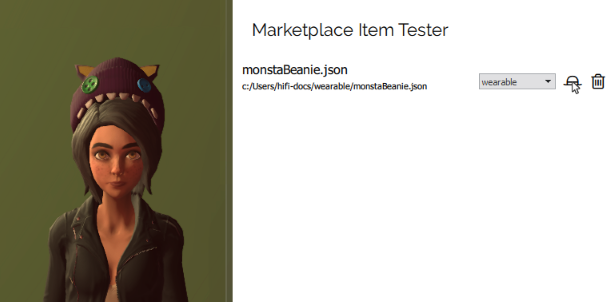
Marketplace Item Tester
Once you have created an item, you can test it prior to using it or submitting it to Marketplace. The Marketplace Item Tester reviews all kinds of content, including tablet apps, avatars, content sets, entities, and wearables. Using it, you can verify that your item works the way you expected, and that it does not have any script errors.
To use the Marketplace Item Tester:
In Interface, open the menu from either the menu bar (in Desktop) or your Tablet (in VR mode).
Go to Menu > Settings > Developer menu to enable the developer menu.
Open the Developer menu and go to Marketplace Item Tester.
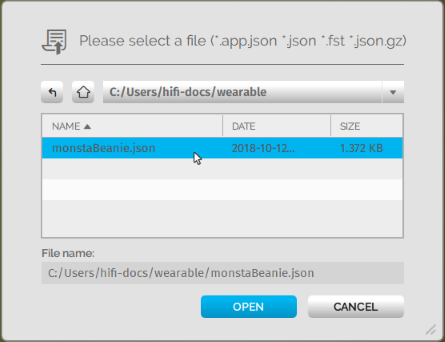
You can load items in two different ways:
- Click ‘Load File’ to load an item from your local computer or network. Browse to your file to open it.
- Click ‘Load URL’ to load an item hosted in the cloud.
- Next to the item you loaded, you will see an icon indicating the type of content. If it is incorrect (or we fail to identify it), you can change it using the dropdown list.
- Click the icon to load your content in world.
External Creator Tools
We’ve listed some external tools you might want to use to create avatars and 3D models.
Adobe Fuse
Note
There are community reports where users are unable to easily open Adobe Fuse once installed. To work around this issue, open it multiple times successively until you are able to open the application.
Use Adobe Fuse to create a custom avatar. The default heads, torsos, arms, and legs in Adobe Fuse can help you start your customization.
Mixamo
Mixamo is a rigging system that will rig your avatar’s skeleton for you. You do not need any advanced knowledge of rigging to create simple animations for your avatar.
Blender
Blender is an open-source 3D modeling creation suite which supports everything from modeling and rigging, to animation and simulation. You can also use Blender to fine tune your avatar, and ensure that the materials and textures render correctly in High Fidelity.
Maya
Maya is a subscription based 3D modeling toolset that you can use to create 3D models to import into High Fidelity.
Blocks
Blocks is a 3D modeling tool you can use in VR. Blocks lets you create models easily regardless of your experience. You can create something on Blocks through Steam or download it for the VR equipment you are using.
See Also
Avatars
When you first use High Fidelity, you will be wearing the default avatar. Your avatar is a representation of you in the metaverse. You can make your time in High Fidelity unique by creating an avatar of your own. All custom avatars must be hosted somewhere in the cloud so that High Fidelity can access it.
In This Section:
Create Your Own Avatar
There are three ways to create your own avatar. You can either:
- Create your avatar from scratch using 3D modeling tools such as Adobe Fuse, Mixamo, and Blender
- Use “VirtualYou: 3D Avatar Creator”, High Fidelity’s app to create a 3D avatar that looks like you in less than five minutes. Download the app from the Apple or Google Play stores.
- Download an existing avatar from external sources such as TurboSquid or CGTrader
Note
If you get an avatar from an external source such as TurboSquid or CGTrader, it is likely that the skeleton does not match our avatar standards. To use these avatars with High Fidelity, use the High Fidelity Avatar Exporter for Unity to correctly map the skeleton and package your avatar.
If you want to create an avatar from scratch, this page covers the steps needed to create, rig, and package your avatar.
In This Section
Avatar Standards Guide
This document outlines the standards you should follow when creating your avatar. Your avatar uses bones to animate the character’s limbs and define the scale variable of limbs. You can add custom bones to further adjust the avatar’s shape. Customization of your avatar can be fine-tuned using blendshapes to animate the face and scripting to define advanced behaviors.
On This Page:
As we delve deeper into creating custom avatars, we may use terminology that you are unfamiliar with. Here are some terms you might come across:
- Avatar - A virtual representation of a person or NPC.
- Mesh - The collection of 3D vertices and triangles for the avatar model. Without this, the avatar is invisible.
- Bones - A component of a skeleton that defines a “limb” such as an arm, leg, etc. Each bone may be animated as a separate limb in your avatar.
- Skeleton - A hierarchy of joints.
- Rigging - The process of creating a skeleton of the avatar model.
- Blendshapes - Variations of the topology that defines how the mesh is modified to create various “shapes”.
- FST file - The main avatar file, which contains information about the skeleton, blendshapes, FBX file and textures used by an avatar.
For the Reference pose, use a T-Pose which complies with the specifications below. You may wish to refer to the properly configured example avatar fbx with source files.
- The character must face along the positive direction of the Z-axis.
- The arms must be spread along the X-axis. The left arm should therefore be pointing along the positive direction of the X-axis.
- The top of the character’s head must be up, in the positive direction of the Y-axis.
- The character’s hands are flat, palms facing the ground, with the thumbs parallel to the X axis.
- The character’s feet need to be perpendicular to the legs (with the toes pointing along the Z-axis as shown). The feet must not be rotated around the Y-axis (meaning the toes of the left foot should not point inward toward the right leg or outward away from the right leg).
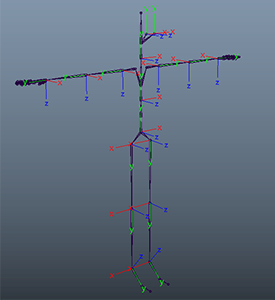
You can download the standard High Fidelity skeleton here. This skeleton conforms to the specifications above.
The standard humanoid skeleton of your avatar should follow HumanIK Skeleton with some modifications made for Mixamo. This skeleton system will work with the input systems already in place in High Fidelity, and will allow users to use their input devices to control their avatar’s arm and finger movements (if they have any).
High Fidelity avatars should match the following standard skeletal structure. Each of these joints can be animated.
Note
Finger #1 is not the metacarpal; instead, it is the first joint between the proximal and intermediate.
![]()
The sim and flow prefixes are reserved for flow bones, such as clothing, hair and tails. These bones should not be animated by an animator. 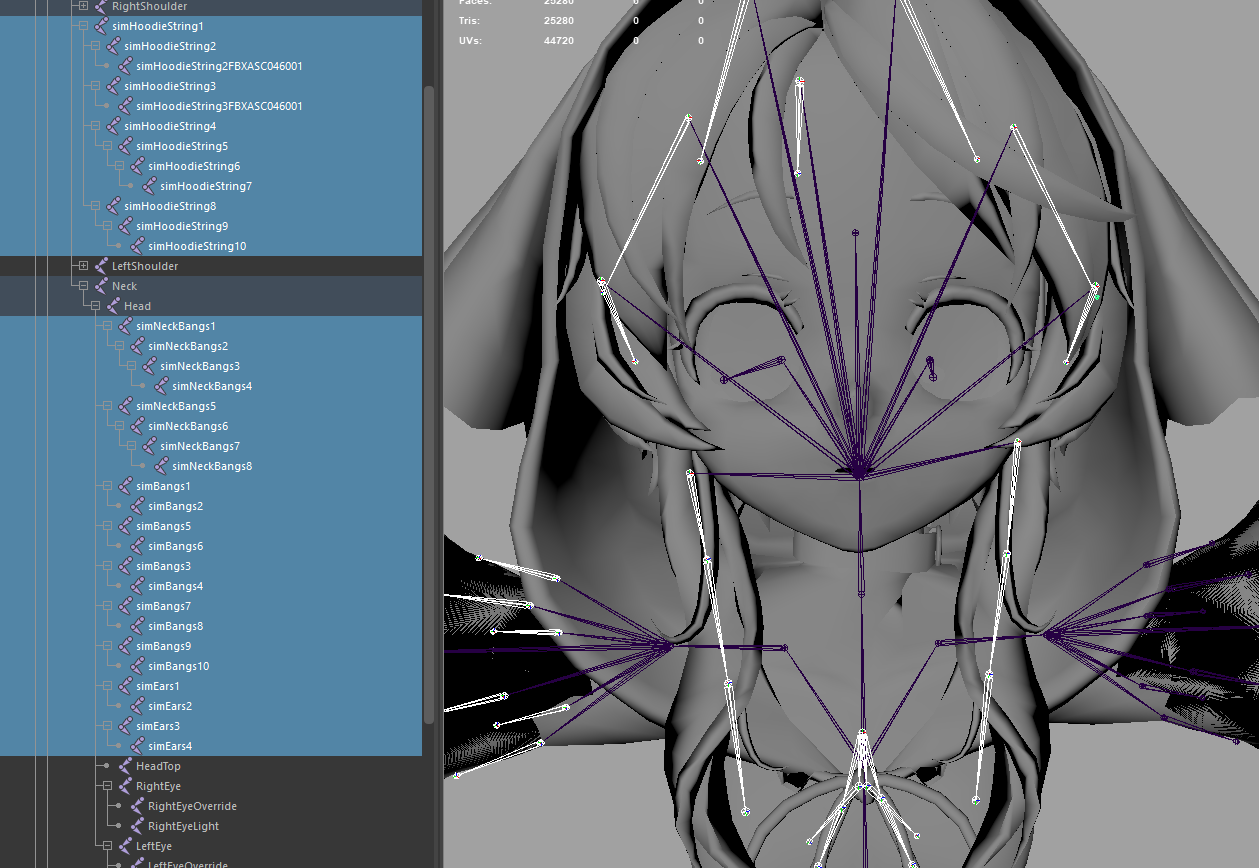 (Many thanks to Akazukin for the model Ouka Miko(櫻歌ミコ) used in this diagram!)
For example, consider a full cape that surrounds the avatar:
simBackCape# - additional bone(s) of the cape, center back
simFrontCape1 - first bone of the cape, center front
simFrontCape# - additional bone(s) of the cape, center front
simLeftCape1 - first bone of the cape, left
simLeftCape# - additional bone(s) of the cape, left
simRightCape1 - first bone of the cape, right
simRightCape# - additional bone(s) of the cape, right
Alternatively, you can use the flow prefix, separating the name and joint number with an underscore. The same cape as above would look like:
flow_BackCape_02
flow_FrontCape_01
flow_FrontCape_#
flow_LeftCape_01
flow_LeftCape_#
flow_RightCape_01
flow_RightCape_#
The look-at vectors are driven by the z-vector of the eye joints.
The +z axis of the eye joints should go through the center of the pupil, and should continue to do so as the eye joint is rotated.
The eye joints are defined in the FST.
High Fidelity uses blendshapes to animate your avatar’s face. Blendshapes allow you to specify a new state for your avatar’s mesh, and facial positions are animated by moving between the different states of your avatar’s expressions. Blendshape behaviors are defined in your avatar’s FST file, and are added to the avatar mesh using a 3D modeling tool like Blender (Shape Keys) or Maya. Adobe’s Fuse program and Mixamo pipeline allow you to export blendshapes as part of your FBX, but if you are modeling an avatar from scratch, you will likely need to specify your own facial expressions.
High Fidelity avatars support a number of blendshapes for creating different facial expressions.
Basic Blendshapes
EyeBlink_L: Blinking action for the left eye.EyeBlink_R: Blicking action for the right eye.JawOpen: Opening of the jaw.
Audio Blendshapes
These blendshapes are used when you speak.
Your eyebrows are blendshapes that react to a change in volume. They will move upwards when your voice gets louder. These include:
BrowsU_C: Center of the brow going upBrowsU_L: Outside corner of the left brow going upBrowsU_R: Outside corner of the right brow going up
Other audio blendshapes are randomly mixed when you speak. These include:
MouthSmile_L: Left side of the mouth lifting up to a smileMouthSmile_R: Right side of the mouth lifting up to a smileLipsFunnel: Funneling of the lips, as when you say “Oh!”LipsUpperClose: Upper lips rolled inwards
Eyelid Offset
To ensure that the top of the eyelid rests on the iris, blendshapes are used to track the current position of the eye along with your head orientation.
EyeBlink_L: Blinking action for the left eyeEyeBlink_R: Blicking action for the right eyeEyeOpen_L: Opening of left eyeEyeOpen_R: Opening of right eyeBrowsD_L: Outside corner of the left brow moving downBrowsD_R: Outside corner of the right brow moving down
We apply a small procedural offset to the blendshape coefficients to prevent sleepy or crazy eye lids:
- If you are looking straight ahead: The
EyeBlinkandEyeOpencoefficients will be0. - If your eyes begin to look upward:
EyeBlink,EyeOpen, andBrowsUstart changing in value, reaching the values of-1,1, and0.5respectively at16.3degrees. This will have the effect of raising your lids and brows as you look upward. - If your eyes begin to look downward:
EyeBlinkandEyeOpenstart changing in value.EyeBlinkreaches a value of0.5at32degrees.EyeOpenwill reach a value of0.5at 27 degrees. This will have the effect of lowering your lids as you look downward.
Tweaks to your blendshapes can be made with a 3D modeling tool, or directly in your avatar’s FST file. In the FST file, blendshapes are defined with the syntax:
Here is an example of modifying your blendshapes in your FST file:
bs = BrowsU_C = head_BS_brow_up = 0.3
bs = BrowsU_R = head_BS_brow_up = 0.3
bs = BrowsD_R = head_BS_brow_down = 0.5
bs = BrowsD_L = head_BS_brow_down = 0.5
bs = EyeBlink_L = head_BS_L_eye_close = 1
bs = EyeBlink_R = head_BS_R_eye_close = 1
bs = EyeOpen_L = head_BS_L_eye_open = 1
bs = EyeOpen_R = head_BS_R_eye_open = 1
bs = JawOpen = JawOpen = 1
bs = MouthSmile_R = head_BS_L_smile = 0.6
bs = MouthSmile_L = head_BS_R_smile = 0.6
bs = LipsFunnel = head_BS_oo = 0.5
bs = LipsUpperClose = head_BS_mouth_down = 0.1
Content creators will have limited bandwidth on servers (read small print on any unlimited host plans) so optimization is important, for both the end users and content creators. The more polygons and larger textures you use, the more bandwidth you are using from your servers per load. Optimally, keep your avatar models under 20 MB.
We recommend that you try to keep total size of all the textures per avatar below 8 MB. They should be always smaller than 1024x1024, unless all the textures are in a single file. If using multiple texture files, then smaller the better, especially if you can make the textures smaller. Remember that you can get a lot more detail through roughness and normal mapping, than just textures. It is suggested that you keep Albedo at a smaller size than your roughness for best detail through light reflection instead of color variation.
When you wear different avatars, you’ll notice that each avatar has a different collision shape or collision hull. The collision hull is the invisible area around your avatar that is used to used to detect when other avatars or entities collide with you.
Depending on the avatar’s design, the collision hulls can be very large or small. This occurs because High Fidelity analyzes the shape of the avatar’s torso (from hips to head) and tries to find the best shape that encloses the mesh. For example, if your avatar has large hips or perhaps a fully extended tail, High Fidelity thinks that the tip of the tail is part of your hips, and makes a very large collision hull. To reduce the size of the collision hull, you can add skeleton joints to your avatar’s tail.
See Also
Create an Avatar from Scratch
The steps involved in creating your avatar are:
- Create an avatar with 3D character modeling tool such as Adobe Fuse, Blender or Maya.
- Rig and animate your avatar with an animation tool such as Mixamo.
- Fine tune your avatar using a tool such as Blender or Maya.
- Package the model in High Fidelity for use as an avatar.
Note
If you intend to upload and sell your avatar to the Marketplace, you need to set your base material color to white (some apps default to grey). This ensures that the avatar renders correctly for all users and that it will be accepted into our Marketplace.
Check out this YouTube playlist for one way to create and customize your own avatar. Here, we use Adobe Fuse to create our avatar, Mixamo to rig our avatar automatically, and Blender to adjust the rendering on our avatar. We also have written instructions on the same process:
Community Tools for Avatars
As you’re creating your avatar, remember that High Fidelity is an open-source project. Many of our community members have created plug-ins, add-ons, toolkits, skeletons and more to help you create content, including avatars. Here are a few for you to play around with.
Plugin (“Project Hermes”) is a plugin for Blender to allow for easier content creation and importing for the High Fidelity Metaverse Platform. It features:
- Material Tools: Allows for easier pipeline to apply materials to objects so that they are ready to use in High Fidelity.
- Armature Tools: Adds a skeleton that is compatible with High Fidelity and let you configure bone names for use in advanced scripts.
- Avatar Converters: Translates and fixes models and materials from MMD and Mixamo so that they work in High Fidelity.
- Export Tools: Exports avatars and scenes so that they can be used in High Fidelity.
- Import Tools: Imports primitive entities from High Fidelity so that you can make modifications to them.
Install it here: https://github.com/Menithal/Blender-Hifi-Addon
Have a project you’ve been working on that you’d like us to share? Let us know by editing this page in GitHub!
See Also
Find and Use an Existing Avatar
You can download avatars for use from external sources such as TurboSquid or CGTrader. Once you get the avatar, you will need to process it in Unity using the High Fidelity Avatar Exporter. This tool imports most avatars into Unity, maps their skeleton using Unity’s humanoid tool, and exports them as FST and FBX files to import in-world.
On This Page
Avatar Guidelines
Many external sites like TurboSquid and CGTrader provide avatars that you can use. However, note that not all of the avatars you find may work in High Fidelity. To improve the chances that your downloaded avatar is compatible with High Fidelity, we’ve compiled a list of guidelines to help you “sanity check” it prior to use.
You should ensure that:
You downloaded a real-time models (rigged for run-time, not rigged for render).
You have the correct downloaded files
- An FBX model for your avatar. We do not support other 3D model formats.
- (Optional) One or more image files to give your avatar color and texture. Sometimes, these are already embedded in your FBX model and you won’t have any additional image files in your download.
Your avatar is rigged.
Note
If your avatar is not rigged, you can use Mixamo to rig it. If you use Mixamo, you do not necessarily need to use Unity and the avatar exporter. Because Mixamo already uses a skeleton that we support, you can use our Avatar Packager to import your avatar into High Fidelity.
High Fidelity Avatar Exporter for Unity
High Fidelity supports only one standard type of rigging for avatars. Because many avatars do not match this skeleton, we created the High Fidelity Avatar Exporter for Unity (also known as the “avatar exporter”) to convert human-like avatars with a humanoid bone structure (body, head, and limbs). The avatar exporter also automatically packages your avatar for use in High Fidelity.
Note
The avatar exporter was written to improve the process of rigging and mapping the skeleton rig. This will not affect the animations or materials in your avatar. To adjust the materials, you will need to use a 3D modeling tool such as Blender or Maya and make modifications to your avatar prior to using the avatar exporter in Unity.
You will need the following to use this tool:
- Unity (Recommended versions: 2017.4.17f1 - 2018.2.12f1)
- High Fidelity (v0.77.0 or higher)
- High Fidelity Avatar Exporter for Unity (v0.4.1)
Please note that the recommended version of Unity is not the latest version. If you are using a newer version of Unity, we recommend that you apply a T-Pose to your avatar. To do so, go to the ‘Inspector’, and click ‘Pose’ near the bottom of the panel. Select ‘Enforce T-Pose’ from the drop-down. Click ‘Apply’ and ‘Done’. We recommend doing this after correcting any issues with remapping bones.
You need to install the extension for every Unity project that you have. Keep in mind, however, that you can import and export multiple avatars in a single Unity project.
- Download the avatar exporter from High Fidelity.
- In Unity, open the ‘Project’ window at the bottom.
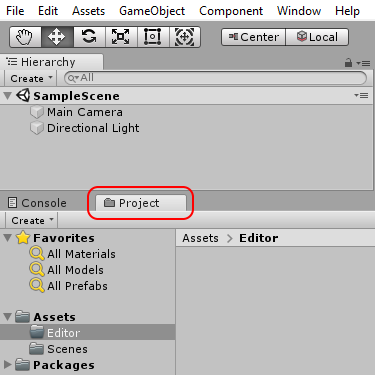
- Right-click the ‘Assets’ folder, then select Import Package > Custom Package.
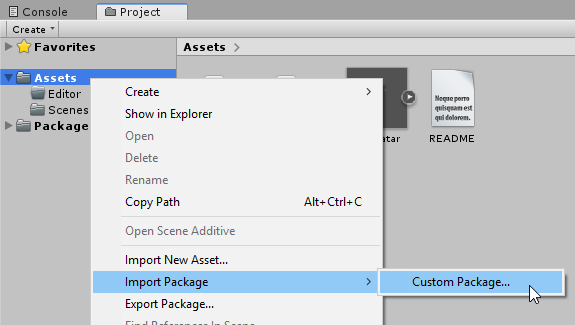
- Navigate to the avatarExporter package (with a .unitypackage extension). Click ‘Open’. You can also double-click the package on your computer to import it automatically.
- In the ‘Importing Package’ window, review the list of files to be imported and check for conflicts with files already in your project. If a conflict exists, save any local changes somewhere outside of your project.
- Click ‘Import’. The package’s files are added to the Assets folder. You should now have a ‘High Fidelity’ menu in Unity.

- If you don’t already have your model open in Unity, you need to import your model. Use any of the following methods:
- Drag and drop the FBX file into the ‘Assets’ folder of your ‘Project’ window.
- In the ‘Project’ window, right-click the ‘Assets’ folder, then select Import Package > Import New Asset. Navigate to the FBX file and click ‘Import’.
- In Unity, open the ‘Assets’ menu, then select Import Package > Import New Asset. Navigate to the FBX file and click ‘Import’.
- In the ‘Project’ window, select your avatar’s FBX file. In the ‘Inspector’, open ‘Rig’. For ‘Animation Type’, choose ‘Humanoid’ and then click ‘Apply’.
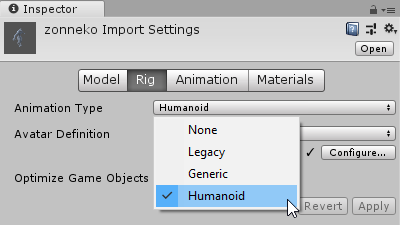
- Click ‘Configure’ to investigate and tweak the mapping of your avatar.
- All bones mapped in Unity are highlighted in green and can be selected. Check if anything is missing. Any errors will appear in red. The minimum required bones for mapping are Hips, Spine, Chest, and Head. If either of these are missing, you must manually add bones before continuing. You can do this by dragging the bones from the ‘Avatar Configuration’ panel to the ‘Inspector’ panel.
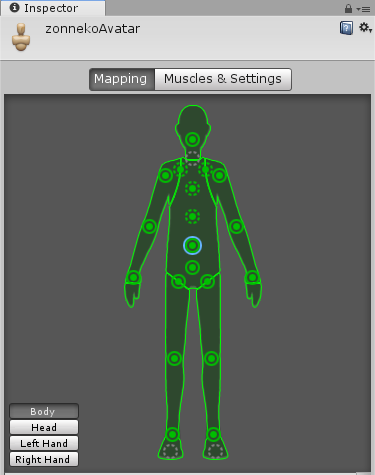
Note
Avatars in High Fidelity must have a Chest bone. If your avatar does not have a chest bone, the avatar exporter may suggest a suitable alternative from the ‘Avatar Configuration’ panel. If the exporter doesn’t suggest an alternative and Humanoid doesn’t correctly map the Chest, then you will get an error and need to manually map a bone to the Chest from ‘Avatar Configuration’.
- If you made any changes, click ‘Done’.
- Click on the FBX file in the ‘Assets’ manager.
- Make sure that you have the avatar exporter installed. Open the ‘High Fidelity’ menu in the top menu bar, then select ‘Export New Avatar’.
- Give your avatar project a name. The default project location is your local user’s
Documents\High Fidelity Projectsdirectory, which is created automatically for you. Though we recommend that you keep your avatars in this directory, you can change it to another location on your computer.
- Click ‘Export’.
Your avatar package has been created! The File Explorer will open to your new avatar project.
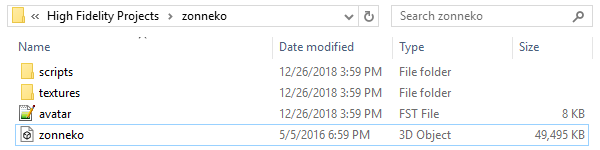
Note
If you are using any external textures with your avatar model, copy those textures to your local user’s Documents\High Fidelity Projects\avatar\<project name>\textures directory. Otherwise, they may not show up on your avatar.
We encourage you to “spot check” your avatar in Unity before exporting it with the High Fidelity Avatar Exporter for Unity. Check for the following:
- Confirm that there are no extraneous objects attached to your model. For example, this Mech avatar has a ground blue object included in the model. All extraneous objects will be imported into High Fidelity and may affect the rendering or animation of your avatar.
- Test your bone movements. In Unity’s ‘Inspector’, open ‘Rig’. For ‘Animation Type’, choose ‘Humanoid’ and then click ‘Apply’. Go to ‘Muscles & Settings’ to test your avatar’s bone configuration and ensure that it works as expected.
After exporting your avatar package, you can also test it in High Fidelity using the Marketplace Item Tester to ensure that it works before you host it. If something doesn’t look right, tweak your avatar in Unity, then update it with the High Fidelity menu.
If everything looks good, you need to host your avatar then change your avatar to wear it.
Many of the errors you will encounter describe issues with the avatar’s skeleton. These are fully documented here: Troubleshooting with the Avatar Packager. Here are some other issues you may encounter after using a downloaded avatar and using the avatar exporter:
| Issue | Troubleshooting Tip |
|---|---|
You receive a warning in Unity: “Character is not in T pose.” |
Go to the ‘Inspector’, click ‘Configure’, and then select ‘Pose’ near the bottom of the panel. Select ‘Enforce T-Pose’ from the drop-down. Click ‘Apply’ and ‘Done’. We recommend doing this after correcting any issues with remapping bones. |
| In Unity, your avatar is a solid color. | This suggests that the materials or shaders you are using are not supported.
|
| Your avatar is grey. | One of the following issues could have occurred:
|
| Your avatar is tied up into knots or laying down. | This could mean that your skeleton is not right. Re-open your avatar in Unity and run through steps 2-5 of Create an Avatar Package again. Update your project in Unity (go to Update Existing Avatar, then browse to your avatar package). If it still doesn’t work, ensure that you are testing the correct file that the avatar exporter created. |
| Your avatar’s skin doesn’t move properly with animations. | The avatar exporter was written to improve the process of rigging and mapping the skeleton rig. This will not affect the animations in your avatar. To adjust the animations, you will need to use a 3D modeling tool such as Blender or Maya and fix the skin weighting on the avatar prior to using the avatar exporter in Unity. |
See Also
Package and Host Your Avatar
At a minimum, avatars in High Fidelity must have an FBX model and an associated FST file that includes information about how your avatar looks and behaves. Together, these two files (with any optional texture or script) form an “avatar package”. There are two ways you can create an avatar package: by using the Avatar Packager in Interface or the High Fidelity Avatar Exporter for Unity in Unity.
Once you have packaged your avatar, you need to host it on the cloud so that High Fidelity can access it and correctly render your avatar for all users.
On This Page
Package Your Avatar
If you’re reading this page, you likely already built your own FBX model or found and downloaded a model that you want to use in High Fidelity. Therefore, all that remains is to package your avatar and create the FST file. This file includes information about the skeleton, blendshapes, textures, and scripts used by your avatar.
We provide two ways to create an avatar package: either through Unity or through our Avatar Packager.
In some cases, you will want to download an avatar from an external website and use that avatar in High Fidelity. The High Fidelity Avatar Exporter for Unity (also known as the “avatar exporter”) converts human-like avatars and packages them for use in High Fidelity.
Once you have successfully used the avatar exporter to package your avatar, you must host it somewhere on the cloud. You can host it on our servers (using the Avatar Packager), or simply copy the avatar package to your own servers.
The Avatar Packager is a tool in Interface that identifies potential errors in your avatar’s FBX model and then creates an FST file for you. Then, you can optionally use the Avatar Packager to upload your avatar to the Marketplace and host it on our servers.
To package your avatar using the Avatar Packager:
- In Interface, go to Edit > Avatar Packager.
- In the Avatar Packager window, click ‘New Project’.
- In the Create Project window, fill in the following details:
- Name: The name you want for your avatar.
- Project Location: The folder path where your avatar’s files are stored. The Avatar Packager will create a new folder for your project at this location. The package will contain your FBX model, an FST file, and any scripts/textures in your avatar.
- Avatar Model: The location of your avatar’s FBX model.
- Texture Folder: If your avatar has textures in a separate folder, specify the folder location. If your avatar’s textures are embedded in the FBX, you do not need to specify anything.
- Click ‘Create’.
At this point, you have successfully packaged your avatar. If you choose to host your avatar on the cloud with your own servers (and not use High Fidelity’s servers), you can close the Avatar Packager here and upload your FST file and FBX model to the cloud location of your choice.
Host Your Avatar
Before you can use a custom avatar, you must first host its FST and FBX files in a place that is publicly accessible to High Fidelity. We recommend hosting them on our own servers using the Avatar Packager, but you can also use any cloud platform including Amazon S3, Google Cloud Storage, Microsoft Azure, Dropbox, etc.
If you want to upload it to High Fidelity’s servers or sell your avatar on the Marketplace, use the Avatar Packager:
If this is a new avatar, first use the Avatar Packager to create an FST file. When you proceed with Step 3 below, you will upload this new project to our servers.
If you want to host an avatar that has already been packaged:
- In Interface, go to Edit > Avatar Packager.
- In the Avatar Packager window that opens, click ‘Open Project’.
- Navigate to your FST file and click ‘Open’.
Click ‘Upload’ to upload your avatar’s files to High Fidelity’s servers. The Avatar Packager will display any errors or warnings that you may want to resolve prior to uploading. View Troubleshooting with the Avatar Packager to determine whether a fix is required to have a usable avatar.
Once your avatar is uploaded to the servers, click ‘View in Inventory’ to view your custom avatar. Unless you submit it for review, your custom avatar will remain in Draft mode, and will not be visible to others. To sell your avatar, you need to submit it for review on the Marketplace.

Note
If you make any changes to your custom avatar, you will need to update it through the Avatar Packager to see your changes. To update, select your project and click ‘Open Project’ in step 1. Follow the same steps to update your avatar.
Troubleshooting with the Avatar Packager
The Avatar Packager will notify you of any errors or warnings that may affect the way your avatar looks and behaves in High Fidelity. This is a list of the errors you may encounter, along with basic instructions on how to fix your avatar. Errors (in red) must be fixed before you upload your avatar, while Warnings (in orange) may or may not affect whether your avatar will show up and behave correctly in High Fidelity.
Note
Many of the errors you will encounter describe issues with the avatar’s skeleton. The troubleshooting tips below will attempt to fix the errors in Unity.
However, if the bone structure of the model does not resemble a humanoid skeleton (with two legs, two arms, hips, chest, spine, and head), then it is likely not compatible with High Fidelity. You will not be able to fix these avatars in Unity alone. Instead, you will likely need advanced knowledge of building, rigging, and mapping bones in a 3D modeling tool such as Blender or Maya.
| Error | How to Fix |
|---|---|
|
Hips are not mapped This error occurs when there is no "hip" bone identified in your avatar's skeleton. |
If an appropriate bone does not exist, or this does not resolve the issue, you will need to fix the avatar's skeleton in a 3D modeling tool of your choice. |
|
Spine is not mapped This error occurs when there is no "spine" bone identified in your avatar's skeleton. |
If an appropriate bone does not exist, or this does not resolve the issue, you will need to fix the avatar's skeleton in a 3D modeling tool of your choice. |
|
Chest (Spine1) is not mapped This error occurs when there is no "chest" bone identified in your avatar's skeleton. |
If an appropriate bone does not exist, or this does not resolve the issue, you will need to fix the avatar's skeleton in a 3D modeling tool of your choice. |
|
Head is not mapped This error occurs when there is no "head" bone identified in your avatar's skeleton. |
If an appropriate bone does not exist, or this does not resolve the issue, you will need to fix the avatar's skeleton in a 3D modeling tool of your choice. |
|
Neck is not mapped This warning occurs when there is no "neck" bone identified in your avatar's skeleton. |
If an appropriate bone does not exist, or this does not resolve the issue, you will need to fix the avatar's skeleton in a 3D modeling tool of your choice. |
|
LeftEye is not mapped | This warning occurs when there is one or more missing "eye" bones in your avatar's skeleton. |
If an appropriate bone does not exist, or this does not resolve the issue, you will need to fix the avatar's skeleton in a 3D modeling tool of your choice. |
|
Multiple top-level joints found High Fidelity's standard avatar skeleton has one root bone (typically the hips) that every other bone is connected to, either directly or indirectly. This bone is known as the "parent", "root", or "top-level" bone and it defines the center of your avatar. Click here to view our standard avatar skeleton. This error occurs when you have more than one of these "top-level" bones defined in your avatar's skeleton. Rather than a hierarchy of joints, you will likely see many bones at the same root level in your skeleton. |
In Unity, check your avatar's skeleton in the Hierarchy window. In some cases, having multiple bones at the root level won't affect your avatar, especially if they are unimportant bones (for example, the tongue bone probably will not affect the overall appearance of your avatar). In these cases, you can simply ignore the error and proceed with packaging and hosting your avatar. If you have multiple "top-level" bones that are important (for example, if the hips and neck bone are at the same level), then you will need to fix the avatar's skeleton in a 3D modeling tool of your choice. |
|
<boneName> is mapped multiple times This warning occurs when one of your avatar's bones is mapped multiple times in your skeleton. For example, a back bone may be mapped to both the spine and the hips. |
If an appropriate bone does not exist, or this does not resolve the issue, you will need to fix the avatar's skeleton in a 3D modeling tool of your choice. |
|
Asymmetrical arm/leg/hand bones We assume that the left and right appendages (arms, legs, and hands) have the same number of bones. This warning occurs if we detect a different number of bones on the left and rights sides of the body. |
|
|
Spine is not a child of Hips High Fidelity's standard avatar skeleton has one root bone, and every other bone is a descendent of that bone (either directly or indirectly). In the standard skeleton, the spine must be a direct descendent of the hips. Click here to view our standard avatar skeleton. This warning occurs when the spine is not a direct descendent of the hip bone. |
If the appropriate bones are mapped to the Hips and Spine, or this does not resolve the issue, you will need to fix the avatar's hierarchy in a 3D modeling tool of your choice. |
|
Spine1 is not a child of Spine High Fidelity's standard avatar skeleton has one root bone, and every other bone is a descendent of that bone (either directly or indirectly). In the standard skeleton, the chest bone (or Spine1) must be a direct descendent of the spine. Click here to view our standard avatar skeleton. This warning occurs when the chest is not a direct descendent of the spine bone. |
If the appropriate bones are mapped to the Spine and Chest (Spine1), or this does not resolve the issue, you will need to fix the avatar's bone hierarchy in a 3D modeling tool of your choice. |
|
Head is not a child of Spine1 High Fidelity's standard avatar skeleton has one root bone, and every other bone is a descendent of that bone (either directly or indirectly). In the standard skeleton, the head bone must be a direct descendent of the chest (or Spine1). Click here to view our standard avatar skeleton. This warning occurs when the head is not a direct descendent of the chest bone. |
If the appropriate bones are mapped to the Chest (Spine1) and Head, or this does not resolve the issue, you will need to fix the avatar's bone hierarchy in a 3D modeling tool of your choice. |
|
Hips are on ground This warning occurs when the bone mapped to the Hips is on the ground, rather than at hip level. |
If the appropriate bone is mapped to the Hips, or this does not resolve the issue, you will need to fix the avatar's bone placement in a 3D modeling tool of your choice. |
|
Hips/Spine/Chest Overlap High Fidelity's standard avatar skeleton requires that each bone is placed at different locations on the body. For example, the hips cannot be positioned at the same location as the chest. This error occurs when either the hips, spine, and/or chest bones have overlapping positions. |
If this does not resolve the issue, you will need to fix the avatar's bone placement in a 3D modeling tool of your choice. |
|
Avatar has over 256 bones This warning occurs when you have more than the maximum number of bones allowed (which is 256 bones). |
This warning cannot be resolved in Unity or High Fidelity. To fix it, you need to remove bones from your skeleton using a 3D modeling tool of your choice. |
|
Missing # texture(s) This warning occurs when High Fidelity cannot find textures for your avatar. This will affect the appearance of your avatar, and it may appear grey when you try to use it. |
After you package your avatar, copy all external textures to the 'Textures' folder that we create for you. Then, update your project using the Avatar Packager. |
|
# unsupported texture(s) found This warning occurs when your textures are not supported by High Fidelity. Supported image formats include PNG, JPG, JPEG, TGA, TIF, and TIFF files. |
|
|
No textures assigned This warning occurs when you do not have any textures embedded in your model or referenced in your FST file. If your avatar was intentionally designed without textures, this warning can be safely ignored. |
For more information, see Unity's help on their Material Editor. You can alternatively use a 3D modeling tool of your choice to assign materials and textures to your avatar. |
|
Model file cannot be opened This warning occurs when your avatar package is missing either an FBX or FST file. |
|
|
Unsupported avatar model format This warning occurs when your avatar model is not a supported format. High Fidelity only supports FBX models for avatars. |
This warning cannot be resolved in Unity or High Fidelity. To fix it, you need to open your model in the 3D modeling tool of your choice, and export your model as an FBX model. |
|
Avatar is possibly too short This warning occurs when High Fidelity detects that your avatar will appear very small when you use it. |
|
|
Avatar is possibly too tall This warning occurs when High Fidelity detects that your avatar will appear very large when you use it. |
|
|
Avatar has no rig This warning occurs when your avatar is not rigged. |
This warning cannot be resolved in Unity or High Fidelity. To fix it, we recommend running your avatar model through an auto-rigging tool such as Mixamo. |
Add Flow to Your Avatar
You can simulate physics on your avatar’s hair, clothes, and body parts with a little bit of scripting and the help of High Fidelity’s Flow technology. The concept of “Flow” simply mimics the natural movement of hair and other attachments on your avatar. You can easily change your avatar’s flow settings using the Flow App. In order to use the Flow App, your avatar must contain flow threads.
On This Page
Prepare Your Avatar
In order to use the Flow technology, your avatar must contain flow threads, which are sets of connected joints in your avatar. Each flow thread must comply with the following rules:
- The first joint is connected to an existing avatar joint, such as “Hips”.
- Every joint in the thread should be named
flow_[TYPE]_[INDEX]orsim[TYPE][INDEX], where TYPE defines a group of joints that share a common physics setup and INDEX is an integer. For example, if the thread is used to simulate a skirt, all the “skirt” joints are named flow_skirt_01, flow_skirt_02, etc.
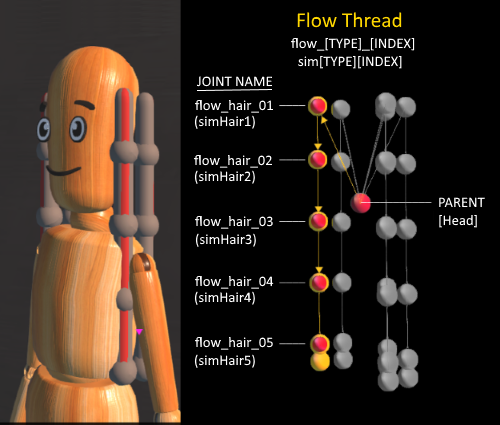
While experimenting, feel free to use Mannequin with Hair, whose hair has flow threads already configured.
Flow App
Download and run the Flow app to configure your flow settings.
The Flow app will show up as an icon on your HUD or tablet. Click this icon to open the Flow app.
The Display panel affects how your avatar looks while the Flow app is open. Using these options, you can choose to view meshes and collisions to help you determine what your final flow configuration will look like.
| Option | Description |
|---|---|
| Avatar | Hides or displays the avatar mesh. |
| Collisions | Activates or deactivates collisions. |
| Debug | Hides or displays the debug shapes. |
| Solid | Enables either a solid or wireframe display for debug shapes. |
The Joints panel lists all of the available flow threads, and lets you configure the behavior of your joints.

| Option | Description |
|---|---|
| Radius | Determines the thickness of segments and knots (needed for collision testing). |
| Gravity | Sets the how each joint will respond to gravity. A positive value will lift your joints in the air, while a negative value will respond to gravity and be pulled towards the ground. Larger values will cause the movement to happen more quickly. |
| Stiffness | Defines how susceptible the flow threads are to movement. |
| Damping | Determines how easily the bones oscillate or move around the joints. |
| Inertia | Changes the rotational velocity of the bones. |
| Delta | Controls the amount of time between each joint movement. |
The Collisions panel controls the collision spheres that define the interactions between flow threads and the joints in your avatar. Each collision sphere is positioned using an existing avatar joint and offset: as you increase the radius of a collision sphere, you increase the distance between the flow thread and the joint. You can only have a maximum of 4 collisions defined for your avatar.
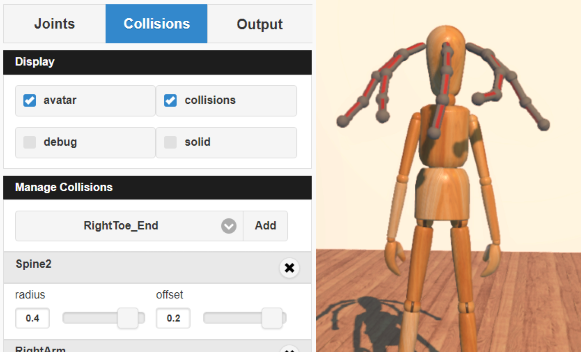
| Option | Description |
|---|---|
| Radius | Controls the collision sphere radius. |
| Offset | Controls the collision sphere offset. |
The Output panel displays the resulting FST data for your avatar’s flow configuration, based on what you entered in the Joints Panel and the Collisions Panel.
Copy this data directly into your avatar’s FST file to complete the flow process.
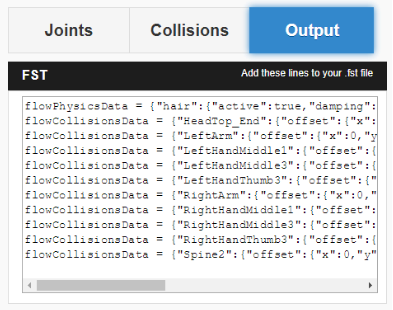
Resources
| File | Description | URL |
|---|---|---|
| Flow App | This app lets users easily update Flow settings without the need for scripting or advanced knowledge of avatars. | flowAppCpp.js |
| Mannequin with Hair | This avatar is properly rigged to work with Flow. Use this as an example for your own avatar models. | Mannequin with Hair |
See Also
Customize Avatar Animations
You can express yourself by overriding High Fidelity’s standard set of animations with your own custom animations such as dancing, juggling, or waving. Any custom animations you set up will be independent to each avatar you own and wear.
Note
We often update our process for importing custom animations to make it more user friendly. As you develop custom animations, keep in mind that you may need to modify them in the future as our custom animation support continues to improve.
On This Page
Prerequisites
As we delve deeper into creating custom animations, we may use terminology that you are unfamiliar with. Here are some terms you might come across:
| Term | Description |
|---|---|
| Avatar animations | Avatar animations are FBX files that define how your avatar moves. For example, turn_left.fbx is the standard animation file for your avatar turning left. |
| Animation roles | Animation roles are triggers that map to an action that an avatar can perform.
For example, turnLeft is an animation role that makes your avatar turn left
while standing in place. This animation role is mapped to the turn_left.fbx
file. You can see this in action by pressing the left arrow key or A in Desktop
mode or using your hand controllers in VR mode. |
| Avatar Animation JSON or Animation Graph File | The standard animation system blends and layers a series of animations from FBX files using a JSON data file. This JSON file is called the Animation Graph file, and it specifies exactly which animations to play and how they are blended. It also determines the order of operations, so that operations like Inverse Kinematics occur after the rest of the body has been animated by traditional means. By default, every avatar uses the same Animation Graph file. |
Prepare Your Custom Animation
Before you replace the existing standard animations, you need to prepare your custom animation file. Use our Avatar Standards Guide and keep the following guidelines in mind:
- Animations must have standard joint names for High Fidelity.
- Animations must have standard joint orientations (y down the bone).
- Key frames must have key frames for every joint at a uniform interval of 30 frames per second.
- Locomotion animation phase has the left ankle in passing position on the first frame. Try to match this phase if you want your locomotion animation to blend with the default set.
Once you create your animation:
- Export your animation from the external tool of your choice as an FBX file.
- Upload your animation FBX file to a cloud server and copy the URL.
Replace Standard Animations
You can have your avatar use your custom animations by overriding the default animations. There are two different ways to do this:
- Override Using a Script: Write a script to override standard animations.
- Create a Custom Avatar Animation JSON file: You can modify this file or create a new data file.
You can write a script and use the MyAvatar namespace to override an existing animation or animation role.
We’ve listed the methods you can use to replace the standard animations on your avatar.
| Method | Description |
|---|---|
| MyAvatar.overrideAnimation | This method can be used to play any animation on the current avatar. It will move smoothly from the current pose to the starting frame of the custom animation. For example, if your avatar is waving, this script will stop your avatar waving and play the custom animation provided. |
| AnimationCache.prefetch | This method fetches a resource. You can use this to fetch a custom animation you’ve hosted on a cloud server. If you do not prefetch your animations before playing them, you might see a t-pose appear briefly as the animation is downloaded. |
| MyAvatar.restoreAnimation | This method stops the override function from playing any custom animation. Your avatar will go back to playing the standard animations. |
Note
This process to replace an existing animation will take complete control of all avatar joints. Inverse Kinematics of the hands and head of HMD users will be disabled.
You can also override an existing animation role mapping:
- Use MyAvatar.getAnimationRoles to view the list of roles for the current avatar.
- You can replace the animation for each role with a custom animation (FBX file) using MyAvatar.overrideRoleAnimation.
We’ve listed the animation roles and their description. These are frequently updated, so we recommend using MyAvatar.getAnimationRoles to get the latest animation roles before continuing. The standard animation FBX files for these roles can be found in the High Fidelity source code repository on GitHub.
| Animation Roles | Description |
|---|---|
| rightHandGraspOpen | When hand controller trigger is not squeezed. |
| rightHandGraspClosed | When hand controller trigger is fully squeezed. |
| rightIndexPointOpen | Point gesture. |
| rightIndexPointClosed | Point gesture with trigger squeezed. |
| rightThumbRaiseOpen | Thumbs up gesture. |
| rightThumbRaiseClosed | Thumbs up gesture with trigger squeezed. |
| rightIndexPointAndThumbRaiseOpen | Simultaneous thumbs up and point gesture. |
| rightIndexPointAndThumbRaiseClosed | Simultaneous thumbs up and point gesture, with trigger squeezed. |
| leftHandGraspOpen | When hand controller trigger is not squeezed. |
| leftHandGraspClosed | When hand controller trigger is fully squeezed. |
| leftIndexPointOpen | Point gesture. |
| leftIndexPointClosed | Point gesture with trigger squeezed. |
| leftThumbRaiseOpen | Thumbs up gesture. |
| leftThumbRaiseClosed | Thumbs up gesture with trigger squeezed. |
| leftIndexPointAndThumbRaiseOpen | Simultaneous thumbs up and point gesture. |
| leftIndexPointAndThumbRaiseClosed | Simultaneous thumbs up and point gesture, with trigger squeezed. |
| idleStand | Standing still, not talking. |
| idleTalk | Standing still, but avatar is talking. |
| walkFwdShort_c | Walking forward at 0.5 m/s. |
| walkFwdNormal_c, walkFwdFast_c | Walking forward at 1.8 m/s. Walking forward at 2.3 m/s. |
| walkFwdJog_c, walkFwdRun_c | Walking forward at 3.2 m/s. Walking forward at 4.5 m/s. |
| idleToWalkFwd, idleSettle | Short transition from standing idle to walking forward. Transition from walk to idle. |
| walkBwdShort_c | Walking backward at 0.6 m/s. |
| walkBwdFast_c, jogBwd_c, runBwd_c | Walking backward at 1.6 m/s. Jog backward at 2.3 m/s. Jog backward at 3.1 m/s. |
| turnLeft | Standing turning in place animation. |
| turnRight | Standing turning in place animation. |
| strafeLeftShortStep_c | Sidestep at 0.1 m/s. |
| strafeLeftStep_c, strafeLeftWalk_c, strafeLeftWalkFast_c, strafeLeftJog_c | Sidestep at 0.5 m/s. Side walk at 1.0 m/s. Side walk at 2.6 m/s. Side jog at 3.0 m/s. |
| strafeRightShortStep_c, strafeRightStep_c | Sidestep at 0.1 m/s. Sidestep at 0.5 m/s. |
| strafeRightWalk_c, strafeRightFast_c, strafeRightJog_c, stepLeftShort_c, stepLeft_c, strafeLeftAnim_c, stepRightShort_c, stepRight_c, strafeRightAnim_c | Side walk at 1 m/s. Sidewalk at 2.6 m/s Side jog at 3 m/s. HMD step left at 0 m/s. HMD step left at 0.5 m/s. HMD strafe left at 2.5 m/s. HMD step right at 0 m/s. HMD step right at 0.5 m/s. HMD strafe right at 2.5 m/s. |
| fly | Flying idle. |
| takeoffStand | Standing jump takeoff. |
| TAKEOFFRUN | Running jump takeoff. |
| inAirStandPreApex | Standing jump in air on the way upward towards the jump apex. |
| inAirStandApex | Standing jump in air at apex of the jump. |
| inAirStandPostApex | Standing jump in air on the downward arc of the jump. |
| inAirRunPreApex | Running jump in air on the way upward towards the jump apex. |
| inAirRunApex | Running jump in air at apex of the jump. |
| inAirRunPostApex | Running jump in air on the downward arc of the jump. |
| landStandImpact | Standing land. |
| landStand | Standing land. |
| LANDRUN | Running land. |
If you’re not comfortable using a script, you can edit or replace the existing Avatar Animation JSON file to override the standard animations.
Note
If you create a custom JSON file for your avatar’s animations, you will not inherit any updates made to the standard animations’ JSON file. You can perform a text merge to the latest version at any time.
The JSON file shows which animation role is mapped to which animation FBX file. You can replace standard animation FBX files with your custom animation’s FBX files. Or, you can write a new JSON file with the new mappings for each animation role.
To replace standard animations:
- Upload your custom JSON file to a cloud server and copy the URL.
- In Interface, pull up your HUD or Tablet and go to Avatar.
- Click on the Settings icon on the top-right corner.
- Under ‘Avatar Animation JSON’, paste the URL for your JSON file.
OR
- Open your avatar’s FST file in a text editor.
- Add your Animation Graph file’s URL.
Note
You will need to run your avatar’s files through the Avatar Packager to include the changes in your FST file.
animGraphUrl = "URL"
- Here is the current default avatar-animation.json file.
- This scoot-animation.json file replaces the idle and walk animations with a sitting pose. This example shows how you can replace some of an avatar’s default animations.
The Avatar Animation JSON file contains a hierarchical tree of nodes called the AnimNode System. The AnimNode system defines how an avatar moves and is described in the Animation Graph JSON file.
The movement of an avatar is determined by a complex blend of procedural animation, pre-recorded animation clips, and inverse kinematics. This blend is calculated at every frame to ensure that the avatar body follows physics and controller input as rapidly as possible. It must handle animation for desktop users, HMD users, and users wearing a full set of HTC Vive trackers. It must be configured on the fly as sensors are added and removed from the system. It should also be open to extensions so unique animations and avatar configurations are possible. These functionalities are handled by the AnimNode system.
We’ve listed some features of the system:
- The AnimNode system is a graph of nodes.
- Some nodes are output only, such as pre-recorded animation clips.
- Other nodes produce output by processing nodes below it in the graph and blending the results together.
- By manipulating the node hierarchy, certain animation actions will occur before or after other animation actions.
- The node parameters can be dynamically changed at runtime. This flexibility is necessary to achieve good visual results.
- The system is in the default Animation Graph JSON file and is loaded during avatar initialization.
Key Concepts
The AnimNode system operates like an expression parse tree. For example the following expression: 4 + 3 * 7 - (5 / (3 + 4)) + 6, can be represented by the following parse tree.
This parse tree can then be evaluated at runtime to compute the actual value. In this tree, the leaf nodes are values and interior nodes are operations that combine two or more sub-trees and produce a new value. The tree is evaluated until there is a single value remaining, which should be the result of the entire expression: 30.2957142.
In the expression case, the output value of each node is a floating point number, and operations can be implemented simply by evaluating each sub-tree, and then combining them with an arithmetic operation, such as addition or multiplication.
The AnimNode system works on a similar concept. Except the value of each node contains all of the avatar’s joint translations and rotations. Leaf nodes can be static avatar poses, such as the T-pose or can be a single frame of an animation clip. Interior nodes can perform operations such as blending between two or more sub-trees, or combining the upper body of one animation with the lower body of another.
See Also
Tutorial: Create an Avatar with Fuse
Note
There are community reports where users are unable to easily open Adobe Fuse once installed. To work around this issue, open it multiple times successively until you are able to open the application.
Using Adobe Fuse, you can create a custom avatar. The default heads, torsos, arms and legs in Adobe Fuse can help you start your customization.
- Launch Adobe Fuse.
- Pick your default body parts.
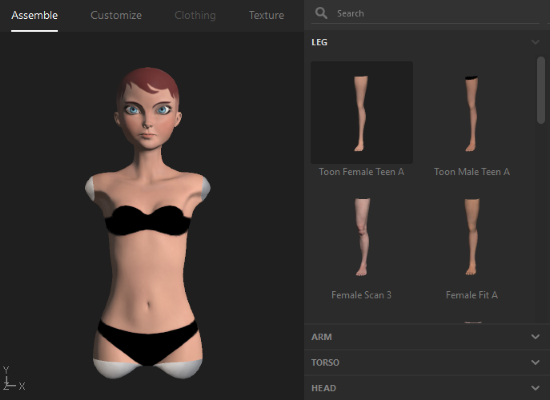
- Click ‘Customize’. Here, you can customize the avatar. For example, you can customize how the eyebrows are shaped, facial expressions, how long the fingers are and much more.
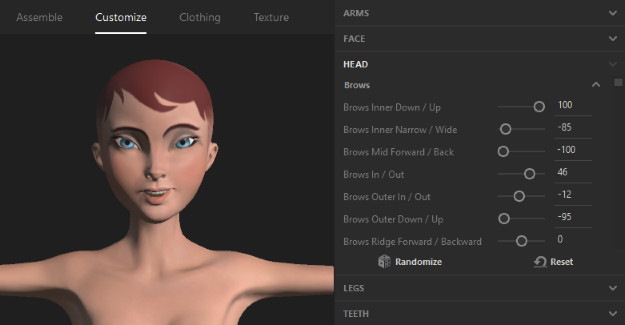
- Click ‘Clothing’. Here, you can choose the clothing you’d like. In addition, you can set hair and facial hair options. In the next step, you will be able to modify the materials, colors, and textures of each clothing item you choose.
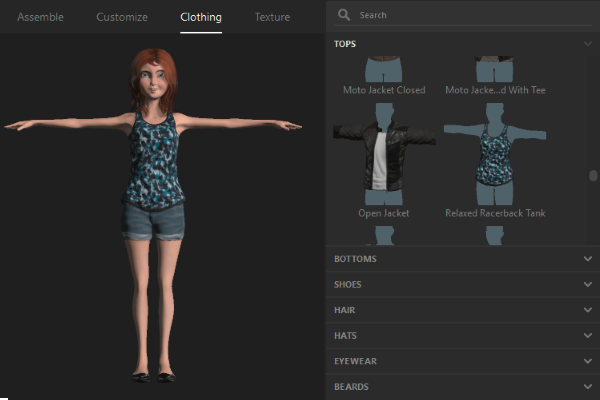
- Click ‘Texture’. Here, you can modify your clothing choices with custom materials and colors.
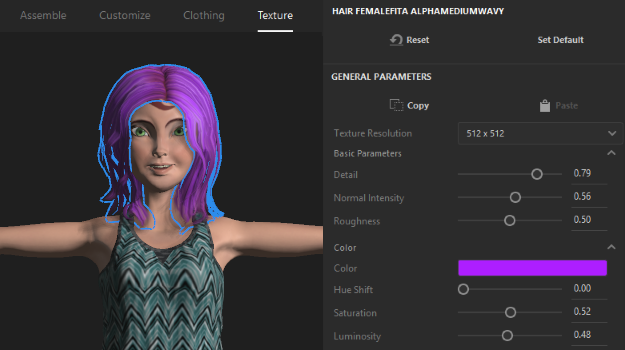
- Save your avatar.
See Also
Tutorial: Rig Avatars in Mixamo
Mixamo is a rigging system that will rig your model’s skeleton automatically for you. You do not need any advanced knowledge of rigging to create simple animations for your avatar.
In this tutorial, we will use the avatar that we created in Adobe Fuse.
Open your avatar in Adobe Fuse.
Go to File > Animate with Mixamo.
Save your avatar with a name and wait while it is exported to the auto-rigger.
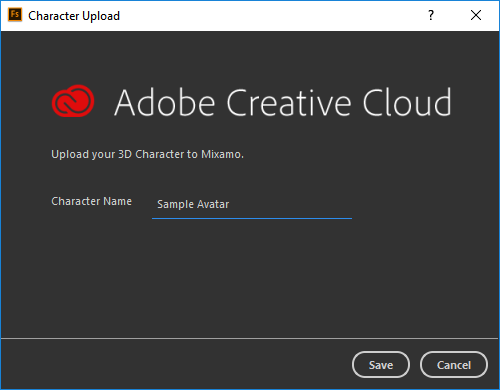
Note
Mixamo's auto-rigger will create a custom skeleton for your avatar so you can start animating. The auto-rigger algorithm can take up to 2 minutes, so be patient!
Once your avatar is processed, Mixamo’s auto-rigger will show your animated avatar. Ensure that Facial Blendshapes are ‘Enabled’ and Skeleton LOD has been set to ‘Standard’. These settings ensure that your avatar will work property in High Fidelity.
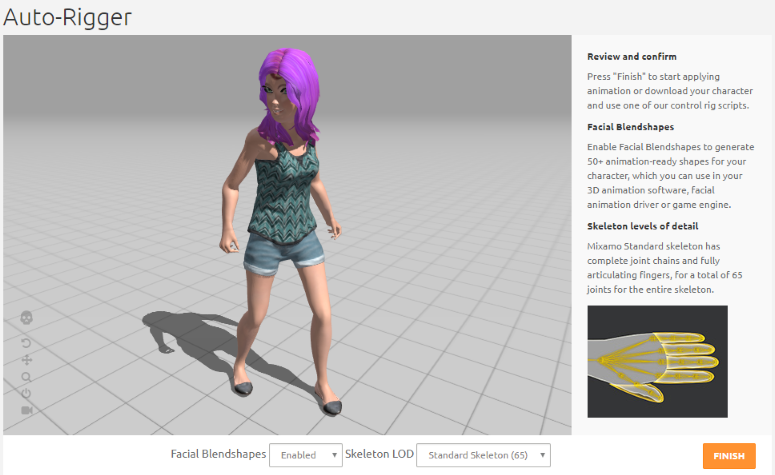
If you made changes to your settings, click ‘Update Rig’. Mixamo will re-process your avatar with these updates.
Click ‘Finish’ to start applying animation.
Once your avatar has been successfully rigged, you can download it and modify it further using a 3D software of your choice. When prompted, select Format as ‘FBX’ and Pose as ‘T-pose’.
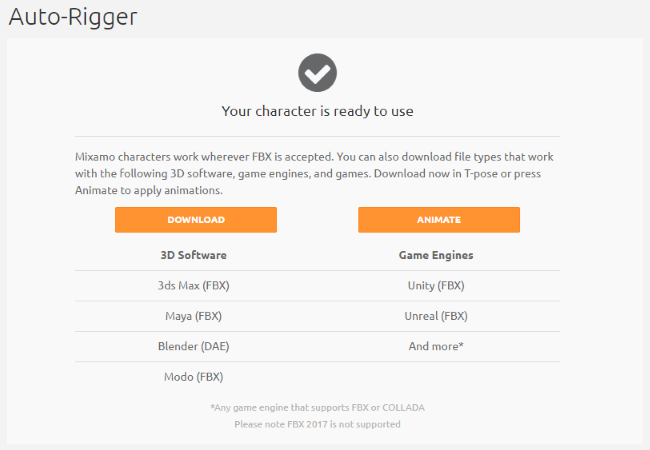
See Also
Tutorial: Modify Materials and Textures Using Blender
Blender is an open-source 3D modeling tool that you can use to fine tune your avatar and ensure that the materials and textures render correctly in High Fidelity.
In this tutorial, we will walk you through simple modifications you can make to your avatar using Blender. You will need to import an FBX file for your avatar. If you don’t have one, see our tutorials for Fuse and Mixamo.
In Blender, go to File > Import > FBX (.fbx).
Choose your avatar’s FBX file and click ‘Import FBX’. This will open your avatar in the main view.
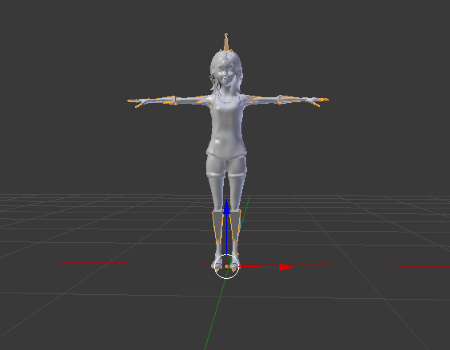
By default, you will not see the materials on your avatar. You can change your view using the toolbar at the bottom of the view.
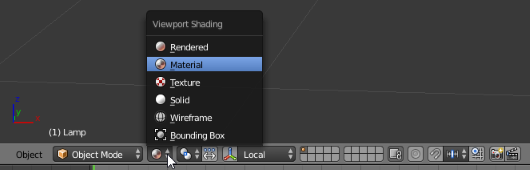
To get a better view of your avatar, change the lamp settings:
- From the Outliner, click the Lamp node in Blender.
- For ‘Type of Active Data to display and edit’, choose the ‘Data’ icon.
- Change the lamp to Sun.
- Rotate the Lamp to light up your avatar.
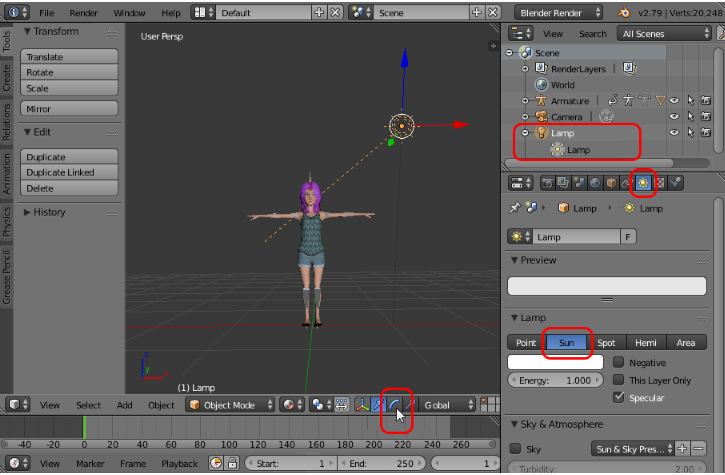
From the Outliner, open the ‘Armature’ tree and select the item you want to fine tune. You can also click on the item directly on your model.
Using the toolbox below, you can change the materials and texture of each body part as desired. We’ve included an example below that changes our avatar’s eyelashes. You can follow similar steps for other avatar items.
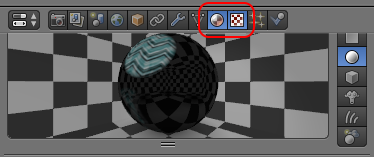
Note
To remove a metallic feel to your avatar in High Fidelity, we recommend changing the default Specular Intensity for each of the main body parts from 0.500 to 0.000.
When you’re done changing your materials and textures, go to File > Export > FBX (.fbx).
Change the ‘Path Mode’ to ‘Copy’, then click the ‘Embed Textures’ icon. This makes sure that all of the textures are embedded into your model.
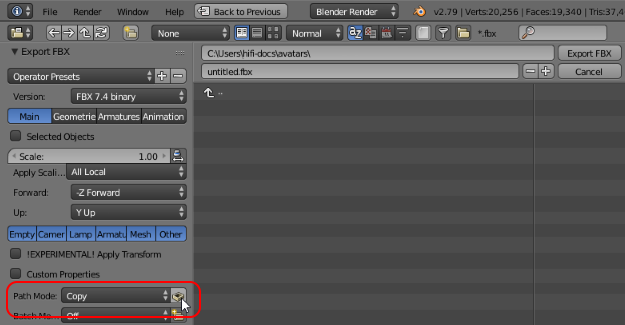
Give your avatar a unique name.
Click the ‘Export FBX’ button.
Now, you are ready to bring your avatar into High Fidelity.
Example: Update Eyelashes from an Image
- Save this texture to a directory where you will remember.
- From the Outliner, open the ‘Armature’ tree and select ‘Eyelashes’.
- In the Toolbox below, click the ‘Materials’ icon.

- Click the ‘+’ button next to the material list to create a new material slot.
- Click ‘+ New’ to add a new material.
- Rename the new material to ‘lashes’.
- At the bottom of the Blender window, switch to ‘Edit Mode’.
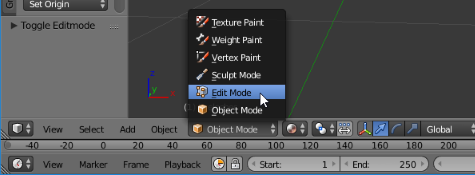
- Under the material list, click ‘Assign’.
- Scroll to the ‘Transparency’ section. Check the Transparency box and change the ‘Alpha’ value to
0.00.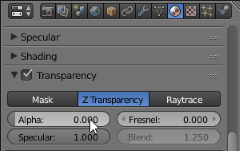
- Scroll to the ‘Specular’ section. Set the specular color to black.
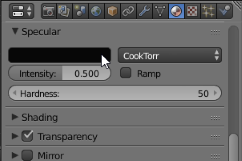
- Change to the ‘Textures’ view.

- Click ‘+ New’ to add a new texture.
- Scroll to the Image section. Click ‘Open’ and find the lashes texture named ‘mixamo_eyelashes’ you previously downloaded. Click ‘Open Image’.
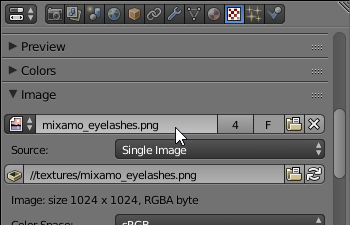
- Check the ‘Alpha’ options in the following sections: Image, Preview, Texture, Influence
- Go to File > External Data > Pack All Into .blend. This will include the texture in your model.
See Also
Tutorial: Add a Scattering Effect
Subsurface Scattering (SSS) is the diffuse reflection caused by light entering a material, being absorbed, scattered, and eventually exiting the material. It’s critical for surfaces like paper, marble, wax, and realistic skin. You can add this effect to your avatar in High Fidelity.
On This Page
Subsurface Scattering Map and Value
Subsurface scattering (SSS) is noticeable when light passes through a thin translucent object like an avatar’s skin. It causes the diffusion of light within the shallow top layer of skin.
Scattering is composed of a “scattering value” and a “scattering map”. By setting the scattering value and map, you can influence how light scatters on the geometry of an avatar.
- The scattering value is a
[0,1]number which sets the amount of scatter. - The scattering map is gray scale image that masks the areas of scatter. It is based on the avatar’s UV map.
Add Scattering to an Avatar
You can easily add scattering to an avatar by adding the value and map to the avatar’s FST file.
- Create a custom avatar and package it using the Avatar Packager.
- Create a scattering map for the subsurface scattering in Adobe Photoshop or its equivalent.
- Open your avatar’s FST file in a text editor of your choice.
- Add scattering information to the avatar’s FST file. For example:
materialMap = { "body_mat": { "scattering": 1.0, "scatteringMap" : "" } }
- Wear the avatar to observe the scattering effects in High Fidelity.
Here’s an example of the scattering effect. The left image has no scattering and the right image has scattering. You can see the red diffuse reflection along the shadow line.
| No Scattering | Scattering |

|
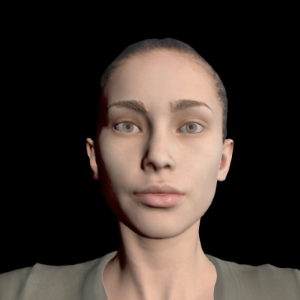
|
Here are the scattering skin maps for this avatar.
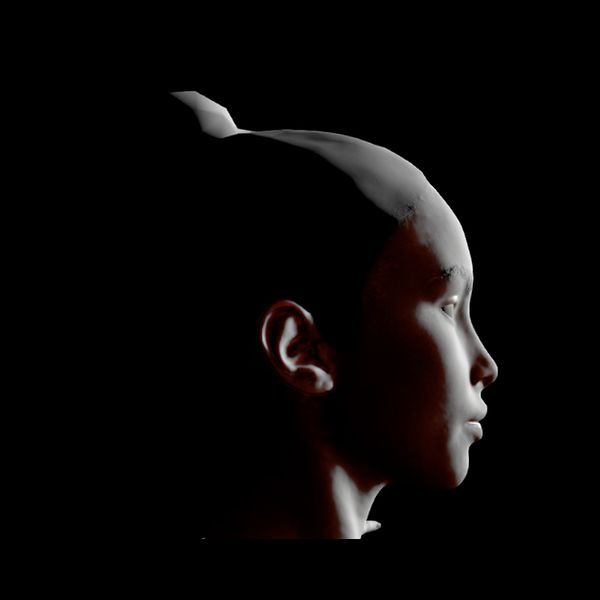
|
|
You can also check out the following avatars that have scattering effects:
See Also
Wearables
Wearables are objects that attach to your avatar. They can be hats, skirts, glasses, headphones and anything else that can accessorize your look in-world. You can express your individuality by creating wearables of your own and putting them on.
Before you can use a custom wearable, you must first host its FBX and JSON files in a place that is publicly accessible to High Fidelity. You can use any cloud platforms including Amazon S3, Google Cloud Storage, Microsoft Azure, Dropbox, etc. You can also upload your custom wearable to the Marketplace and sell it to others.
Build a Custom Wearable
Wearables are simply 3D models that are customized to fit on your avatar. Therefore, the first step in creating your wearable is to build one or find an existing model that you want to use.
There are a few different applications you can use to build and edit the 3D model for your wearable, including:
Some guidelines to follow when you’re building soft wearables like clothes:
- Your soft wearable should be designed to fit a particular type of avatar. Since avatars vary in size and structure, a soft wearable designed to fit one avatar may not fit another one as well.
- The soft wearable should be slightly larger than the avatar to avoid clipping. Clipping is when one 3D object goes through another 3D object without colliding.
- Your soft wearable’s shape should match the avatar’s.
- The soft wearable should have similar or the same weights as the avatar.
When building soft wearables like clothes, ensure that you are making it to fit the avatar well. Its mesh should match the avatar’s and have a higher weight.
When building your model, be sure to follow these guidelines to ensure that it is compatible with High Fidelity. Once you’re done editing your model, export the file as an FBX or OBJ file. You’ve now created your own custom model!
After hosting your wearable in the cloud or the Marketplace, put it on and adopt your new look.
Note
If you're creating a wearable to add to the Marketplace, make sure it will fit the default wooden mannequin avatar (unless you are specifically making it to go with a very specific base avatar model). This will ensure that the wearable will work with most avatars in High Fidelity.
See Also
Entities
To build any content in High Fidelity, whether it is an object that you interact with, or a domain to host an event, you need entities. Entities are the building blocks of the virtual world, and are used to build items as simple as boxes and squares to complex animated items such as butterflies and stereo equipment. Each entity type has its own set of properties that define its appearance and behavior.
In This Section:
Create New Entities
We are continually surprised by the ingenuity and creativity of the content creators in our community. You too can join this community by creating new entities. The easiest way to start building is to use High Fidelity’s Create app.
Note
You can only use the Create app in domains where you have the permission to build.
To add a new entity to your domain:
- In Interface, pull up your tablet or HUD and go to Create.
- In the Create app, select the type of entity you want to create.
- Depending on the entity type, the behavior will be different:
- For model and material entities, enter the URL that you want to import.
- For all other entities, an entity with the default settings will appear in front of your avatar.
- Edit the properties of your entity so that it looks and behaves like you want it to.
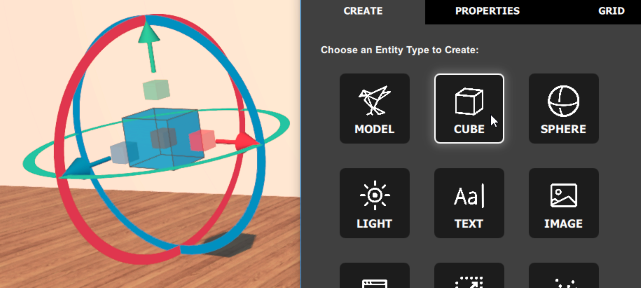
Types of Entities
You can choose from the following entity types:
- MODEL entities are 3D models that you can import in-world.
- CUBE entities are used to create basic box shaped entities.
- SPHERE entities are used to create basic sphere shaped entities.
- LIGHT entities are balls or beams of light that are used to add local lighting effects and spotlights to an area.
- TEXT entities display text against a flat plane, similar to a whiteboard or blackboard.
- IMAGE entities display an image from a specified URL.
- WEB entities display a web page from a specified URL. Only 20 web entities can run at the same time in a domain.
- ZONE entities are 3-dimensional areas that allow you to create a custom lighting environment.
- PARTICLE entities create dynamic effects that are made of many small parts, such as smoke clouds or falling water.
- MATERIAL entities modify the existing materials on other entities and avatars.
See Also
Change How Entities Look
You can edit an entity’s size, color, position and rotation using your mouse or trackpad. To edit an entity, open the Create app and either select the entity or find it in the Entity List.
Note
You can select and edit multiple entities at once. The behavior will be different based on the type of property you’d like to set:
- Numbers: When using the slider, an offset will be applied to each of the original values. When typed in, the new value will replace the original values for the selected entities.
- All other field types (checkboxes, input fields, etc): The new value will replace the original values for the selected entities.
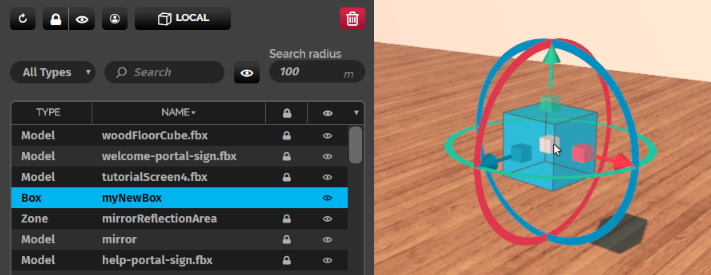
On This Page
Change the Color of an Entity
You can manually change the color of most entity types in the Create app. With the entity selected, click on ‘Properties’ and scroll down to the ‘Color’ settings. Here are the different color settings you can configure:
| Setting | Description | Supported Entity Type(s) |
|---|---|---|
| Color | The color of an entity. | Cube, Sphere |
| Light Color | The color of the light. | Light |
| Text Color | The color of the text. | Text |
| Background Color | The color of the background of the text. | Text |
| Key Light | The color of the lighting in the zone. Select ‘Inherit’ to keep the lighting of the domain, or ‘Off’ to remove all lighting. | Zone |
| Sky Box | The color of the ceiling in the zone. Select ‘Inherit’ to keep the color of the domain, or ‘Off’ to remove all color. | Zone |
| Ambient Light | Configures the amount of ambient light in the zone. Ambient light reflects on content within your zone. | Zone |
| Haze > Haze Color | When Haze is turned on, the color of the haze in the zone. | Zone |
| Haze > Glare Color | When Haze is turned on, the color of the glare based on the key light. | Zone |
| Bloom | Configures how much the bright areas of the scene glow. | Zone |
| Color > Color | As the particle moves, sets the color of the particle at the start, middle, and finish. | Particle |
| Color > Color Spread | The spread of color that each particle is given, resulting in a variety of colors. | Particle |
Set the Size of an Entity
For cube, sphere, text, image and web entities, you can change its size directly in your environment by selecting and dragging the small boxes inside the object.

For all entities, you can also set the size manually in the Create app. With the entity selected, click on ‘Properties’ and scroll down to the ‘Size’ settings. Here are the different size settings you can configure:
| Setting | Description | Supported Entity Type(s) |
|---|---|---|
| Spatial > Local Dimensions | The size of the entity. If the entity is parented to an avatar, this value remains the original dimensions value while the avatar scale changes. | All |
| Spatial > Dimensions | The size of the entity. If the entity is parented to an avatar, this value will change if the avatar scale changes | All |
| Spatial > Scale | Sets the size of the entity as a percentage of its original size. | All |
| Fall-Off Radius | The distance from the light’s center where the intensity is reduced. | Light |
| Spotlight Cut-Off | Affects the size of the spotlight’s beam; the higher the value, the larger the beam. | Light |
| Line Height | The height of each line of text. | Text |
| Emit > Dimensions | The outer limit radius that particles can be emitted from. | Particle |
| Emit > Radius Start | The inner limit radius that particles can start emitting from. | Particle |
| Size > Size | The size of each individual particle in the entity. | Particle |
| Size > Size Spread | How far apart a particle is from other particles. | Particle |
Rotate an Entity
All entities can be rotated directly in your environment by selecting and dragging the circles around the object.

You can also set the rotation manually in the Create app. With the entity selected, click on ‘Properties’ and scroll down to the ‘Rotation’ settings. Here are the different rotation settings you can configure:
| Setting | Description | Supported Entity Type(s) |
|---|---|---|
| Spatial > Local Rotation | The orientation of the entity relative to its parent. | All |
| Spatial > Rotation | The orientation of the entity with respect to world coordinates. | All |
Note
You can switch between ‘Local’ and ‘World’ using the keyboard shortcut T.
Move an Entity
All entities can be moved directly in your environment by selecting and dragging the object to the correct location. Alternatively, you can use the arrows around the object to move it in only one direction.
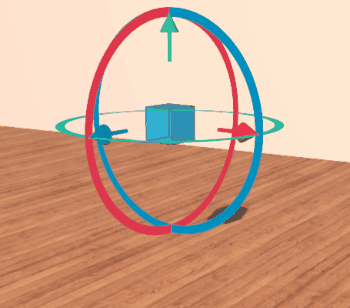
You can also set the position manually in the Create app. With the entity selected, click on ‘Properties’ and scroll down to the ‘Position’ settings. Here are the different position settings you can configure:
| Setting | Description | Supported Entity Type(s) |
|---|---|---|
| Spatial > Local Position | The position of the entity relative to its parent. | All |
| Spatial > Position | The position of the entity with respect to world coordinates. | All |
Note
You can switch between ‘Local’ and ‘World’ using the keyboard shortcut T.
See Also
Define an Entity’s Behavior
An entity’s behavior controls its interactions with other entities and avatars in High Fidelity. Can an entity be grabbed, does it collide with other entities and avatars, or can a change in the domain’s gravity affect it? You can check and change an entity’s behavior by editing its properties.
Note
You can select and edit multiple entities at once. The behavior will be different based on the type of property you’d like to set:
- Numbers: When using the slider, an offset will be applied to each of the original values. When typed in, the new value will replace the original values for the selected entities.
- All other field types (checkboxes, input fields, etc): The new value will replace the original values for the selected entities.
On This Page
Set an Entity to Respond to Physics
If you want an entity to respond to physics or other entities and avatars, you need to make it dynamic. This allows a box to respond to gravity or a ball to bounce when it hits the floor. If an entity is not dynamic, it is static and has no gravity and no velocity. It can only be moved by a user.
To make an entity dynamic:
- In Interface, pull up your HUD or Tablet and go to Create.
- Select your entity on the ‘Entity List’ window or just click on it.
- Go to the ‘Properties’ tab, scroll down to ‘Collision’ and check ‘Dynamic’.
Set Entity Behavior on Collision
When an entity has no collision properties, it moves through other entities and avatars like it’s not a solid object. For an entity to collide when it comes in contact with another entity or avatar, its collision properties need to be changed. With the entity selected, click on ‘Properties’ and scroll down to the ‘Collision’ settings.
Here are the different collision settings you can configure:
| Collides With | Description |
|---|---|
| Static Entities | Your entity will collide with static entities. Keep in mind that if your entity is a static entity, it will not collide with another static entity. Only a dynamic entity can collide with a static entity. |
| Kinematic Entities | Your entity will collide with kinematic entities. Kinematic entities have velocity, but are not dynamic. Their behavior is controlled by an external script. |
| Dynamic Entities | Your entity will collide with other dynamic entities. |
| My avatar | Your entity will collide with your avatar. |
| Other avatars | Your entity will collide with other user’s avatars. |
| Collision Sound | You can make your entity emit a sound whenever it collides with other entities. |
Make an Entity Grabbable
Your entity’s grab properties determine how it behaves when you or another user interacts with it. By default, ‘Grabbable’ and ‘Follow Controller’ are checked.
Here are the different grab settings you can configure:
| Behavior | Description |
|---|---|
| Grabbable | You or other users can grab this entity. |
| Follow Controller | Your entity will follow the movements of your hand controller instead of your avatar’s hands. If your avatar’s arms are shorter than your real arms, your entity will be grabbed where the controller is (at a distance from your avatar’s hands). |
Set an Entity to Trigger Scripts
If you want your entity to trigger a script when you, other users, or other entities come in contact with it, you can do so by editing its properties.
Here are the different trigger settings you can configure:
| Behavior | Description |
|---|---|
| Triggerable | Your entity can trigger a script. For instance, you can trigger a cube entity to run a script asking for a tip every time you click it. |
Make an Entity Cloneable
You can clone your entity to create other entities with the same properties as yours. While creating clones, you can set how long they’ll exist, how many clones you can create, how the clone responds to physics, and if the clone is an avatar entity.
Here are the different clone settings you can configure:
| Behavior | Description |
|---|---|
| Cloneable | Your entity can be cloned. You can change the ‘Clone’ settings to manipulate your cloned entity’s behavior. |
| Cloneable > Clone Lifetime | Select this option to set how long (in seconds) your clone will exist. |
Cloneable > Clone Limit |
Select to set a limit to how many clones you can create. If you don’t want to have a limit, set the value to 0 . |
| Cloneable > Clone Dynamic | Select to make the clone entity a dynamic entity. |
| Cloneable > Clone Avatar Entity | Select to specify if a cloned entity is created as an avatar entity. An avatar entity doesn’t exist in the Entity Server. Instead, it is specific to a user’s Interface client. For instance, say a user comes to visit the coffee shop in your domain. The user grabs a coffee cup that’s been cloned. Once the user is done visiting, the cloned entity leaves with their avatar, ensuring there isn’t any clutter left behind. This feature ensures that your entity is cloned locally for each avatar. |
Note
A user does not need create permissions to clone an entity or edit an unlocked entity.
To make entities cloneable in your domain (this can only be done with unlocked entities):
- In Interface, pull up your HUD or Tablet and go to Create.
- Select the entity of your choice in the ‘Entity List’ window.
- Go to the ‘Properties’ tab, scroll down, and check ‘Cloneable’.
Keep in mind that any user can now clone the entities that are cloneable. If you don’t want any users to clone your entity or any entities in your domain, you can do one of the following:
- Lock any entities you don’t want cloned, then restrict user ‘Lock’ permissions to the users of your choice.
- Set entity filters to prevent users from editing entities in your domain.
Set an Entity to Cast a Shadow
You can make your entity behave like a real world object by making it cast a shadow on other entities and avatars. In High Fidelity, entities cast shadows only from the key light, not from the light entities. The key light is a parallel source of light, like the sun.
Here are the different shadow settings you can configure:
| Behavior | Description |
|---|---|
| Cast Shadow | Your entity will cast a shadow on other objects and avatars. |
See Also
Apply Physics to Entities
Your High Fidelity VR experience is made realistic with the help of a physics engine. High Fidelity uses this engine to simulate an object’s behavior according to the Newtonian laws of physics. For example, if you hit a ball with a bat in High Fidelity, the physics engine computes these movements and makes the ball spin away from the bat after collision. You can modify an entity’s physics behavior using the Create app.
Note
You can select and edit multiple entities at once. The behavior will be different based on the type of property you'd like to set:
- Numbers: When using the slider, an offset will be applied to each of the original values. When typed in, the new value will replace the original values for the selected entities.
- All other field types (checkboxes, input fields, etc): The new value will replace the original values for the selected entities.
On This Page:
- Apply Physics to an Entity
- Change an Entity’s Velocity
- Set How a Moving Entity Slows Down
- Set an Entity’s Friction and Bounciness
- Set an Entity’s Density
- Set How an Entity Moves in a Gravitational Field
Apply Physics to an Entity
To apply physics properties to an entity:
- In Interface, pull up your HUD or Tablet and go to Create.
- Select or add any entity of your choice.
- In the ‘Properties’ tab, scroll down to the Physics section. When you first create an entity, the physics properties are set to the default values you can see in the image below.
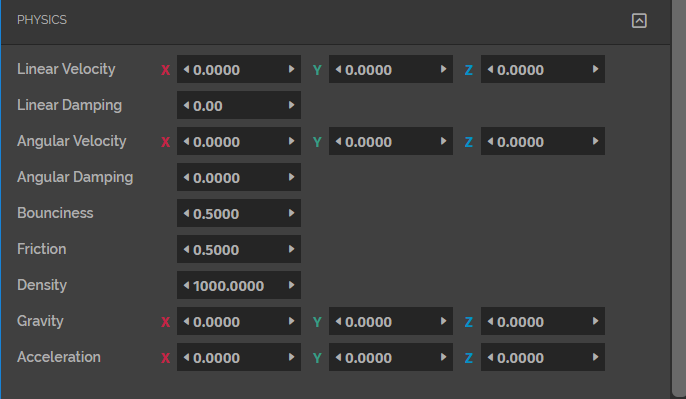
Change an Entity’s Velocity
Velocity is the speed of an object in a certain direction. All entities that have a position and orientation in High Fidelity will have linear and angular velocity. These velocities might be zero, but they still exist.
Type: 3D Vector
Unit: meters/second
Default Value: (0,0,0)
You can choose to make an entity move in a specified direction by changing its linear velocity. The direction is determined using the x, y, or z coordinates in a 3D Cartesian coordinate system. The 3D Cartesian coordinate system helps you determine the position of your entity in space. Every time your entity moves, its x, y, and z coordinates change to show you the new position. To change an entity’s linear velocity:
- In the ‘Properties’ tab, scroll down to ‘Linear Velocity’ property. The default value is
0.0000. - Say you want to move a cube entity upwards in a straight line. Change the Y value for linear velocity to
0.1000and see your cube start moving. - If you want your cube to change direction, change the x and z values to
0.1000.
Type: 3D Vector
Unit: radians/second
Default Value: (0,0,0)
Angular velocity is the speed at which an object is rotating in a certain direction. It is measured in radians/second. To change an entity’s angular velocity:
- In the ‘Properties’ tab, scroll down to the ‘Angular Velocity’ property. The default value is
0.0000. - Change the X value to see your cube entity start rotating around an axis.
- If you want your cube entity to change its angular velocity direction, change the Y and Z values.
Set How a Moving Entity Slows Down
Type: Scalar
Range: 0 - 1
Default Value: 0.00
In High Fidelity, damping represents how much of an entity’s linear or angular velocity is lost over time. All moving objects we see in the real world experience some friction with air, reducing their velocities over time. Damping is used to approximate this effect of the real world in High Fidelity. So if the damping of an object is 0.00, it will not lose any velocity and it will not slow down. If the damping of an object is 1.00, it will lose all its velocity and stop immediately. If you want to throw a ball and have it slow down over time, you can add a damping value to do so.
To set the linear damping of an object:
- In the ‘Properties’ tab, scroll down to the ‘Linear Damping’ property. The default value is
0.00. - Change the linear velocity of a cube to any value.
- Change the ‘Linear Damping’ value to
1.00to make the cube stop moving. You can change this value to anything between0.00and1.00to make an entity slow down over time.
To set the angular damping of an object:
- In the ‘Properties’ tab, scroll down to the ‘Angular Damping’ property. The default value is
0.00. - Change the angular velocity of a cube to any value.
- Change the ‘Angular Damping’ value to
1.00to make the cube stop moving. You can change this value to anything between0.00and1.00to make an entity slow down over time.
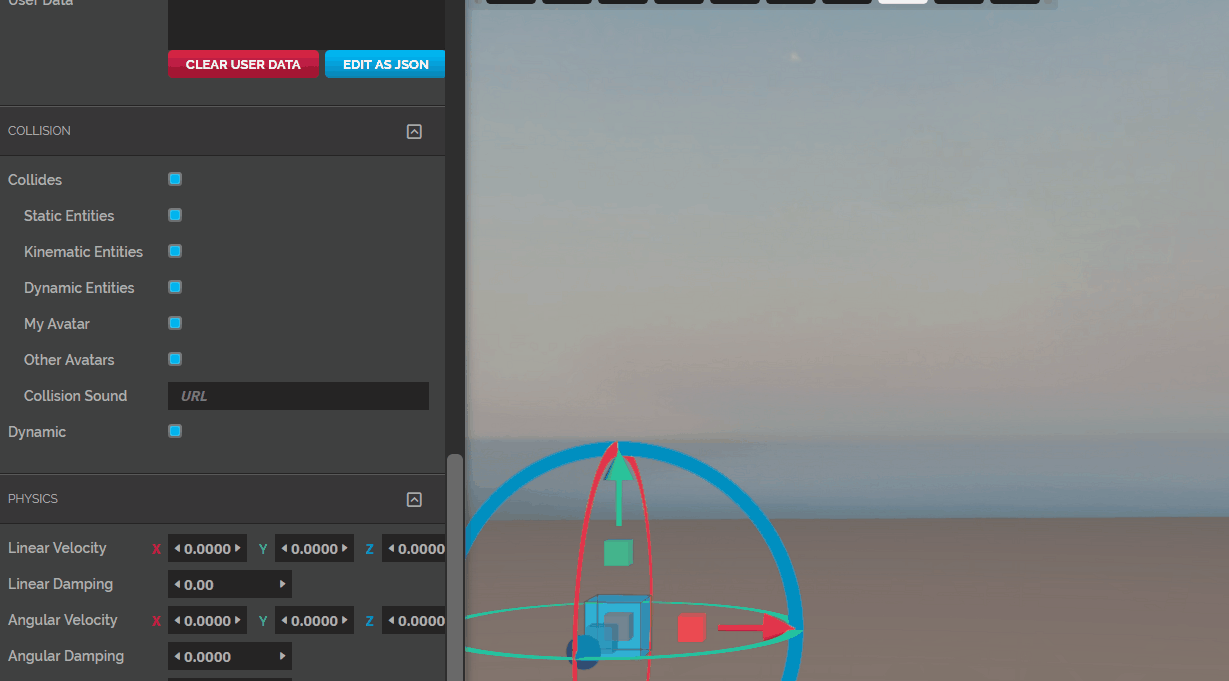
Set an Entity’s Friction and Bounciness
Range: 0 - 1
Default Value: 0.5000
When a dynamic entity collides with another entity, it can react in a number of ways depending on its physics properties. The values you set for friction and bounciness determine this reaction. By default, both values are 0.5000.
Friction is a measure of how slippery an object is. When an entity with low friction collides against another object, it will slide a good distance before coming to a stop. On the other hand, an entity with high friction will slow down much faster. To set the friction of an entity:
- In the ‘Properties’ tab, scroll down to the ‘Friction’ property.
- Change the value to anything between
0.0000and1.0000. An entity with a friction of0.0000will be very slippery, while an entity with a friction of1.0000will have a coarse or sticky surface.
Bounciness is the energy an entity conserves during collision. For example, a ball will conserve more energy and bounce more than a heavy cube. To set the bounciness:
- In the ‘Properties’ tab, scroll down to the ‘Bounciness’ property.
- Change the value to anything between
0.0000and1.0000. An entity with a bounciness of0.0000will conserve no energy, while an entity with a bounciness of1.0000will conserve all of its energy.
Set an Entity’s Density
Type: Scalar
Unit: kg/meter3
Range: 100 - 10000
Default Value: 1000.0000
An entity’s density is the ratio of its mass to its volume. For example, an entity with low density is made of light materials such as wood, while an entity with high density is made of dense materials such as iron.
In High Fidelity, the maximum (10000) and minimum (100) values of density were chosen for stability. It’s difficult to perform stable physics calculations between objects of very disparate masses (such as a light feather and an iron ball). To help keep the environment stable, we picked conservative density limits.
To change this value, scroll down to the ‘Density’ property in the ‘Properties’ tab. Change it to the value of your choice.
Set How an Entity Moves in a Gravitational Field
Type: 3D Vector
Unit: meters/second2
Default Value: (0,0,0)
In the Create app, ‘Gravity’ is the acceleration of the entity, as if it were in a uniform gravitational field. This property controls how an entity behaves when you change the gravity of a domain. For example, if a ball is floating in zero gravity, it will float downwards when you increase gravity downwards.
To change this value, scroll down to the ‘Gravity’ property in the ‘Properties’ tab. Change it to the value of your choice.
See Also
Add a Material Entity
You can add a material entity to an object in your domain. A material entity contains specific material data that determines the texture and shading of an object. For example, if you want to create a castle in your domain, you need your walls to look like they’re made of rough gray stone. You can do this by adding a castle wall material entity to your walls.
Before adding a material entity, make sure you have created a material using the PBR Materials Guide.
On This Page:
Generate a Material Entity
To add a material to your object in High Fidelity, you need to specify the material data in a JSON file or add the material directly into the Create app.
Note
We are aware of the difficulties involved in converting your material data to a JSON file and are working on making the process easier for our users. In the meantime, we recommend embedding your material data in your models as FBX files if you are facing difficulties generating a JSON file.
This is what the JSON file for a sample castle wall material looks like:
{
  "materialVersion": 1,
  "materials": [
    {
      "name": "CastleWall",
      "model": "hifi_pbr",
      "albedo": [1, 1, 1],
      "albedoMap": "https://hifi-public.s3.amazonaws.com/sam/MaterialExportGuide/MaterialEntities/MatOne/CastleWall/CastleWall_Base_Color.png",
      "roughnessMap": "https://hifi-public.s3.amazonaws.com/sam/MaterialExportGuide/MaterialEntities/MatOne/CastleWall/CCastleWall_Roughness.png",
      "normalMap": "https://hifi-public.s3.amazonaws.com/sam/MaterialExportGuide/MaterialEntities/MatOne/CastleWall/CastleWall_Normal.png"
    }
  ]
}
This file contains all related material data, such as the color, roughness, and other texture and shading information. Note that you can edit this information programmatically with the Material EntityType in our API, and define its properties using EntityProperties-Material.
Add a Material Entity
Note
At this time, we have no way to automatically generate a JSON file with another tool, and you will need to write your own JSON file.
Once you have your material entity JSON file, you can add it to an object in High Fidelity. Let’s add the castle wall material to a box entity in your domain.
- In Interface, pull up your HUD or Tablet and go to Create.
- Create a wall. Click the ‘Cube’ icon to add a box entity and change the dimensions to make it resemble a wall.
- Go to the Create tab and click on the ‘Material’ icon to add a material entity. Enter the material’s JSON file URL when prompted. You will see the material entity represented as a small sphere.
- Click and select the wall. Go to the ‘Properties’ tab and copy the parent ID under the ‘Name’ box.
- Click and select the material entity. Go to the ‘Properties’ tab and paste the copied parent ID in the ‘Parent’ box. You will see the material applied to the wall. In this step, you are parenting or applying a material to an entity.
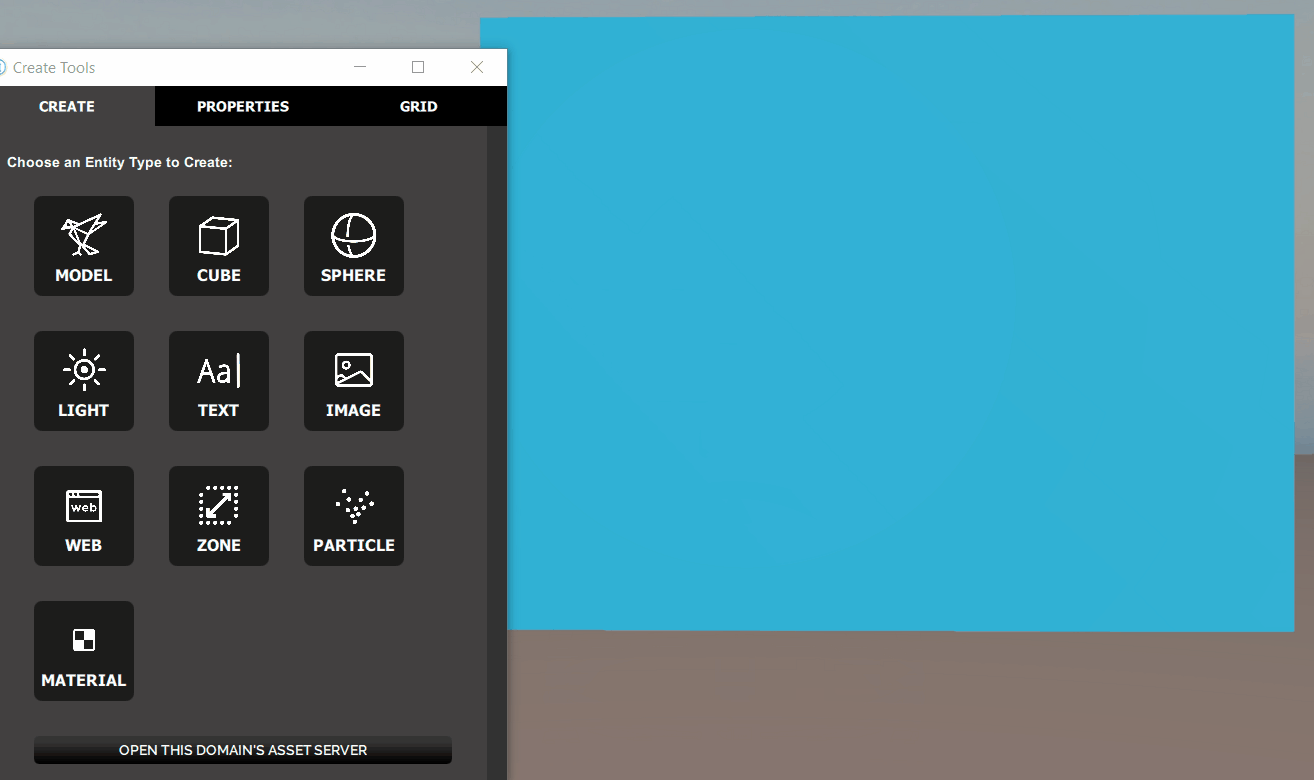
To add a material entity directly into the Create Tools app:
- In Interface, pull up your HUD or Tablet and go to Create.
- Create a wall. Click the ‘Cube’ icon to add a box entity and change the dimensions to make it resemble a wall.
- Go to the Create tab and click on the ‘Material’ icon to add a material entity.
- Enter
materialDatawhen you’re prompted for a ‘Material URL’. - Click and select the wall. Go to the ‘Properties’ tab and copy the parent ID under the ‘Name’ box.
- Click and select the material entity. Go to the ‘Properties’ tab and paste the copied parent ID in the ‘Parent’ box. In this step, you are parenting or applying a material to an entity.
- Scroll down to the ‘Material Data’ field. Click ‘Clear Material Data’ and then paste the following JSON data:
  {
    "materialVersion": 1,
    "materials": [
    {
      "name": "CastleWall",
      "model": "hifi_pbr",
      "albedo": [1, 1, 1],
      "albedoMap": "https://hifi-public.s3.amazonaws.com/sam/MaterialExportGuide/MaterialEntities/MatOne/CastleWall/CastleWall_Base_Color.png",
      "roughnessMap": "https://hifi-public.s3.amazonaws.com/sam/MaterialExportGuide/MaterialEntities/MatOne/CastleWall/CCastleWall_Roughness.png",
      "normalMap": "https://hifi-public.s3.amazonaws.com/sam/MaterialExportGuide/MaterialEntities/MatOne/CastleWall/CastleWall_Normal.png"
    }
    ]
  }

See Also
Add Sound to Entities
Entities have the ability to add a collision sound, so that the entity will emit a sound every time it comes in contact, or collides, with another entity.
To add a sound:
- In Interface, pull up your Tablet or HUD and go to Create.
- Select the entity.
- In the Create app, click on ‘Properties’ and scroll down to the ‘Collision’ settings.
- Check the box for ‘Collides’, then enter the URL of the audio file for ‘Collision Sound’.
Tutorial: Create a Bouncing Ball
In this example, we will walk through the steps to create a bouncing ball that emits a sound every time it hits a wall.
- Create a wall to bounce your ball off of:
- Add a cube entity to your domain.
- Resize the entity to approximately 10m wide, 10m high and 1m deep (X:10, Y:10, Z:1).
- Create a ball by adding a sphere entity to your domain. Optionally, change the color of your ball, so that it is different than your wall.
- In the Create app, click on ‘Properties’ and scroll down to the ‘Collision’ settings. Check the box for ‘Collides’ and ‘Dynamic’.
- For ‘Collision Sound’, enter the URL of your sound file. The sound must be a .wav file, uncompressed, 48Khz, 16 bit. The URL can be either a web address, or an ATP reference to the assets on this domain server.
- Scroll down to the ‘Physics’ settings. Set the ‘Gravity’ for Y to -5. This will cause your ball to fall a little more slowly than things on earth (use -9.8 if you want that). Gravity is in units of m/s2.
As soon as you click off the ball, the gravity will cause the ball to fall downwards. When it hits the floor, it should stop or bounce a little and the sound should play.
See Also
Define Interactions with Avatars
In real life, you interact with objects on a daily basis. In High Fidelity, your avatar can also interact with objects (entities) in the metaverse. There are a number of ways you can define the interactions you have with objects: you can write scripts to change the properties of an entity. You can create entities that are unique to your avatar (we call these “avatar entities”). And don’t forget that you can set an entity’s behavior and collision properties, so that objects are grabbable, triggerable, or dynamic.
On This Page:
Control Interactions with Entities using Scripts
When your avatar comes in contact with an entity, you can control its interactions with the entity using simple scripts.
An interaction between an avatar and an entity occurs when the avatar comes in contact with an entity’s bounding box. The bounding box (or bounds) is the frame that is around the outside of the entity. In the case of a cube, the bounds are the exact size and shape as the entity. However, in the case of more complex objects, the bounds might be larger than the actual mesh model.
There are two methods you can use to script these interactions. Entities.enterEntity() occurs when the avatar contacts the bounding box, not the model itself. Similarly, Entities.leaveEntity() occurs when the avatar exits the bounding box.
The following example walks you through the process of creating a simple entity, and scripting an interaction between the entity and your avatar. When your avatar comes in contact with the box, the box will change color. When your avatar moves away, the box will return to its original color.
The following script changes the color of the cube as you approach (yellow) or leave (pink) its bounding box. Save it to a file called
interactions-example.js.(function(){ this.enterEntity = function(entityID) { Entities.editEntity(entityID, { color: { red: 255, green: 64, blue: 64 }, }); }; this.leaveEntity = function(entityID) { Entities.editEntity(entityID, { color: { red: 255, green: 190, blue: 20} }); }; });
In the Create app, click on ‘Properties’ and scroll down to the ‘Script’ settings. Enter the path and file name to
interactions-example.jsthat you created above. Press ‘Enter’.
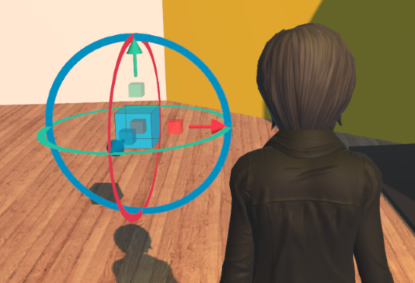
A full range of entity parameters are controllable with these functions. Entities can be used as invisible sensors or expanded to cover an entire building with the functions running while you are inside, and stop when you walk out.
Create Avatar Entities
Your avatar will also interact with avatar entities. Avatar entities are entities that are attached to your avatar, and unlike domain entities, they travel with your avatar when you go to other domains. Examples of avatar entities include wearables such as glasses or hats.
Avatar entities live on the Avatar Mixer, so they are connected to (and move with) your avatar. We’ve listed the ways you can create avatar entities with some examples:
Create a wearable: All wearables are avatar entities.
Clone as an avatar entity: When you clone an entity as an avatar entity, you make a copy of the entity and attach it to your avatar. Every copy of that entity will now leave with the avatar when they leave the domain. For example, if you have a coffee shop in your domain, you can set all coffee cups to be cloned as avatar entities. Any user who clones a coffee cup will take the avatar entity with them when they exit the domain. You can keep your domain free of clutter using this property.
Add an avatar entity using a script: You can add an avatar entity using scripts. For example, you can create a script to have a pet (avatar entity) follow you around as you explore High Fidelity.
This example script adds a cube as an avatar entity to your domain.
var entityID = Entities.addEntity({
    type: "Box",
    position: Vec3.sum(MyAvatar.position, Quat.getFront(MyAvatar.orientation))},
    "avatar");
See Also
Prioritize Zones Within Your Domain
Whenever someone enters your domain, they must load all domain content, including avatars, models, textures and external resources that are used in the domain. Many of these resources are not optimized and can take a while to load, especially in large domains or events with lots of avatars. In these situations, you can prioritize a zone so that all avatars within that zone move smoothly to all observers. The avatars within the zone are known as “heroes”. Examples of heroes include a keynote speaker at an event or performers at a concert.
Avatar Hero Zones
All avatars in hero zones are allocated additional bandwidth, allowing them to load completely and move smoothly within the zone. You can set the amount of bandwidth that is dedicated to your hero zones in your domain settings. Go to http://localhost:40100/settings and scroll to Avatar Mixer > Advanced Settings > Hero Bandwidth to set the bandwidth.
To create an avatar hero zone:
In Interface, pull up your HUD or Tablet and go to Create.
Click the ‘Zone’ icon to create a zone entity. You’ll see a wireframe shape showing the zone’s bounding box.
If you are unable to view the zone’s bounding box, go to Edit > Show Zones in Create mode and select the option. Your zone should now be visible.
Go to the ‘Properties’ tab. Here, we recommend that you add a name to your zone.
For ‘Avatar Priority’, choose the desired setting:
- Inherit: If the zone is nested within another zone, then it will inherit the priority of the parent zone. For single zones that are not nested, this option defaults to “Crowd”.
- Crowd: The zone will not be prioritized in any way.
- Hero: The zone will be given preferential treatment, and additional bandwidth will be given to heroes within the zone. This ensures that all avatars within the zone will load completely and move smoothly.
Like all entities, you can customize your zone by changing the lighting, size, or shape of the zone.
At any point, you can change the properties of your hero zone. These changes will take place immediately, and the zone will be updated to match your new settings.
Entity Tutorials
Walk through our online tutorials to get a deeper understanding of entities and their role in the metaverse.
Tutorial: Create a Gold Spotlight
In this tutorial, you will learn how light entities work by creating a gold spotlight that shines down a wall. A light entity behaves like a ball or a beam of light, and is used to add local lighting effects or spotlights to an area.
On This Page:
Consider getting familiar with the following concepts before starting this tutorial:
Your gold spotlight needs a surface to shine on. Create this surface or wall in the Create app:
- In Interface, pull up your HUD or Tablet and go to Create.
- Click the ‘Cube’ icon to create a cube entity.
- Go to the ‘Properties’ tab and make the following changes:
- Change the color of the cube to teal (Red = ‘0’, Green = ‘128’, Blue = ‘128’).
- Change the dimensions of the cube to make it bigger and look more like a wall. We’ve used the following local dimensions:
- X = ‘0.1300’
- Y = ‘2.4000’
- Z = ‘3.2000’
You’ve made your wall! 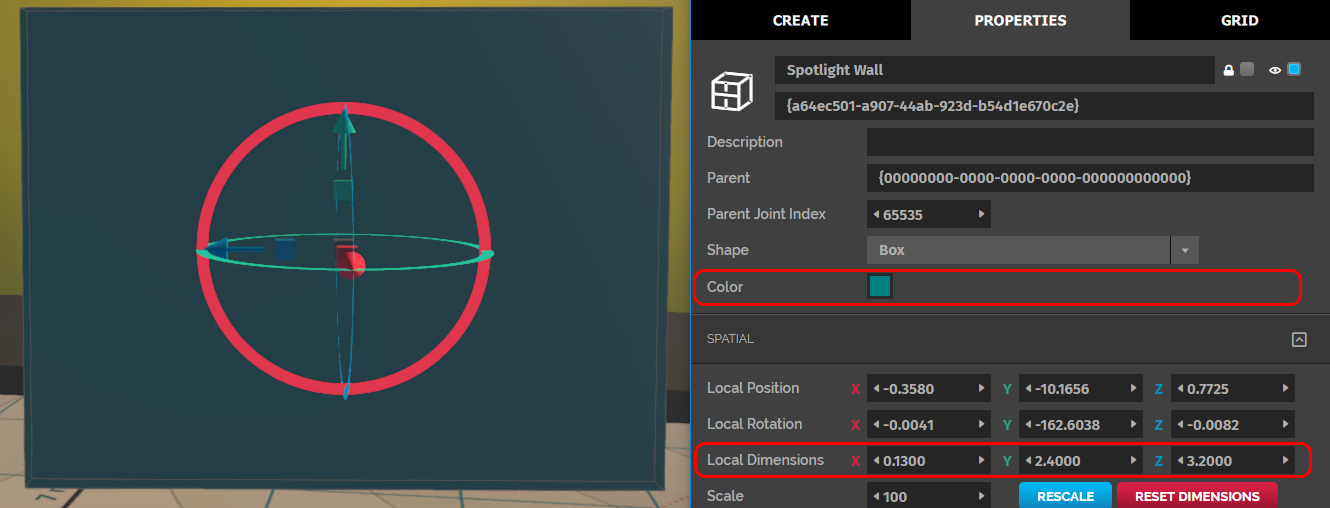
Create and edit the light entity to get a soft gold spotlight.
Note
The domain sun shines from one side, so one side of the wall is already bright. Light from the light entity won't show up on the bright side of the wall.
- In Interface, pull up your HUD or Tablet and go to Create.
- Click the ‘Light’ icon to create the light entity.
- Grab and move the entity to the top and center of the wall. You’ll notice there is a white light shining on the wall. The light is small because of low brightness. This type of light is a point light and it emanates in all directions equally. It is meant for general area lighting as it has a bright point in the middle and fades as it radiates out.
- Go to the ‘Properties’ tab and modify the light entity to make a gold spotlight:
- Change the color of the light to gold (R = ‘255’, G = ‘215’, B = ‘0’).
- You can make the light entity brighter by changing its intensity. Change the ‘Intensity’ to ‘100’. You’ll see that the light is now covering a larger area and is much brighter.
- You can modify the light entity’s ‘Fall-off Radius’ so that the it dims gradually towards the edges. The ‘Fall-off Radius’ defines the shape of the light curve of a light. A larger radius will simulate a larger light, which will “fall-off”, or dim, more gradually. It is the distance from the light at which the intensity is reduced by ‘25%’. Change this value to ‘0.5’.
- Select the ‘Spotlight’ checkbox to convert the light entity to a spotlight.
- Change the ‘Spotlight Cut-off’ to ‘50’. This property determines the radius of the spotlight. A higher cut-off value corresponds with a larger spotlight radius. You should see the beam tighten get smaller.
- Change the ‘Spotlight Exponent’ to ‘5’. This property affects the softness of the beam. You should see the edge of the beam soften.
- Rotate the spotlight so that it’s facing down the wall by changing the ‘Local Rotation’s’ X value to ‘-90.0000’. A spotlight positioned like this can be used for a soft lighting effect over paintings or wall hangings in your world.
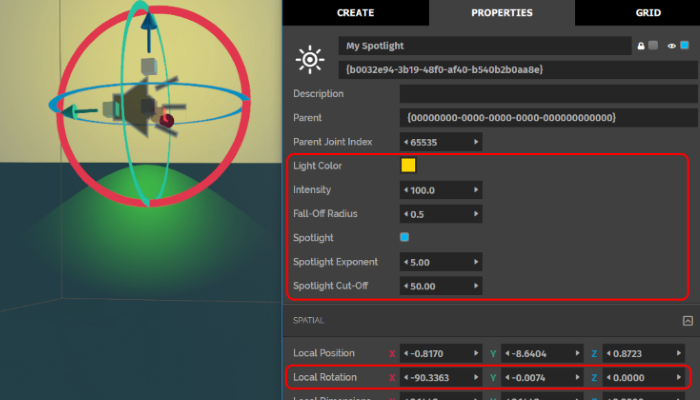
Congratulations! You’ve created a soft gold spotlight! You can experiment with different spotlight exponents, cutoff values, and intensity combinations for varied effects.
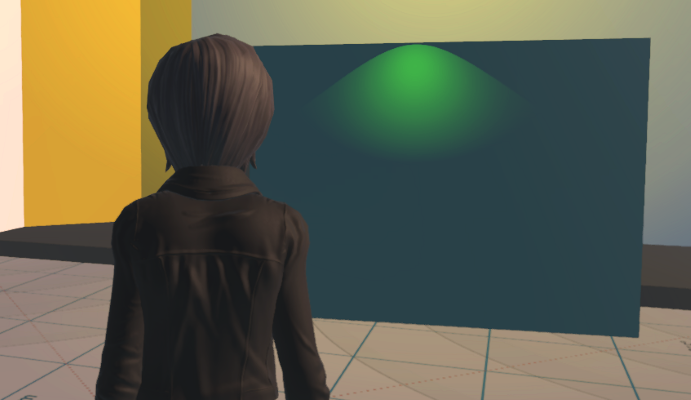
See Also
Tutorial: Create a Smoke Fountain
In this tutorial, you will learn how particle entities work by creating a smoke fountain that emits multiple colors. Particle entities are used to create effects made up of many small particles, such as smoke, confetti, or falling leaves.
Consider getting familiar with the following concepts before starting this tutorial:
Particle entities are used to create effects that are made up of smaller parts such as smoke, confetti, or falling leaves. The entity’s effect and appearance is defined by its texture. The default texture is a wispy smoke texture, but you can replace this texture with your own to create your desired effect.
To create your smoke fountain using a particle entity:
In Interface, pull up your HUD or Tablet and go to Create.
Click the ‘Particle’ icon to create the particle entity. By default, the particle entity emits smoke.
Go to the ‘Properties’ tab, and set the following values:
Property Value Description Lifespan 1.20This property defines how long each particle lives, in seconds. Max Particles 356Max particles defines how many particles are rendered at one time. Older particles, whose lifespans are completed, are swapped out for newer ones. Increase this value to increase the number of particles for your effect. Emit Rate 524The emit rate defines how many particles are emitted per second. Speed Spread 2.10This defines the range of speeds the particles will emit, which changes as per the Emit Speed. For example, if Emit Speed is 5and Speed Spread is1, the particles will have speeds that range from4to6.Emit Dimensions x = 0.60, y =10.00, z =0.30Particles are emitted from a radius. This property defines the outer limit of that radius. Size Start = 0.40, Middle =0.80, Finish =0.80This property determines the size of each particle and how it changes from emission to end of life. Here, it starts at 0.4and when its life is completed, the particle has increased in size to0.8.Color Start = #000000, Middle =#FFFFFF, Finish =#000000This determines the colors the particles will emit. Start, middle, and finish define the color spectrum to be emitted. Color Spread #FFFFFFThis determines the color spectrum of the particles. Emit Acceleration x = 0, y =-9.09, z =0This is the acceleration of each particle during its lifetime. Spin Spread 147.40The spread in spins for the particle entity. Changing this value results in a variety of spins for different particles. Horizontal Angle Start = 0, Finish =180This is the angle range in degrees at which the particles are emitted along the z axis and rotated around on the y axis. Vertical angle Start = 150, Finish =180.This is the angle range in degrees at which the particles are emitted along the x axis and rotated around on the z axis.
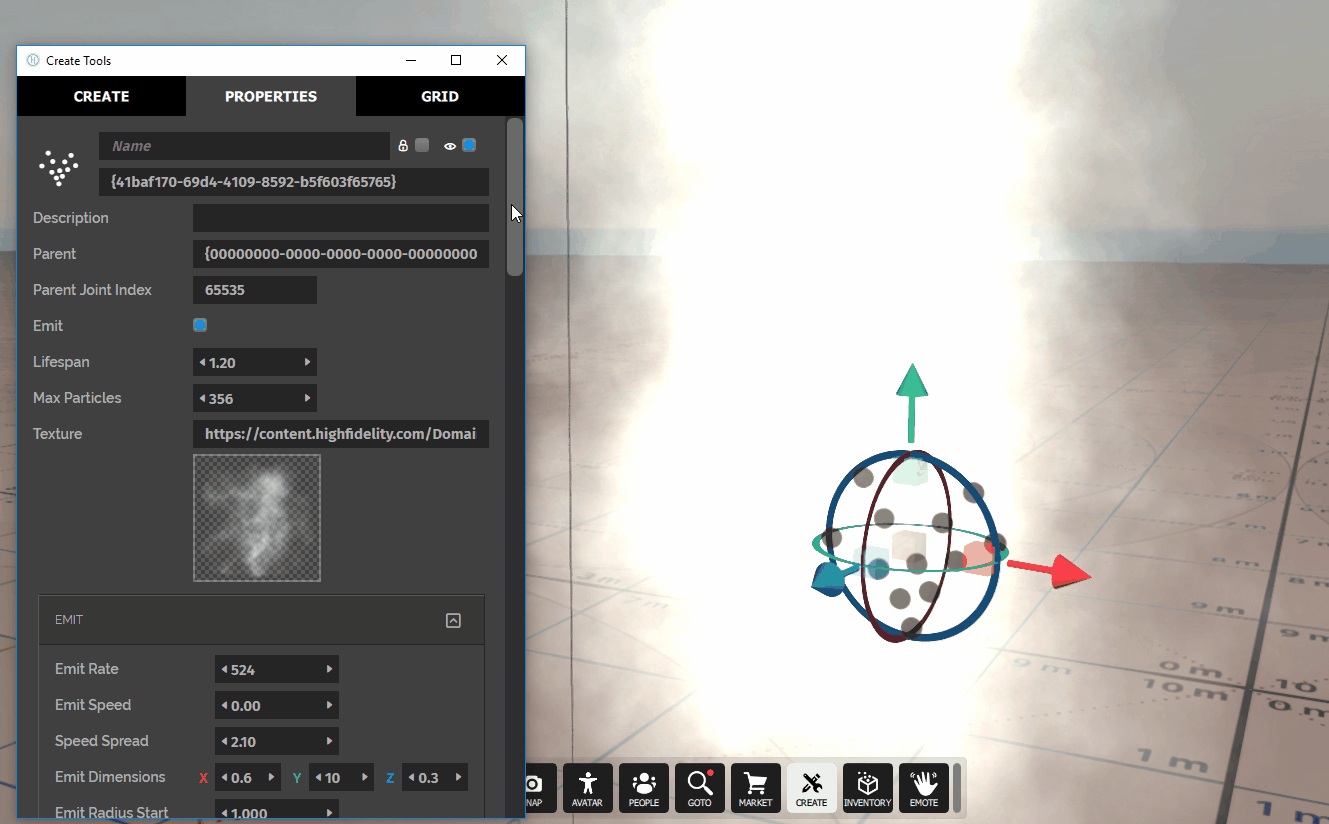
Congratulations! You’ve created a multi-colored smoke fountain! You can experiment with different settings to simulate particle movement, such as a waterfall, confetti gun, or falling leaves.
See Also
Tutorial: Modify a Zone Entity
A zone entity is a 3D area where you can create custom lighting environments. You can define zone boundaries using shapes and customize the zone’s light properties such as its intensity, direction, and color to create different effects.
The mini tutorials on this page show you how zone entities work and how you can edit their properties to create areas with different lighting effects.
On This Page:
- Prerequisites
- Create a Zone Entity
- Create Nested Zones with Different Lighting
- Change a Zone’s Shape
- Add a Skybox to a Zone
- Add Ambient Light to a Zone
Consider getting familiar with the following concepts before starting this tutorial:
To create a zone entity:
- In Interface, pull up your HUD or Tablet and go to Create.
- Click the ‘Zone’ icon to create a zone entity. You’ll see a wireframe shape showing the zone’s bounding box.
- If you are unable to view the zone’s bounding box, go to Edit > Show Zones in Create mode and select the option. Your zone should now be visible.
- Go to the ‘Properties’ tab, and add a name ‘Zone-1’ for your zone.
Each zone entity you create can have different properties. When your avatar moves through different zones, you will experience each zone’s properties. In the case of nested or overlapping zones, you will experience the properties of the smallest zone you are currently inside.
You can understand how an avatar experiences lighting in a zone using this mini tutorial:
Follow the steps to create a zone entity to create two zone entities named ‘Zone-1’ and ‘Zone-2’.
Note
By default, zone entities are created at your current position, so to see the zone entities you just created, you may need to reposition your avatar.
To nest a zone, you have to resize one zone to make it smaller than the other, and change its position to bring it inside the larger zone.
- In Interface, pull up your HUD or Tablet and go to Create.
- Select ‘Zone-1’ either from the Entity List or directly in Interface.
- In the ‘Properties’ tab, change the dimensions of ‘Zone-1’ to
x=5, y=10, z=5. - If you created both zones without moving your avatar, you don’t need to change the zone’s position. ‘Zone-1’ will already be inside ‘Zone-2’. If you moved while creating the zones, select ‘Zone-1’ and move it inside ‘Zone-2’.
When you create a zone, it inherits the properties of the zone your avatar was standing in. This means that both zones inherit the lighting properties of your domain. You won’t notice when you are entering or leaving a zone.
All lighting effects have three modes:
- Inherit: The property is inherited from the zone bounding the current zone.
- Off: The lighting effect is turned off.
- On: The lighting effect is turned on and can be changed to values of your choice.
The keylight represents a parallel source of light, such as the sun. Let’s change the keylight properties for each zone:
- In Interface, pull up your HUD or Tablet and go to Create.
- Select ‘Zone-1’ either from the Entity List or directly in Interface.
- In the ‘Properties’ tab, change the ‘Key Light’ property to ‘On’ from the drop-down.
- Click on ‘Key Light’ color, and add these RGB (
255,0,0) values to add a red key light. - Select ‘Zone-2’ either from the Entity List or directly in Interface.
- In the ‘Properties’ tab, change the ‘Key Light’ property by selecting ‘On’ from the drop-down.
- Click on ‘Key Light’ color, and add these RGB (
0,0,255) values to add a blue key light.
When your avatar walks from Zone-1 to Zone-2, you will see the lighting around change from red to blue.
By default, a zone’s shape is a cube, like its bounding box. You can change a zone’s shape to the following:
- None: This will be the default shape (cube).
- Box: The zone’s shape will be a box.
- Sphere: The zone entity’s shape will be a stretched sphere.
- Ellipsoid: The zone entity will take the shape of an ellipsoid.
- Cylinder: The zone entity’s shape will be a cylinder.
- Compound: The zone entity’s shape will be a convex mesh that is an FBX or OBJ file. These complex convex shapes must be composed of multiple shapes. We can’t check against hollowed out interior volumes. For example, if you want a zone shaped like a bowl, you’ll have to build it up from other elements. You can include elements like sides and a floor, especially if you want a user to experience the right collision properties when in the center of the bowl. Upload your FBX or OBJ file to a cloud server, copy the URL, and paste it in ‘Compound Shape URL’.
All shapes will be stretched to fit the zone entity’s dimensions.
A skybox determines the texture of the sky in your domain. The skybox can be just a color, or an image from a URL. For example, you can have a blue sky or use an image of the night sky with stars as a skybox.
To add a blue sky to your zone:
- In Interface, pull up your HUD or Tablet and go to Create.
- Select ‘Zone-1’ either from the Entity List or directly in Interface.
- In the ‘Properties’ tab, change the ‘Skybox’ property by selecting ‘On’ from the drop-down.
- Click on ‘Skybox’ color, and add these RGB (
0,0,255) values to add a blue key light.
To add an image of the night sky to your zone:
Host your image on a cloud service and copy the URL.
Create a JSON file that refers to the URL and other skybox properties.
{
   "Entities": [
       {
           "skybox": {
               "color": {
                   "blue": 255,
                   "green": 255,
                   "red": 255
               },
               "url": SKYBOX_IMG_URL
           },
           "skyboxMode": "enabled",
           "type": "Zone",
           "userData": "{\"grabbableKey\":{\"grabbable\":false}}"
       }
   ],
   "Id": ENTITY_ID,
}
Host the JSON file on a cloud service. Copy its URL.
Select ‘Zone-1’ either from the Entity List or directly in Interface.
In the ‘Properties’ tab, change the ‘Skybox’ property by selecting ‘On’ from the drop-down.
In ‘Skybox source’, add the JSON file’s URL.
You’ll see your zone’s lighting change to the image you specified in the skybox.
The ambient light in a zone is a source of light different from the key light and provides background lighting. For example, warm sunlight coming from a sunset in your domain is ambient light.
Similar to the skybox, your ambient light image can be added as a JSON file.
- Select ‘Zone-2’ either from the Entity List or directly in Interface.
- Change the ‘Ambient Intensity’ to
1.00. - In ‘Ambient Source’, add your ambient light JSON file, or click ‘Copy from Skybox’ to use the same image as the skybox.
Your zone’s ambient lighting will change to the image you’ve provided.
See Also
Tutorial: Display a YouTube Channel
In this tutorial, you will learn how web entities work by creating one displaying a YouTube channel. You can watch videos in High Fidelity using this web entity.
On This Page:
Consider getting familiar with the following concepts before starting this tutorial:
A web entity is a flat object on which you can view any website of your choosing. A web entity lets you access the internet from inside your domain.
To create a web entity:
- In Interface, pull up your HUD or Tablet and go to Create.
- Click the ‘Web’ icon to create a web entity. By default, a web entity always displays High Fidelity’s home page.
Note
Currently, only 20 web entities can run at the same time in a domain to avoid performance issues.
You can make the web entity display High Fidelity’s YouTube channel.
- In Interface, pull up your HUD or Tablet and go to Create.
- Select your web entity and go to the ‘Properties’ tab.
- Scroll down until you see the ‘Source URL’ option. Enter the High Fidelity YouTube channel URL: https://www.youtube.com/user/HighFidelityio. You should see the new page as soon as you hit ‘Enter’.
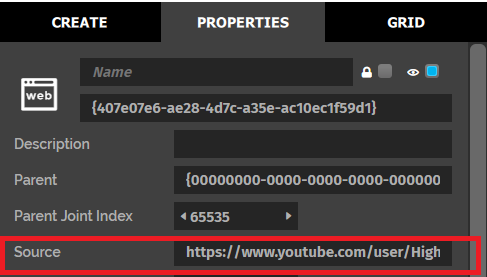
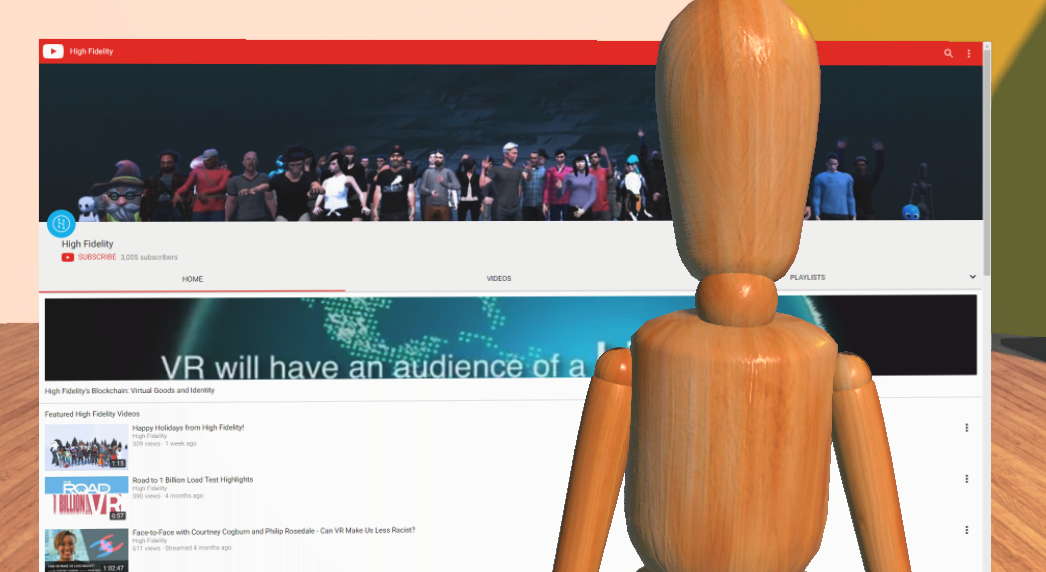
See Also
Tutorial: Create a Portal
Portals in High Fidelity transport you to the domain of your choice. You can use these portals to travel to a domain you visit frequently instead of using the GoTo app on your HUD or Tablet.
On This Page:
Consider getting familiar with the following concepts before starting this tutorial:
A portal is an entity with a script attached (entity script). This attached script defines what happens when a user comes in contact with the portal. We’ve used portal.js, the script used to teleport in High Fidelity domains. You can also write your own script to suit your needs.
The portal.js script we’ve used:
- Uses High Fidelity’s JavaScript API to determine when a user walks into the entity and the teleport destination.
- Includes a sound that will played every time a user uses the portal.
- Teleports a user to the specified destination.
Any entity you create to be used as a portal has to be collisionless so that the script can detect when you walk into the entity.
- In Interface, pull up your HUD or Tablet and go to Create.
- Create an entity to be used as a portal. This can be a 3D model or a box or sphere entity.
- Go to the ‘Properties’ tab and scroll down to ‘Behavior’.
- Next to ‘Script’, paste the script URL. In this case, it is ‘portal.js’.
- The script takes the location you want to teleport to from the ‘User Data’ field under ‘Behavior’.
- Add
hifi:// welcome(High Fidelity’s welcome domain) to the ‘User Data’ field. - Scroll down to ‘Collision’ and uncheck ‘Collides’. This is so that a user can walk into the entity and trigger the script.
- Exit Create mode and walk into the entity.
You will be teleported to High Fidelity’s welcome domain.
See Also
Tutorial: Create an Avatar Scaling Button
You can build content in High Fidelity that breaks the laws of physical boundaries by making them oversized or extremely small. To give any visiting users access to such an experience, you can add an avatar scaling button to your domain. This will help users fit into the spaces you design.
On This Page:
Consider getting familiar with the following concepts before starting this tutorial:
To define the behavior of your avatar and the button, you need to write a client entity script that:
- attaches to an entity (a button in your domain).
- shrinks or increases the size of an avatar.
- defines what happens when a user clicks on or triggers the entity.
In this tutorial, we’ve used shrink-avatar.js, an avatar scaling script used to shrink an avatar down to a tiny size. You can use this script, modify it, or write your own to suit your needs.
The shrink-avatar.js uses High Fidelity’s JavaScript API to determine when a user clicks with the mouse or triggers the entity with their hand controllers. It then scales the avatar to one-tenth its original size.
The entity you create for your button has to be triggerable so that the script can detect when you trigger or push the button with your hand controllers.
- In Interface, pull up your HUD or Tablet and go to Create.
- Create an entity to be used as a button. This can be a 3D model, cube, or sphere entity.
- Go to the ‘Properties’ tab and scroll down to ‘Behavior’.
- Next to ‘Script’, paste the script URL. In this case, it is ‘shrink-avatar.js’.
- Ensure that ‘Triggerable’ is selected.
- After you exit the Create app, test your script by clicking or triggering the button to observe your avatar scale down.
![]()
See Also
Tutorial: Open Web Page with Entities
Entities are often used to add objects to your environment. However, you can do so much more with this when you use scripting to define their behavior. In this tutorial, we will use an entity as a button to open a web page on your tablet. You can use this tutorial to do things like directing your visitors to specific Marketplace items for purchase.
On This Page:
Consider getting familiar with the following concepts before starting this tutorial:
The script used here opens a web page on the Tablet when a user clicks or triggers an entity. In this example, we’ve written a client entity script that opens the Marketplace web page when an entity/item is triggered. The script looks for the URL in the ‘User data’ property of the entity and injects the Marketplace code into the link. This allows the user who triggered the script to purchase the item without having to go to the Market app on their Tablet or HUD.
You can get the script here.
The entity you create for your button has to be triggerable so that the script can detect when you trigger or push the button with your hand controllers.
In Interface, pull up your HUD or Tablet and go to Create.
Create an entity to be used as a button. This can be a 3D model, cube, or sphere entity.
Go to the ‘Properties’ tab and scroll down to ‘Behavior’.
Paste the following JSON data into the ‘User data’ field for your entity:
{
  "url": "your_marketplace_url_in_quotes_here",
  "grabbableKey": {
    "grabbable": false,
    "triggerable": true
  }
}
Next to ‘Script’, paste the script URL. In this case, it is openTabletPageButton.js.
Scroll down and ensure that ‘Triggerable’ is selected.
After you exit the Create app, test your script by clicking or triggering the button to open the Marketplace web page for your item.
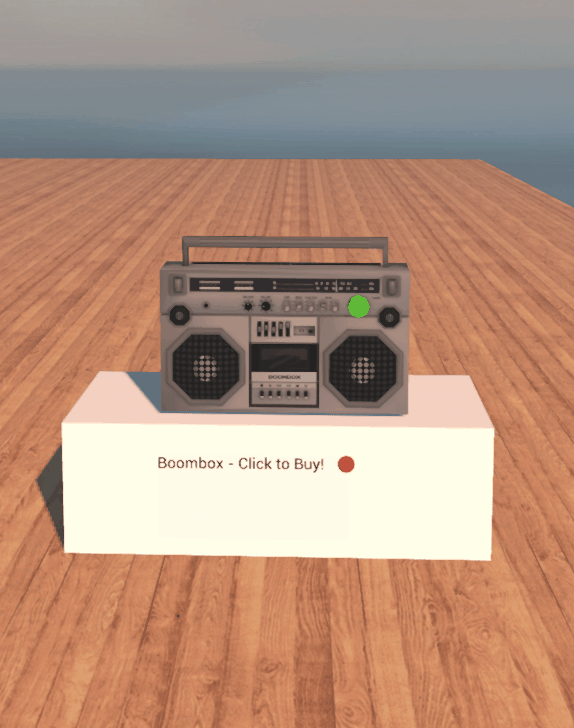
See Also
Tutorial: Build a Painting Set
There are different ways to create games and experiences in High Fidelity. In this tutorial, we’ll cover how to make a pixel-like painting set to allow users to “paint” pictures on a canvas made out of “pixels” that are box entities.
On This Page:
Consider getting familiar with the following concepts before starting this tutorial:
Our painting set comprises three elements:
- A brush, made of a cylinder and a sphere object.
- A palette, made of an octagon and sphere object.
- A canvas, made of box entities.
All of the logic for our painting set is contained in the brush head. The rest of the content is made by parenting entities to one another to make our brush, palette, and canvas.
We’ll start by creating the paint brush. The brush is comprised of two parts, the handle and the brush head. The brush handle is the parent of the brush head, so we can control the movement and color of the brush head using only the handle.
To create the brush handle:
- In Interface, pull up your HUD or Tablet and go to Create.
- Create an entity to be used as the handle. This can be a box or sphere entity.
- Go to the ‘Properties’ tab and select the ‘Shape’ drop down. Change the shape of the entity to a ‘cylinder’.
- Name your entity ‘Paint-Paintbrush-Tube’ by selecting the text box at the top of the ‘Properties’ tab.
- Select your desired handle color from the ‘Color’ picker.
- Scroll down to the ‘Spatial’ section. Change the local dimensions to: {x: 0.025, y: 0.5, z: 0.025}.
To create the brush head:
- In Interface, pull up your HUD or Tablet and go to Create.
- Click on the ‘SPHERE’ icon to create a sphere entity to be used as the brush head.
- Go to the ‘Properties’ tab and select your desired brush head color from the ‘Color’ picker.
- Name your entity ‘Paint-Paintbrush-Head’ by selecting the text box at the top of the ‘Properties’ tab.
- Scroll down to the ‘Spatial’ section. Change the local dimensions to {x: 0.05, y: 0.1, z: 0.05}.
Once you’ve created the brush head, you can parent the brush handle to it:
- In Create Tools app, select your brush handle and go to the ‘Properties’ tab.
- Copy the ‘entityID’.
- From the Entity List window, select the brush head and go to the ‘Properties’ tab.
- In the ‘Parent’ text box, paste the entityID of the brush handle (Paintbrush-Tube) entity.
- Scroll down to the ‘Spatial’ section. Change the local position to {x: 0, y: 0.2, z: 0}.
We’ve detailed how you can add a script to use the brush to transfer color to other objects in Add a Paint Brush Script.
The second part of our painting set is the palette. This is where you can get creative, and add as many (or as few) paint colors as you’d like. Once you have the base of the palette created, you can repeat the process of adding paints until you are satisfied with the end result.
To create the palette base:
- In Interface, pull up your HUD or Tablet and go to Create.
- Create an entity to be used as the palette base. This can be a box or sphere entity.
- Go to the ‘Properties’ tab and select the ‘Shape’ drop down. Change the shape to an ‘octagon’.
- Name your entity ‘Paint-Palette-Base’ by selecting the text box at the top of the ‘Properties’ tab.
- Select your desired palette color from the ‘Color’ picker.
- Scroll down to the ‘Spatial’ section. Change the local dimensions to {x: 0.55, y: 0.5, z: 0.55}.
- Scroll down to the ‘Behavior’ section. Check ‘Grabbable’.
To create the paint colors:
- In Interface, pull up your HUD or Tablet and go to Create.
- Create a sphere entity to be used as your first paint color.
- Go to the ‘Properties’ tab and name your entity ‘Paint-Color’ by selecting the text box at the top of the tab.
- Select your desired paint color from the ‘Color’ picker.
- Scroll down to the ‘Spatial’ section. Change the local dimensions to {x: 0.1, y: 0.05, z: 0.1}
- In the Create Tools app, select your palette base and go to the ‘Properties’ tab.
- Copy the ‘entityID’.
- Select your paint color and go to the ‘Properties’ tab.
- In the ‘Parent’ text box, paste the palette base entityID.
- Use the grab handles to adjust the position and size of the paint on the palette.
- Scroll down to the ‘Behavior’ section and uncheck ‘Grabbable’.
Repeat the above steps to create additional paint colors for your palette.
The last component that makes up our painting set is the canvas we’ll use for our “pixel” style painting. We’ve provided a JSON file for you to import a canvas so you don’t need to go through each step individually, but you can import the grid multiple times to make a larger painting space, if desired.
- In Interface, go to Menu > Edit and select ‘Import Entities from URL’.
- Paste this URL into the dialog window and select ‘OK’.
The canvas is made up of box entities parented to a single backplate, but you could use any entities to create a scene that could be painted this way.
To start painting on the canvas, you have to write a paint brush script that serves as our ‘painting’ logic. This script will:
- Check if the paint brush head has collided with another entity.
- Check if this entity is a paint color, and change the color of the brush head.
- Check if the entity is a different entity. If it is not a paint color, the script will “transfer” it’s color over to the other entity.
To add the paint brush script:
- In Interface, pull up your HUD or Tablet and go to Create.
- Select the Paint-Brush-Head entity.
- Go to the ‘Properties’ tab and scroll down to ‘Behavior’.
- Next to ‘Script’, paste the script URL. In this case, it is ‘brushScript.js’.
- After you close the Create app, test it out by painting on the canvas in your domain!
See Also
Tutorial: Create a Purchase Button for Marketplace Sales
If you are selling items on the Marketplace, you can have a space in your domain where users can easily buy your items. This could be done with a display copy of your items, an image of your item, or a purchase button for users to click.
On This Page:
- Prerequisites
- Get an Item’s Marketplace ID
- Write a Purchase Item Script
- Create an Entity to Use as a Button
Consider getting familiar with the following concepts before starting this tutorial:
If you are putting up an item (in your domain) you have on sale in the Marketplace, you need to get the item’s ‘marketplaceID’. This unique identifier can be found when you view your Marketplace item in a browser window.
Note
This tutorial lets you link to any item in the Marketplace, even those you don't own. If you link to another user's item, keep in mind that they will receive the proceeds from the sale.
- In your browser of choice, navigate to www.highfidelity.com/marketplace.
- Locate the item.
- Copy the multi-number identifier at the end of the URL in the address bar of your browser. This is your item’s ‘marketplaceID’.
To make our button work and actually sell an item, we need to attach a client entity script to it. In this example, buy-item.js, the script opens a specified Marketplace page. You can use it as-is, modify it, or write your own script to suit your needs.
The buy-item.js script we’ve used:
- Uses High Fidelity’s JavaScript API to determine when a user clicks with the mouse or triggers the entity using hand controllers.
- Opens the user’s Tablet to the purchase page if there is a valid ‘marketplaceID’ specified in the ‘userdata’ field of the entity that is clicked or triggered.
The entity you create for your button has to be triggerable so that the script can detect when you trigger or push the button with your hand controllers.
In Interface, pull up your HUD or Tablet and go to Create.
Create an entity to be used as a button. This can be a 3D model, cube, or sphere entity.
Go to the ‘Properties’ tab and scroll down to ‘Behavior’.
Select ‘Code’ from the drop down menu in the ‘User Data’ property. Add the following line, replacing ‘YOUR_MARKETPLACE_ID_HERE’ with the ‘marketplaceID’ that you copied in the first step of the tutorial:
{'marketplaceID' : 'YOUR_MARKETPLACEID_HERE'}Next to ‘Script’, paste the script URL. In this case, it is ‘buy-item.js’.
Scroll down to ‘Triggerable’ and ensure that ‘Triggerable’ is selected.
When you close the Create app, test your script by clicking or triggering the button to open the item’s purchase page. If a user has already purchased the item, they will be shown a page that allows them to re-purchase another copy or view it in their Inventory.
See Also
Tutorial: Create a Boombox
You can create a music player that plays all your favorite tracks and also syncs the audio for other users in your domain.
On This Page
Your BoomBox will consist of:
- A boombox base model: A model entity that runs an entity server script.
- An ‘ON/OFF’ button: A child entity runs a client entity script to allow users to interact with the boombox.
The boombox will start playing when users click or trigger the ON/OFF button.
To create a boombox:
- In Interface, pull up your HUD or Tablet and go to Create.
- Use the Create app to import the 3D model entity. You can create your own 3D model for the boombox base or use one we’ve created.
- Next, create the button entity that users will interact with. This can be a cube entity.
- Go to ‘Properties’ tab for the button entity. Change the ‘Shape’ property from ‘Box’ to ‘Octagon’ or ‘Cylinder’ depending on your aesthetic preferences.
- Scroll down to the ‘Behavior’ section and ensure that ‘Grabbable’ and ‘Triggerable’ are checked.
- Scale, rotate, and move your button to align it to the desired position on the model.

- With the Create app open, select the 3D model of the boombox. Go to the ‘Properties’ tab and copy the ‘ID’ under ‘Name’.
- Select the cube entity you created, go to the ‘Properties’ tab, and paste the copied entity ID in the ‘Parent’ field. This makes your boombox model entity the parent of your button entity.
The User Data property is a JSON object that can be customized to fit the needs of a script. User Data also helps in synchronizing and keeping variables the same for all users in a domain. In this case, User Data will contain:
- Song List: All URLs of the songs you want played on your boombox. You can also use MP3 or WAV files stored on your local machine.
- Music player volume information: You can change this as per your preference.
Note
User Data can store information only up to a certain size. We recommend keeping the limit of 10 songs. We support the following formats:
- WAV: 16-bit uncompressed WAV at any sample rate, with 1 (mono), 2(stereo), or 4 (ambisonic) channels.
- MP3: Mono or stereo, at any sample rate.
- RAW: 48khz 16-bit mono or stereo. Filename must include “.stereo” to be interpreted as stereo.
To add User Data to your boombox:
In Interface, pull up your HUD or Tablet and go to Create.
Select your boombox entity, not the button.
Go to the ‘Properties’ tab. Scroll down to ‘User Data’ and paste the following JSON information. This JSON data consists of 10 songs and the volume setting. You can use your own songs and change the volume setting:
{
  "grabbableKey": {
    "grabbable": false
  },
  "music": {
    "All That": "https://hifi-content.s3-us-west-1.amazonaws.com/liv/dev/BoomBox/music/bensound-allthat.mp3",
    "Country Boy": "https://hifi-content.s3-us-west-1.amazonaws.com/liv/dev/BoomBox/music/bensound-countryboy.mp3",
    "Cute": "https://hifi-content.s3-us-west-1.amazonaws.com/liv/dev/BoomBox/music/bensound-cute.mp3",
    "Happiness": "https://hifi-content.s3-us-west-1.amazonaws.com/liv/dev/BoomBox/music/bensound-happiness.mp3",
    "Happy Rock": "https://hifi-content.s3-us-west-1.amazonaws.com/liv/dev/BoomBox/music/bensound-happyrock.mp3",
    "High Octane": "https://hifi-content.s3-us-west-1.amazonaws.com/liv/dev/BoomBox/music/bensound-highoctane.mp3",
    "Hip Jazz": "https://hifi-content.s3-us-west-1.amazonaws.com/liv/dev/BoomBox/music/bensound-hipjazz.mp3",
    "Pop Dance": "https://hifi-content.s3-us-west-1.amazonaws.com/liv/dev/BoomBox/music/bensound-popdance.mp3",
    "Sci-Fi": "https://hifi-content.s3-us-west-1.amazonaws.com/liv/dev/BoomBox/music/bensound-scifi.mp3",
    "Sample": "sample.com"
  },
  "volume": 0.7
}
The boombox system contains the following scripts and files that allows a user to control audio playback:
| File | Description | URL |
|---|---|---|
| Entity Server Script | This server script handles the state of the music player and plays audio back so that it is synchronized across all users. Actions and behaviors of entities that need to be in the same state for all users, should run on the server. The client script that runs on the button relays the requests for each remotely callable function to execute on the server, and the server script handles the audio playback accordingly. | boomBoxEntityServerScript.js |
| Client Entity Script | This client script handles the interactions between users and displays the UI for controlling the boombox via an HTML page using the Tablet Scripting Interface. It listens for mouse clicks and controller triggers, displays the controls, and serves as a relay mechanic between the HTML page and the boombox entity server script. | boomBoxEntityScript.js |
| HTML and CSS | The HTML page displays the controller UI for the boombox through the Tablet Scripting Interface and is styled with CSS. It uses the EventBridge to send the user input from the HTML elements to the boombox entity script, which in turns calls entity server methods depending on the EventBridge message contents. |
You can use the existing versions of our scripts, modify them, or write your own scripts.
If you’re using the existing versions of our scripts:
- In Interface, pull up your HUD or Tablet and go to Create.
- Select your boombox model and go to the ‘Properties’ tab.
- Scroll down to the ‘Behavior’ section and paste the entity server script’s URL into the ‘Server Script’ field.
- Select your button entity and go to the ‘Properties’ tab.
- Scroll down to the ‘Behavior’ section and paste the client entity script’s URL into the ‘Script’ field.
If you’re writing your own scripts or modifying the existing ones, and want to host these in the ‘Asset Browser’:
- On your computer, create a folder called ‘BoomBox’. You’ll save your files here with the following structure.
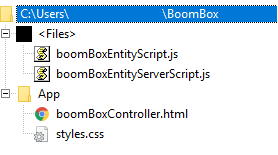
- Save the entity server script, client entity script, HTML file, and CSS file to the folder in your computer.
- In Interface, pull up your HUD or Tablet and go to Create.
- In the Create app, click ‘Open This Domain’s Asset Server’ to view the Asset Browser.
- Create the same boombox directory in your ‘Asset Browser’ and upload your files.
- Use the Create app and select your boombox model and go to the ‘Properties’ tab.
- Scroll down to the ‘Behavior’ section and paste the entity server script’s URL into the ‘Server Script’ field.
- Use the Create app and select your button entity and go to the ‘Properties’ tab.
- Scroll down to the ‘Behavior’ section and paste the client entity script’s URL into the ‘Script’ field.
Note
Some additional notes:
- The scripts linked above use relative paths to link to one another, so it’s important to preserve the folder structure given. If you want to move things around, make sure you also update the links in the scripts themselves to reference the new file location.
- If you want to make modifications to your script files, you will need to re-upload them to the asset browser. Reload all content and reload your entity server scripts to see changes take effect after modifying files.
- Entity server scripts do not have access to mouse press or controller events, since these are all handled on the client side.
- HTML pages will not render in the Oculus Quest, so only desktop users will be able to interact with the boombox controls.
See Also
3D Models
3D models are entities that represent objects you’d like to see in-world such as a water fountain, a castle, or a coffee mug. You can get your 3D model by creating your own, sourcing it externally, or purchasing them from our Marketplace. We only support 3D models in the OBJ and FBX formats.
The appearance of a 3D model is controlled by its materials. The materials supported in High Fidelity are Physically-based Rendering (PBR) materials. This means that a 3D model’s materials will reflect or absorb light as they would (approximately) in real life.
In This Section:
Get Your 3D Model
Many 3D models are available for purchase on our Marketplace. If the Marketplace doesn’t have the model you’re looking for, you can create and customize your own. All 3D models should be in the OBJ or FBX format and have materials supported by High Fidelity.
Get Your 3D Model from 3D Content Stores
There are many online 3D content websites that contain models that you can purchase or get for free. Keep the following in mind when sourcing 3D models from such sites:
- Check Licensing Terms: Make sure you check a model’s licensing terms before you use it. It is your responsibility to ensure that you have sufficient rights to upload the content. When you make a 3D model available on your High Fidelity server, visitors are getting the links to those files in the same way as they would when viewing an image on a website. You should be comfortable and have the rights to re-distribute the 3D content. High Fidelity offers proof-of-purchase certificates for 3D models (uploaded to our Marketplace) that certify that they have been legitimately purchased.
- Check Materials: You might find that the model may be missing its textures. If that happens, first check to see if the textures are included. If a model loads into High Fidelity and doesn’t look right, you may also find error information in the Interface logs.
Create Your Own 3D Model
You can create your own 3D model using 3D modeling software such as Blender or Maya. Use any software of your choice as long as:
- The 3D model is in the OBJ or FBX format.
- The 3D model materials are supported by High Fidelity. Use our materials guide to make sure that your materials load correctly.
Making 3D models for High Fidelity (and VR) is different than making models for films, videos, and games.
- 3D models for VR are rendered twice (for both right and left eyes): This means that the number of polygons on your model and the number of materials you use will affect your performance.
- All VR headsets run at 90Hz: You’ll have to keep your framerate at 90fps and be cautious about your model’s size. Models that are too big or very complex can slow down the framerate and make people feel nauseous.
We’ve listed the best practices for creating 3D models for High Fidelity (and VR).
| Property | Best Practice |
|---|---|
| Polycount | Your count should resemble that of a model for a tablet game, not too high, but not too low either. |
| Edge Loops | Remove edge loops that are not needed. |
| Mesh | Clean the mesh to make sure there are no N-gons and no coplanar faces. |
| Materials | Always try to create Atlas maps. When every piece of your content shares the same material and UV space, it is an Atlas map. For example, if you create a robot, all its pieces should share one UV map, instead of giving its hands, feet, or face separate materials and UV maps. |
| Materials | High Fidelity’s engine only supports one UV mapping per material. |
| Textures | PNG, JPEG and JPG files are recommended, but we also support TGA, TIF and TIFF formats. |
| Textures | Choose the color types wisely to minimize the size of the final file. |
| Textures | PNG-8 has only ON/OFF transparency, has a palette of colors (256 colors, like GIF), and can be used to mask transparency. |
| Textures | For more color resolution, you can use PNG-24. For translucent mask or transparent textures, use PNG-32. |
| Textures | Do not use PNG-48 or PNG-64, as neither are supported by High Fidelity. |
| Textures | When loaded in the engine, textures are automatically resized to a grid of 128x128. Pick sizes which are multiples of 128. |
| Draw Calls | Draw calls happen before something gets rendered on screen.
There are no definitive measures for a desirable polycount. You need to balance between draw calls and polys. Fewer draw calls means more room for polys. Smaller textures means more room for higher poly models. |
See Also
Import a 3D Model
You can import a 3D model into High Fidelity that is hosted online or on your domain’s Asset Server. Importing your model rezzes it into your domain and adds it to your virtual world.
Import Models from the Cloud
If you want your model available to users in other domains, we recommend uploading it to a cloud hosting service of your choice.
- Locate and copy the URL of the model you would like to import. The model should be a OBJ or FBX format.
- In Interface, pull up your HUD or Tablet and go to Create.
- Select the ‘Model’ icon.
- Paste the model’s URL and click ‘Add’.
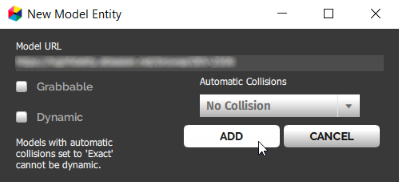
Import Models from the Asset Server
The Asset Server hosts files or assets that can either be added as-is to a domain or that are referenced by existing entities and scripts already in a domain. To import assets from the Asset Server, you must have permissions to rez entities in the domain that the Asset Server is running on.
- In Interface, pull up your HUD or Tablet and go to Create.
- Click ‘Open this Domain’s Asset Server’.
- In the Asset Browser, browse to the model you would like to import.
- Click ‘Add to World’. Then click ‘Add’ on the confirmation window that opens.
See Also
PBR Materials Guide
The appearance of a 3D model is controlled by its materials. The materials supported in High Fidelity are physically-based rendering (PBR) materials. This means that a 3D model’s materials will reflect or absorb light like how they would (approximately) in real life.
On This Page
Introduction to Materials, Textures, and Shading
A 3D model’s appearance is controlled by its materials. For example, a 3D model of a key will use a material that determines its color, how metallic it looks, and if its surface is bumpy or smooth. A 3D model of a brick wall will have material that determines its roughness and color.
High Fidelity supports physically-based rendering (PBR) materials. This means that your model will behave like a real world object when exposed to light. For example, the same 3D model of a key will shine and reflect any light that falls on it. The 3D model of a brick wall will not shine, but will reflect enough light for you to observe its colors and surface.
A material contains texture and shading information.
Textures are flat images that are applied to 3D models. These add detail on how a 3D model’s material looks. For example, a 3D model of a tree trunk will use a texture of bark to show what the surface looks like.
High Fidelity supports the use of the following texture formats:
- PNG (recommended)
- JPEG, JPG (recommended)
- TGA
- TIFF, TIF
For best performance, we recommend baking all 3D models (including textures) before uploading it to High Fidelity.
Since High Fidelity supports PBR materials, the shading used depicts an accurate representation of a how light interacts with different material surfaces. This means that your 3D model will not look the same under different light settings. The PBR shader has a set of material parameters or channels that can be modified to create different types of materials.
Note
You can combine shaders with material entities on shape and zone entities to apply shaders to models and avatars. This feature was released as an experimental feature and has not been thoroughly tested through our normal channels. If you wish to try applying procedural materials to models or avatars at your own risk, then you can find more information at Procedural Shaders for Models and Avatars.
Material Channels
Material channels determine various parameters such as the roughness or color of a material. You can determine the value of each channel in two ways:
- Setting a Value: The value of a channel is a value set on a slider. Setting a value is like turning off or turning on a switch. For example, if you look at your phone, some parts of it are shiny and some are matte. When you use a value, the entire object reflects that value. If you want different parts of an object to reflect varied roughness, you’ll need to use a map.
- Using a Map: The map is an image which you can import to define a property. You will use a map to apply a texture to your 3D model. For instance, your phone may have a case that is matte, but the rest of your phone is shiny. You can use a map to set the case as matte and the phone as shiny.
All materials in High Fidelity have the following channels that determine how they look:
| Channel Type | Description | Value | Map |
|---|---|---|---|
| Albedo | This channel defines the material’s color. You can pick any color value of your choice. | sRGB | sRGB |
| Metallic | This channel determines if the material is metallic or not. You cannot have a material that is half metallic, it is either metallic or it isn’t. | [0,1] | [0,1] |
| Roughness | This determines how rough/matte or glossy/shiny an object is, using brightness levels. | [0,1] | [0,1] |
| Normal | Normal is a channel that renders an object like there is actual geometry. For instance, normal would add bumps and other irregularities to a stone or ridges to a sea-shell. | xyz | bump |
| Opacity | Opacity determines if an object is transparent or opaque. | [0,1] | mask, alpha |
| Occlusion | This property approximates the shading to be as natural as possible. This means that it will reproduce how objects interact with light. | — | [0,1] |
| Emissive | This channel controls the amount of light being reflected from an object. | sRGB | sRGB |
| Scattering | Scattering determines how light will behave when it hits human skin. This channel details how light is reflected or absorbed by human bodies. | [0,1] | [0,1] |
| Material Type | This channel decides if an object is lit or unlit. | [lit, unlit] | — |
Notes:
- If you set transparency with a texture, the transparency (alpha) should be in the material’s albedo texture, as a PNG file with transparency and not as a separate transparency texture.
- High Fidelity’s renderer can draw two different kinds of transparency: “alpha” (255 graduates steps of transparency, no shading on surface, casts no shadows,) and “mask” (binary transparency, full shading of opaque surface, whole surface casts shadow.)
- To determine whether a texture is treated as a mask or as alpha, the engine looks for alpha values between 2% and 98%. An easy way to create a mask texture is to save your image as a PNG-8 since it only supports binary transparency, while PNG-24 supports a range of transparency levels.
- We support using a second UV set with the following texture channels only: Light Map and Ambient Occlusion.
Sample Materials and Their Textures and Shading
High Fidelity supports different types of materials. We’ve created sample objects with each material type. You can download each object from this repository on GitHub, or run this script in High Fidelity to upload all sample objects in your domain.
We’ve listed all material information (including textures, shading, and channel values and maps) for these sample objects here.
Set Material Values in Blender
When you create a model in Blender, you have to export it in the FBX format to use in High Fidelity. Additionally, you have to modify material properties and textures in Blender to match the PBR material textures in High Fidelity.
Doing so ensures that your model appears like how you want it to.
By default, any material property set with a texture will override a property set with a value. The only exception to this is in the case of the albedo color set with an RGB color value and a texture, in which case the albedo value and texture will multiplied together.
We’ve included images where the fields corresponding to each supported PBR channel in Blender are highlighted, along with details about which values and colors correspond to the range corresponding with that channel. It should be noted that all of the Blender material properties below only relate to exported FBX format models. Models exported as OBJ or other formats do not have full PBR material support in High Fidelity yet.
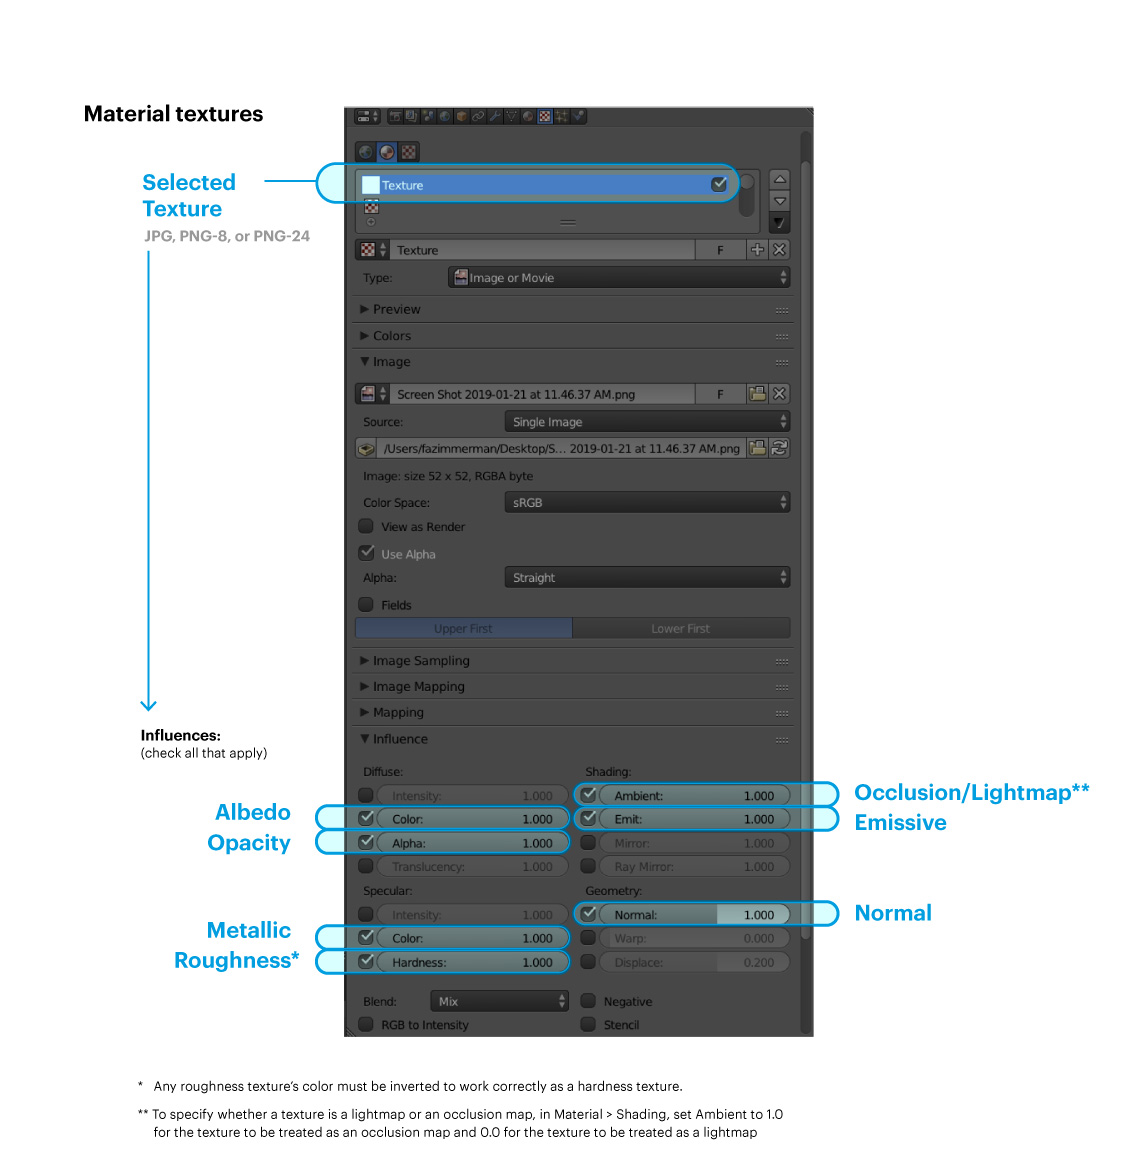
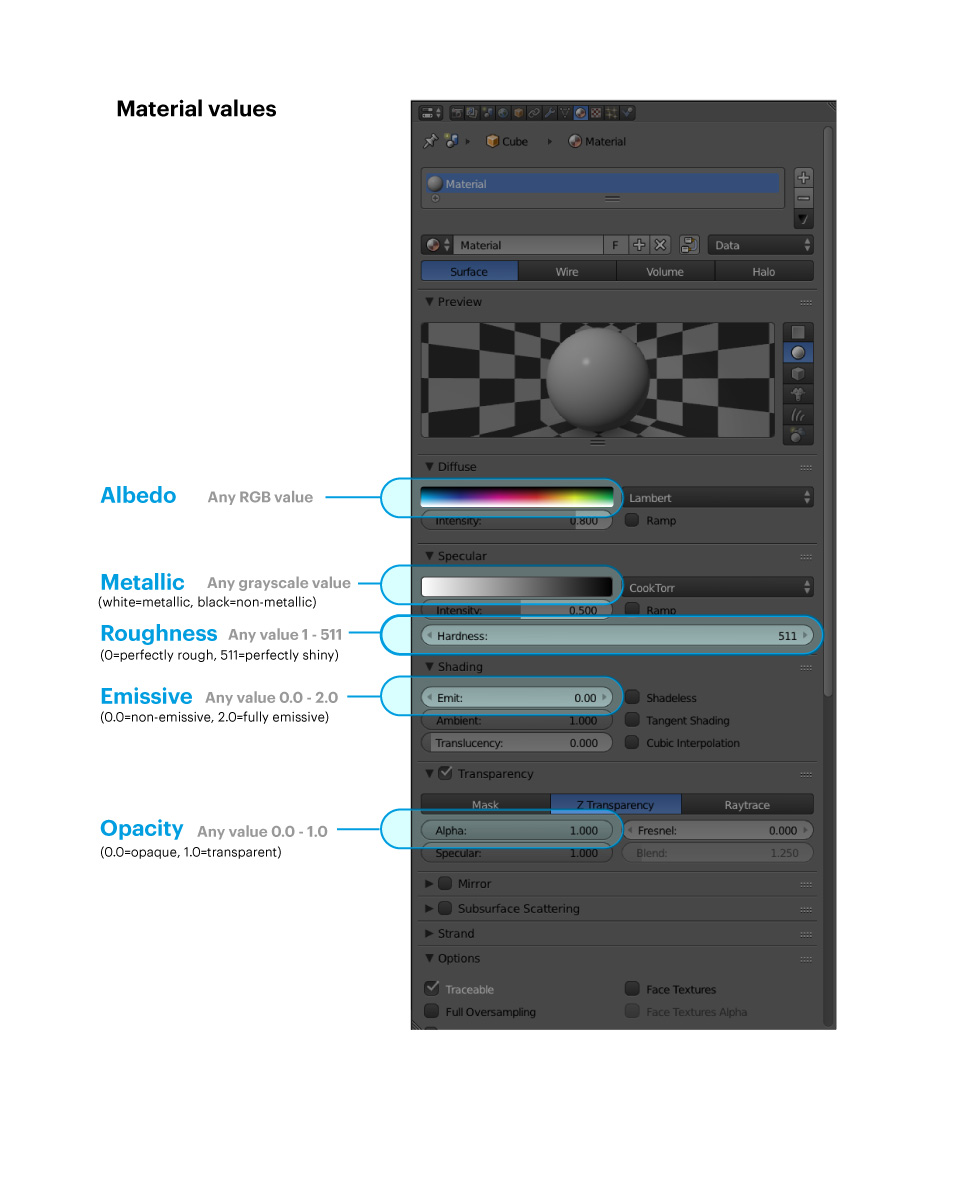
Set Material Values in Maya
Use the graphics below to set the right material values and textures in Maya.
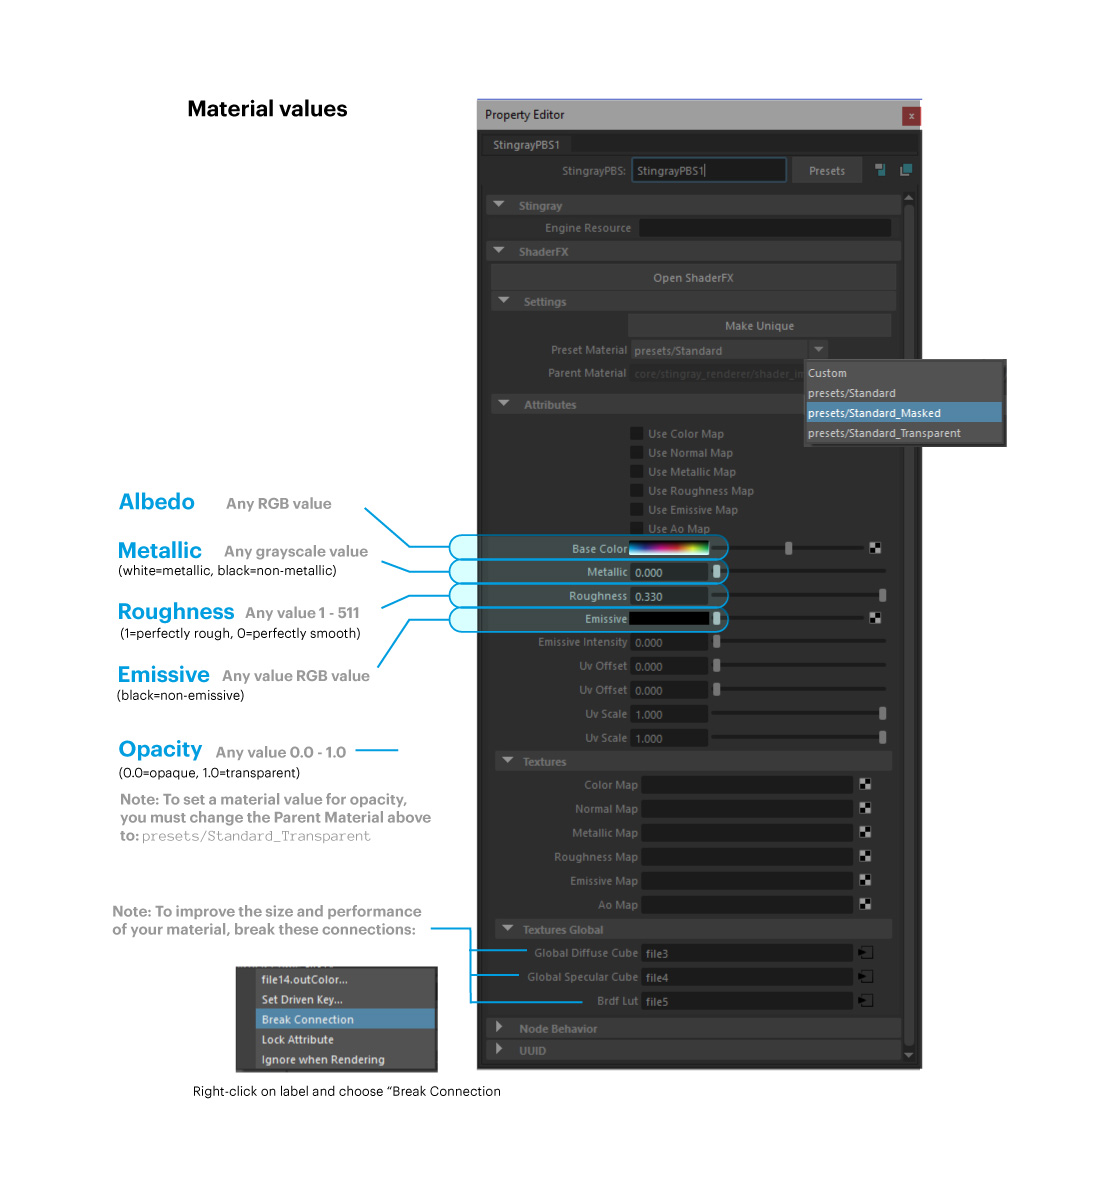
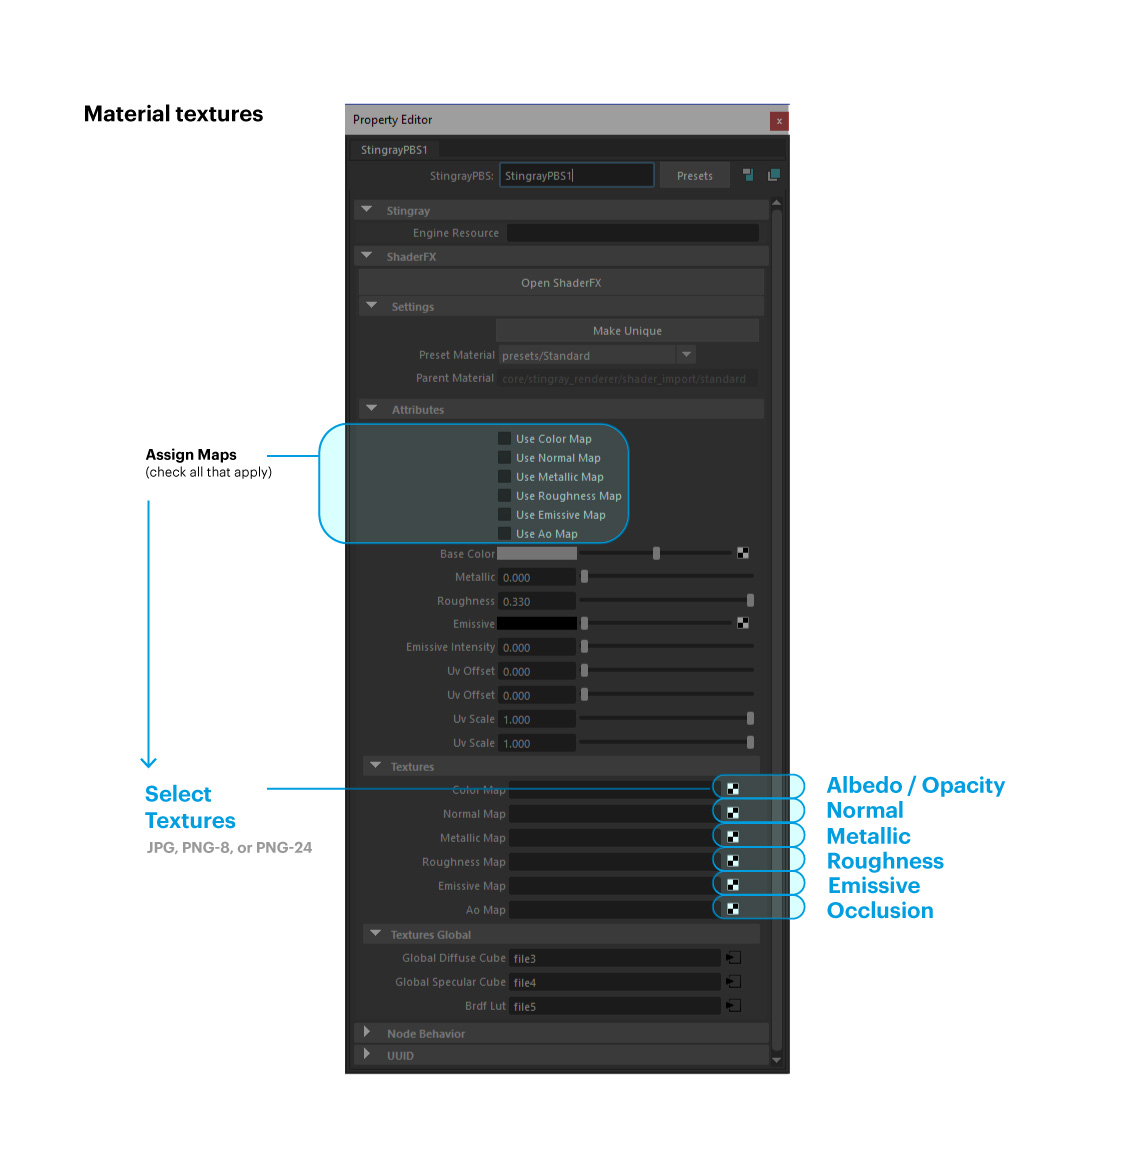
See Also
Import Animations
Enrich your High Fidelity experience by having 3D models in your domain with animations. For example, you can import the 3D model of a flag that appears to flutter with the wind using this feature.
Prerequisites
You need to be familiar with creating animations in 3D modeling tools such as Blender and Maya before importing an animation into High Fidelity.
Prepare a 3D Model Animation
Before you import an animation into High Fidelity, adjust some settings in the 3D modeling tool of your choice to ensure that it plays smoothly.
- Set the framerate to 30 fps for the best results (our recommendation).
- Bake your animation channels, key frames, and inbetweens to ensure that High Fidelity reads everything. This is to ensure that your animation doesn’t stop and start, but appears smooth and flows through each movement.
- Prepare to export the skeleton and frames that are being used in the animation.
- Export your animation as an FBX file.
- Upload this FBX file to a cloud server. Copy the URL.
Import an Animation
Once you complete uploading your animation’s FBX file, you can import the 3D model and it’s animation into High Fidelity.
- In Interface, pull up your HUD or Tablet and go to Create.
- Click on the ‘MODEL’ icon and enter your 3D model’s URL. If you have saved your 3D model’s FBX file with the animation, the model’s URL and the animation’s URL will be the same. Otherwise, your animation is saved as a separate FBX file.
- In the ‘Properties’ tab, scroll down to ‘Animation’ and paste the animation’s URL.
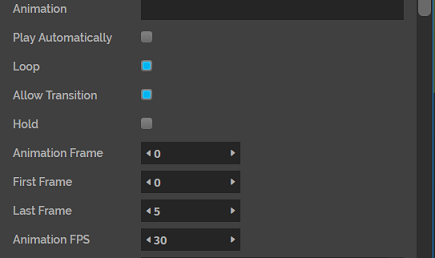
You can edit the following animation properties:
Property Description Play Automatically Enable this to play your animation automatically when a user loads a domain. Loop Select this property to play your animation in a continuous loop. Allow Transition Enable this to let the animation move through space. This means that the joints will not only rotate, but translate through three dimensions. Hold Select to pause your animation at a particular frame. Animation Frame Enter the frame at which you want to pause or hold your animation. First Frame This is the first frame from when your want your animation to start. Last Frame This is the last frame where you want your animation to stop. It will not play beyond this specified frame. Animation FPS This is the animation’s framerate. You can also control an animation’s properties and when it starts playing with an entity script.
See Also
Environments
A High Fidelity domain can have an environment to express a theme. Environments include all the domain content, such as entities, skyboxes, assets, and more. You could have a domain with a deserted island environment or a cyberpunk apartment environment.
Environments are available for purchase on our Marketplace. If you don’t want to use any of the available environments, you can create your own.
Create an Environment
An environment consists different types of 3D models and a skybox following the theme of your choice. You can create an environment using:
| Method | Description |
|---|---|
| Marketplace Items | You can purchase various models like buildings and skyboxes from the Marketplace. For example, you can change the skybox in your domain by purchasing a different one from the Marketplace. |
| 3D Models Available | You can purchase or get 3D models from online 3D content websites. Then, you can import these models using the Asset Server. |
| Your 3D Models | You can use 3D modeling software like Blender or Maya to create your own 3D models and import them into your High Fidelity domain. |
| A Content Archive File | High Fidelity domain settings have downloadable content archives. These archives are zip files containing all domain content information. You can use a backup file of your own or one sent to you by a user. |
See Also
- Shopping the Marketplace
- Get Your 3D Model
- Import 3D Models Using the Asset Server
- Backup and Restore Your Domain
Tablet Apps
Tablet apps (or simply “apps”) in High Fidelity are customizable programs that expose functionality in an easy-to-use user interface. Apps let you take complex code from our JavaScript API and simplify it into a window with controls for others to use.
Note
To create custom apps, you must have a basic knowledge of web development (HTML, CSS and JavaScript) and be able to navigate our API.
The steps involved in creating a tablet app are:
-
- Adds a button to the tablet and HUD
- Loads your app
- Closes your app
- Listens for events
- Runs your code (in this case, create some gemstones)
Tutorial: Create Gemstone Switching Tablet App
In this tutorial, we will walk through the above steps to create an app called “Gemstone Magic Maker”. This simple app lets you spawn colorful little gemstones in VR that you can share with your friends.
Create icons to show up on the tablet and HUD
You need two icons to show up on the tablet and HUD: an SVG or PNG image to display on the app button when the app is active, usually named <appName>-a.svg and another to display when the app is inactive, usually named <appName>-i.svg.
We recommend the following specs for your icons:
- Size: 50px by 50px
- Color: White on a transparent background (for inactive icons) and black on a transparent background (for active icons)
- File format: SVG or PNG
You can create your own icon using graphic design software or any other online resources.
Design your app’s UI in HTML and CSS
Your app’s UI should provide text on how the app works and use familiar UI elements that a user knows how to interact with (such as buttons, scroll bars, and links). Keep in mind that the tablet screen dimensions are 480 x 720, so all of your UI should be confined to this space.
To help you get started, we’ve put together a quick start HTML template that you can reuse. It contains the same layout, styling and font as the main menu screen, and has a header bar for your app title. With just a few simple modifications, you can create have a simple app UI within minutes.
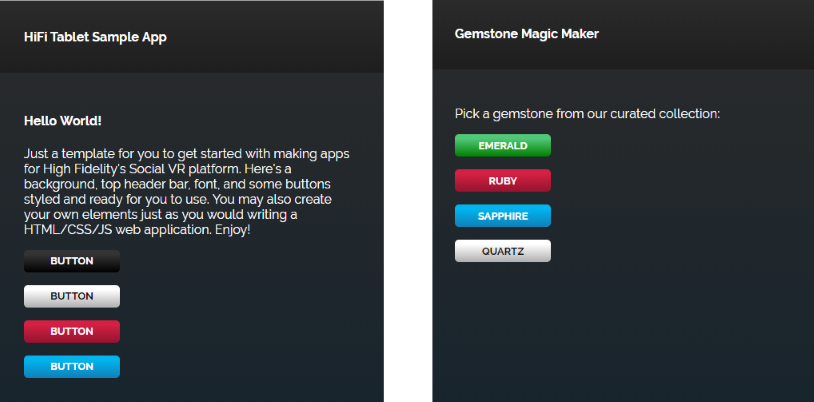
Add event handlers to your HTML file
The Tablet UI framework provides a communication channel called EventBridge. It allows you to send and receive events between the client script (gemstoneApp.js) and JavaScript in your web app (gemstoneMagicMaker.html). Use the following EventBridge code inside of <script> </script> tags in the body of your HTML file to handle the button clicks:
function main() {
    // Send an event to gemstoneApp.js when the page loads
    // and is ready to get things rolling
    console.log("document ready");
    var readyEvent = {
        "type": "ready",
    };

    // The event bridge handles events represented as a string the best.
    // So we first create a JavaScript object, then convert to string
    EventBridge.emitWebEvent(JSON.stringify(readyEvent));

    // Send an event when user click on each of the gemstone buttons
    $(".gemstone-button").click(function(){
        console.log(this.value + " button click");
        var clickEvent = {
            "type": "click",
            "data": this.value
        };
        EventBridge.emitWebEvent(JSON.stringify(clickEvent));
    });
}
$(document).ready(main);
Write a JavaScript file
Your JavaScript file will contain all of the core functionality of your app. At a minimum, we require that you have code that adds a button to the tablet and HUD, loads your app, closes your app gracefully, and listens for events. Below, you will find code samples to do each of these things.
Add buttons to the tablet and HUD
Use the AppUI module to automatically add your app’s button to the tablet and HUD, and to wire button click handlers:
(function () { // BEGIN LOCAL_SCOPE
var AppUi = Script.require('appUi');

var ui;
function startup() {
    ui = new AppUi({
        buttonName: "APP-NAME", // The name of your app
        home: Script.resolvePath("app.html"), // The path to your app's UI
        graphicsDirectory: Script.resolvePath("./") // The path to your button icons
    });
}
startup();
}()); // END LOCAL_SCOPE
Determine the app’s startup behavior
If you want your app to do something specific when it is opened, use the AppUI module’s onOpened functionality. For example, you could:
- Query a server to get a response and determine what to show on the UI
- Start displaying a 3D interface separate from the tablet
- Determine the display mode (VR/Desktop) and change things to show on the UI
(function () { // BEGIN LOCAL_SCOPE
var AppUi = Script.require('appUi');

function onOpened() {
    console.log("hello world!");
}

var ui;
function startup() {
    ui = new AppUi({
        buttonName: "APP-NAME", // The name of your app
        home: Script.resolvePath("app.html"), // The home screen of your app that appears when clicking the app button
        graphicsDirectory: Script.resolvePath("./"), // Where your button icons are located
        onOpened: onOpened // See the simple function above
    });
}
startup();
}()); // END LOCAL_SCOPE
Close the app gracefully
The AppUI module ensures that your app closes gracefully. However, if you want to do something else when you close the app, you can with the onClosed functionality built into the AppUI module. For example, you could:
- Remove 3D interfaces
- Stop secondary scripts
(function () { // BEGIN LOCAL_SCOPE
var AppUi = Script.require('appUi');

function onOpened() {
    console.log("hello world!");
}

function onClosed() {
    console.log("hello world!");
}

var ui;
function startup() {
    ui = new AppUi({
        buttonName: "APP-NAME", // The name of your app
        home: Script.resolvePath("app.html"), // The home screen of your app that appears when clicking the app button
        graphicsDirectory: Script.resolvePath("./"), // Where your button icons are located
        onOpened: onOpened // See the simple function above
        onClosed: onClosed // See the simple function above
    });
}
startup();
}()); // END LOCAL_SCOPE
Listen for events
In step 3 above, we added event handlers to your HTML file. Now, you need to add code to your JavaScript file to listen for the events:
function onWebEventReceived(event) {
   print("gemstoneApp.js received a web event: " + event);
}
tablet.webEventReceived.connect(onWebEventReceived);
Create gemstones
The final step is to code the behavior of your JavaScript file. In this case, we’ll create gemstones using High Fidelity’s JavaScript API. Each gemstone will be created as an entity, and we can change the gemstone’s properties using the Entity namespace.
Calculate the position of each new gemstone
The following code gives us a position right in front of the user:
// Helper function that gives us a position right in front of the user
function getPositionToCreateEntity() {
  var direction = Quat.getFront(MyAvatar.orientation);
  var distance = 0.3;
  var position = Vec3.sum(MyAvatar.position, Vec3.multiply(direction, distance));
  position.y += 0.5;
  return position;
}
Set the gemstone’s properties and add it
The gemstone will be created when gemstoneApp.js receives click events from each of the buttons:
// Handle the events we're receiving from the web UI
function onWebEventReceived(event) {
    print("gemstoneApp.js received a web event:" + event);

    // Converts the event to a JavasScript Object
    if (typeof event === "string") {
        event = JSON.parse(event);
    }

    if (event.type === "click") {
        // Define the entity properties of for each of the gemstone, then add it to the scene
        var properties = {
            "type": "Shape",
            "position": getPositionToCreateEntity(),
            "userData": "{\"grabbableKey\":{\"grabbable\":true}}"
        };
        if (event.data  === "Emerald") {
            properties.name = "Emerald";
            properties.shape = "Dodecahedron";
            properties.color = {
                "blue": 122,
                "green": 179,
                "red": 16
            };
            properties.dimensions = {
                "x": 0.20000000298023224,
                "y": 0.26258927583694458,
                "z": 0.20000000298023224
            };
            Entities.addEntity(properties);
        } else if (event.data  === "Ruby") {
            properties.name = "Ruby";
            properties.shape = "Octagon";
            properties.color = {
                "blue": 160,
                "green": 52,
                "red": 237
            };
            properties.dimensions = {
                "x": 0.20000000298023224,
                "y": 0.24431547522544861,
                "z": 0.12547987699508667
            };
            Entities.addEntity(properties);
        } else if (event.data  === "Sapphire") {
            properties.name = "Sapphire";
            properties.shape = "Icosahedron";
            properties.color = {
                "blue": 255,
                "green": 115,
                "red": 102
            };
            properties.dimensions = {
                "x": 0.160745769739151,
                "y": 0.20000000298023224,
                "z": 0.23340839147567749
            };
            Entities.addEntity(properties);
        } else if (event.data  === "Quartz") {
            properties.name = "Quartz";
            properties.shape = "Octahedron";
            properties.color = {
                "blue": 245,
                "green": 142,
                "red": 216
            };
            properties.dimensions = {
                "x": 0.20000000298023224,
                "y": 0.339866042137146,
                "z": 0.20000000298023224
            };
            Entities.addEntity(properties);
        }
    }
}
Congratulations, you have successfully created an app in High Fidelity! To use your app, upload it to a cloud platform, such as Amazon S3, Google Cloud Storage, Microsoft Azure, etc. Once hosted, you can install it and use it:
- In Interface, go to Edit > Running Scripts.
- Under Load Scripts, click ‘From URL’ and enter the URL to your hosted JavaScript file.
- Click the app icon on the tablet or HUD to open the app.
See Also
Script
High Fidelity uses scripts (written in JavaScript) for a number of different things: creating content, moving your avatar, playing audio at a specific location, wearing an avatar attachment, and much more.
Throughout this chapter, learn about the different types of scripts and how you can use them to create new experiences:
Get Started with Scripting
Many of the scripts in High Fidelity run behind the scenes, so that you don’t even know they’re running. However, if you want to create some advanced behavior, you may need to write your own scripts to make sure everything works correctly.
This page ensures that you know what type of script to use and helps you get started running your own simple scripts.
On This Page
JavaScript Basics in High Fidelity
High Fidelity scripting runs on a JavaScript engine that is provided with Qt.
Note
Note that any functionality that runs around web pages (such as cookies, local storages, or databases) does not work with 3D environments such as High Fidelity. For this reason, you cannot use JavaScript frameworks such as Angular, React, Express, jQuery, Vue, etc.
You are likely to interface most with these High Fidelity APIs:
| API(s) | Description |
|---|---|
| Entities | Lets you manipulate the entities around you, as long
as you have permissions to do so. This means you can
add, remove, and edit entities. Everyone has access
to get properties of an entity, and can be used
to find Entities in range, direction, collision, or
raytrace. |
| Lets you get information on an Avatar, or manipulate your own client-only MyAvatar. The information here will be always the avatar information of the client running the script. AvatarList and AvatarManager are basically the same. | |
| Script | Lets you to connect callbacks from your client to script, such as functionality that is dependent on time (Script.update, Script.setTime, Script.setInterval etc), connect paths relatively to Assets (Script.relativePath), refer to other scripts (Script.include), or create events which occur when the script is turned off (Script.scriptEnding). |
There are many other APIs available, and we encourage you to make sure use of them as you become more comfortable scripting in High Fidelity.
Types of Scripts
| Script Type | Description |
|---|---|
| Interface Script | Interface scripts run as long as you have Interface running. With these scripts, you can perform one-time creation tasks or modify the user experience with new menus, overlays, tweaks, plugins, and extensions. |
| Assignment Client Script | Assignment client scripts coordinate the actions between entities and avatars in your domain. These scripts continue to run even when you shut down Interface. |
| Avatar Script | Avatar scripts run on an avatar and can give it unique effects, such as flowing hair. |
| Client Entity Script | Client entity scripts are scripts attached to entities that run locally in response to a user in a domain. With these scripts, you can customize what happens when a user encounters an entity. |
| Server Entity Script | Server entity scripts are scripts attached to entities that do not require a user to trigger. These scripts control entities so that their behavior is seen and heard by everyone in the domain. |
Scripting Permissions
Each domain owner has the ability to restrict create and edit permissions. If the script you want to run adds or edits entities and you don’t have the permission to do so, you won’t see any objects created or changed. However, you will still see the script listed in the Running Scripts window.
Running Scripts Window
The Running Scripts window can be used to load, run and stop scripts from a URL or from a disk drive. High Fidelity also provides a number of sample scripts for you to try out.
To open the Running Scripts window, go to Edit > Running Scripts or press Ctrl + J on your keyboard.
Sample Scripts
High Fidelity comes with a collection of scripts designed to improve your experience as a user and provide tools for developing your own content. We encourage you to look at these scripts as a resource to learn how to code your own.
Note
Loading (or running) a script lets you test the functionality and see how it behaves. If you want to view the actual code, you will need to open the file in the text editor of your choice. In the ‘Running Scripts’ window, click the ‘Reveal Scripts’ folder and browse to the JavaScript file that you want to view.
These are the scripts we have available:
| Scripts Folder | Description |
|---|---|
android |
These scripts were built to run on Android devices. |
developer |
These scripts were created for internal use and debugging, but are available as advanced developers may find them useful when creating content. These scripts are not “entry-level” and are not guaranteed to work or be documented. |
modules |
These scripts create external tools that simplify scripting in High Fidelity. For example, the AppUI module helps you create a tablet app, while the Request module processes HTTP requests. |
system |
These scripts are critical to the stability and usability of High Fidelity. Making changes to these scripts is not recommended, nor is it easy, as you may need ‘administrative’ privileges. |
tutorials |
These scripts provide examples of what you can do using scripts in High Fidelity. Examples include: creating butterflies, making your avatar clap, and adding ambient sound to your domain. |
Load and Run a Script
To run a script:
- Open the ‘Running Scripts’ window.
- For scripts hosted in the cloud, click ‘From URL’. Enter the URL of your script file and click ‘OK’.
- For scripts on your local computer, click ‘From Disk’. Browse to your script file and click ‘Open’.
- To load a sample script, browse to the script at the bottom of the ‘Running Scripts’ window.
Reload or Stop a Script
To reload or stop a script, open the ‘Running Scripts’ window and do one of the following:
- To reload all running scripts, click the ‘Reload All’ button at the top of the ‘Running Scripts’ window.
- To reload a specific script, click the circular arrow next to the script.
- To stop all running scripts, click the ‘Stop All’ button at the top of the ‘Running Scripts’ window.
- To stop a specific script, click the ‘X’ next to the script.
Add a Script to the Default Scripts
You can add a script to the default scripts to run every time you start Interface.
- In Interface, pull up your Tablet or HUD and go to Menu > Edit > Running Scripts.
- Click ‘Reveal Scripts Folder’ at the bottom.
- In the file explorer window, open the ‘defaultScripts.js’ file.
- Add your script to this file to make it run with other default scripts. Ensure the folder path to your script is correct.
Note
The ‘defaultScripts.js’ file is updated every time you update Interface to the latest release version. This means that any changes you make to the file will be overwritten. You can avoid this by writing and running a ‘loader’ script to load scripts on start up.
Scripting Console
The Scripting Console lets you test and run short script snippets quickly in High Fidelity to see how they work. To open the console, go to the ‘Developer menu’, then Scripting > Console. If the ‘Developer’ menu is not visible, first go to the ‘Settings’ menu and click ‘Developer’ Menu.
Debug Window
The Debug Window shows the output generated by your running scripts. This lets you watch the script(s) in action and make sure that it is running as you intended. If the script fails, the debugger can help you identify what went wrong, and point you to specific lines of code where the error occurred. To open the Debug Window, go to the ‘Developer’ menu, then Scripting > Script Log (HMD Friendly). If the Developer menu is not visible, first go to the ‘Settings’ menu and click ‘Developer’ Menu.
See Also
Write Your Own Scripts
High Fidelity’s robust JavaScript API provides the tools for you to build great content and user experiences in VR.
In this section, you can find simple code samples to do common tasks in High Fidelity. To see these code samples in action, copy the code to a file, testScripts.js, saved somewhere on your computer.
Note
Entity scripts, unlike interface scripts, are in containing functions. The example scripts here cannot be attached to an entity (and be used as an entity script) unless they are in a containing function ``function() {}``.
On This Page:
Write to the Debug Window
This is an example of an interface script and cannot be attached to an entity. It shows you how to print something to the debug window . In this example, we’ll start with a simple “Hello, World” script.
print("Hello, World");
- Copy and paste this in a file
testScript.jsand save it on your computer. - When you load and run this script, it will write the words “Hello, World” to the ‘Debug Window’ in High Fidelity.

Create an Entity
Instead of using the Create app to add an entity, you can create one using an interface script.
// Get your position in the domain, so that the cube is spawned in front of you
var position = Vec3.sum(MyAvatar.position, Quat.getFront(MyAvatar.orientation));
var properties = {
    type: "Box",
    name: "ScriptBox",
    position: position,
    color: { red: 255, green: 0, blue: 0 }
};
var entityID = Entities.addEntity(properties);
print("Entity added");
- Copy and paste this in a file
testScript.jsand save it on your computer. - When you load and run this script, it will locate your avatar in the domain, create a new entity based on the customized properties that you set, then print a line to the ‘Debug Window’. In this case, the entity will be a red box.
Edit an Entity
To manipulate an entity’s properties, you can use Entities.editEntityin an interface script.
var entityID = Entities.addEntity({
    type: "Box",
    position: Vec3.sum(MyAvatar.position, Quat.getFront(MyAvatar.orientation)),
});

var properties = Entities.getEntityProperties(entityID, ["color"]);
print("Entity color: " + JSON.stringify(properties.color));

Entities.editEntity(entityID, {
    color: { red: 255, green: 0, blue: 0 }
});
properties = Entities.getEntityProperties(entityID, ["color"]);
print("Entity color: " + JSON.stringify(properties.color));
- Copy and paste this in a file
testScript.jsand save it on your computer. - When you load and run this script, it will locate your avatar in the domain, create a new entity based on the customized properties that you set, then print the color of that entity to the ‘Debug Window’. Then, the script changes the color of the entity to red, and prints the new color in the ‘Debug Window’.
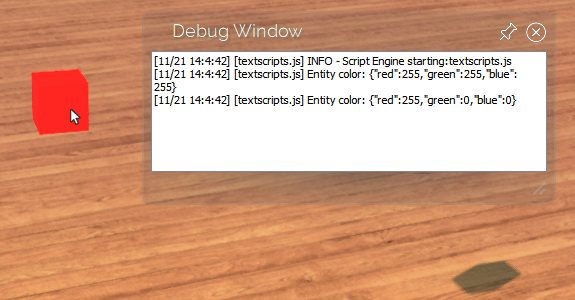
See Also
JavaScript Tips & Tricks
High Fidelity’s robust JavaScript API provides the tools for you to build great content and user experiences in VR. We’ve compiled some advanced JavaScript tips you can use while scripting for High Fidelity.
You can use the Scripting Console in Interface to try out the examples on this page. The output will be visible in the console itself.
On This Page:
- Compute 3D Math Operations
- Include External JS and JSON Files
- Equip an Item
- Connect a Signal to a Function
Compute 3D Math Operations
When you script for VR worlds like High Fidelity, you need 3D math operations to compute the position and orientation of 3D objects and avatars in-world. We cannot simply add two vectors. To script 3D math operations and to determine position and orientation information of avatars, you can use the following namespaces in our JavaScript API:
- Vec3: The Vec3 API has facilities for generating and manipulating 3-dimensional vectors.
- Quat: The Quat API provides facilities for generating and manipulating quaternions.
- MyAvatar: The MyAvatar API provides facilities for manipulating avatars.
Get Your Avatar’s Position
When creating objects in world, it’s often very helpful to know where your avatar currently is.
High Fidelity uses a 3D Cartesian coordinate system where the position vector of an entity or avatar looks like this:
{ x: 0, y: 0, z: 0 }
To get your avatar’s current position, use the MyAvatar namespace. MyAvatar contains properties with information related to your avatar. Use the position property, MyAvatar.position, which returns an object.
In the following example, we are using the JSON.stringify method to convert the JavaScript object (returned by MyAvatar.position) to a data string that can be sent over the server.
Open your Scripting Console and find your avatar’s position.
JSON.stringify(MyAvatar.position);
// {"x":-10.349810600280762,"y":-9.55379867553711,"z":11.861204147338867}
Get Your Avatar’s Orientation
If you want an object to appear in front of you, you need to know how your avatar is currently oriented in-world.
Rotations are handled are by a number-system called Quaternions. Quaternions help simplify calculations in three dimensional space. They add an extra dimension of ‘w’ and the values are normalized (-1,1).
Quaternions are represented in the form:
{ x: 0, y: 0, z: 0, w: 1 }
Get your avatar’s orientation in the Scripting Console by using the MyAvatar.orientation property:
JSON.stringify(MyAvatar.orientation);
// {"x":0,"y":-0.4974651634693146,"z":0,"w":0.8674839735031128}
Get the Direction Your Avatar is Facing
You can use the Quat namespace to get the direction which your avatar is facing. Pass your avatar’s orientation to Quat.getForward to get a vector describing which direction you are facing on the world axis.
{ x: 0, y: 0, z: 1 } // Backward
{ x: 0, y: 0, z: -1 } // Forward
{ x: -1, y: 0, z: 0 } // Left
{ x: 1, y: 0, z: 0 } // Right
Make an Entity Appear Before Your Avatar
You can make an entity appear before your avatar and also control the distance at which it appears.
Use the Vec3 namespace and the direction your avatar is facing to return the position at which you can make your entity appear. This position is 1m away from your avatar.
Vec3.sum(MyAvatar.position, Quat.getForward(MyAvatar.orientation)); // This will add your position vector to the direction vector returned from Quat.getForward. This will represent a position that is 1 meter in front of your avatar.
You can also control the distance at which an entity appears rather than using the default distance of 1m. First, multiply the vector representing the direction your avatar is facing and the distance.
Vec3.multiply(Quat.getForward(MyAvatar.orientation), 2.0); // if we are facing forward, that means our vector { x: 0, y: 0, z: -1 }, get's multiplied by 2.0 giving us a vector of { x: 0, y: 0, z: -2 }
Use Vec3.sum to return a new vector representing how far away an entity will appear from your avatar.
Vec3.sum(MyAvatar.position, Vec3.multiply(Quat.getForward(MyAvatar.orientation, 2.0))); // this will give us a final vector representing where in the world a point 2 meters directly in front of our avatar is
We’ve included the above operations in a function below for you to save and run as a script.
var myPosition = MyAvatar.position;
var myOrientation = MyAvatar.orientation;
var myDirection = Quat.getForward(myOrientation);
var distanceInFrontOfMe = 2.0;
var distanceVectorOfObjectInFrontOfMe= Vec3.multiply(myDirection, distanceInFrontOfMe);
var positionOfObjectInFrontOfMe = Vec3.sum(myPosition, distanceVectorOfObjectInFrontOfMe);

// we can even wrap this all up in a function to help simplify this any time we want the position of an object to appear in front of us
function getPositionInFrontOfMe(distanceInFrontOfMe){
  var myPosition = MyAvatar.position;
  var myOrientation = MyAvatar.orientation;
  var myDirection = Quat.getForward(myOrientation);
  var distanceVectorOfObjectInFrontOfMe= Vec3.multiply(myDirection, distanceInFrontOfMe);
  var positionOfObjectInFrontOfMe = Vec3.sum(myPosition, distanceVectorOfObjectInFrontOfMe);
  return positionOfObjectInFrontOfMe;
}

getPositionInFrontOfMe(4.0); // { x: 0, y: 0, z: -4 }
getPositionInFrontOfMe(8.0); // { x: 0, y: 0, z: -8 }
Include External JS and JSON Files
When writing a script in High Fidelity, you might need to access the methods or objects in an external JS file or get information from a JSON file. For example, if you’re writing a script to make your avatar wave, you might need to use some methods that already exist in an external JS file. You can do this using the require method in the Scripts namespace of our API.
Any script that you try to retrieve using this method must export either a function or an object. Let’s try this using an example.
Create a JS script that you want to access from your main script.
example.js
module.exports = {
    sayHello: function () {
        console.log("Hello!");
    },
    sayGoodbye: function () {
        console.log("Goodbye!");
    }
};
In example.js, you are exporting two functions that print either Hello or Goodbye, depending on which function you call, to the console. Now, let’s use require in your main script.
Create a JS script called main.js.
var greet = Script.require(Script.resolvePath("example.js"));
greet.sayHello(); // prints Hello to the console
When you use the require method, you are making any function or object exported from example.js available to main.js. This means that main.js now has access to functions that will print either Hello or Goodbye to the console. In the above example, we are printing Hello to the console when we run main.js.
Note
We recommend using relative paths in your development so that you can easily move content without having to update absolute paths. However, in JSON files, you have to use absolute paths (e.g. in the event of a marketplace upload).
Equip an Item
You can equip an item by grabbing and holding an entity without pressing the grab button or trigger continuously. For example, you could equip a paint brush to your avatar’s hand and drop it only when you’re done painting.
You can equip an item using a script:
Messages.sendLocalMessage('Hifi-Hand-Grab', JSON.stringify({hand: 'XXX', entityID: 'YYY'})); \\ where XXX is either the left or right hand and YYY is entityID to equip
To drop the entity from your avatar’s hand:
Messages.sendLocalMessage('Hifi-Hand-Drop', 'XXX'); \\ where XXX is either the left or right hand
Connect a Signal to a Function
Signals can be connected to functions. This means that every time a signal is triggered, a function is executed. For example, if your avatar changes when collisions are enabled or disabled, you can connect a function to react to this specific event such as:
function collisionChanged(enabled) {
  if(enabled) {
    console.log("avatar collision is enabled");
  } else {
    console.log("avatar collision id disabled")
  }
}

MyAvatar.collisionsEnabledChanged.connect(collisionChanged);
Each signal usually gets passed in arguments, and you can refer to the API documentation to see what a signal will provide you, such as the enabled property passed into collision changed.
It’s good practice to disconnect from signals, but you can only do that if you name your function.
MyAvatar.collsionEnabledChanged.disconnect(collsionChanged);
See Also
Interface Scripts
Interface scripts run on your local machine, as long as you have Interface up and running. Each user has full control over when interface scripts are started and stopped. The results (such as when your script changes the color of a box) can be seen by everyone in your domain, but the script itself is running on your local machine. Your Interface will communicate that information to the Entity Server, which will communicate it to whoever is visiting the domain.
With interface scripts, you can do things like add new menus to the Interface, add plug-ins, or add 3D overlays that you have control over.
On This Page
Load an Interface Script
To load and run an interface script:
- In Interface, go to Edit > Running Scripts or press Ctrl + J on your keyboard.
- For scripts hosted in the cloud, click ‘From URL’. Enter the URL of your script file and click ‘OK’.
- For scripts on your local computer, click ‘From Disk’. Browse to your script file and click ‘Open’.
Example of an Interface Script
The following script automatically enters a first person perspective when you enter VR mode with a HMD.
(function() {

// Automatically enter first person mode when entering HMD mode
HMD.displayModeChanged.connect(function(isHMDMode) {
    if (isHMDMode) {
        Camera.setModeString("first person");
    }
});

}());
See Also
Assignment Client Scripts
Assignment Client (AC) scripts (also known as “persistent scripts”) run persistently in a domain and aren’t affected by other scripts. These scripts run on an assignment client separate from the Interface, so the script will continue to run until you either remove the script from the domain or you shut down the domain entirely.
With AC scripts, you can do things like coordinate actions between entities and avatars, and add virtual pets to greet visitors to your domain.
On This Page
Add an AC Script
Once you’ve written and hosted your script, you need to add it to a domain, either your own or one where you have permissions to run an AC script.
- Open your ‘Domain Administration Panel’. If you are on a local sandbox, open it by clicking on the High Fidelity icon in the taskbar notifications and ‘click Settings’.
- From the menu, go to Content > Scripts.
- In the Persistent Scripts section, click + and paste the URL to your script under ‘Script URL’.

- At the top of the page, click ‘Save and Restart’. Now, every time you enter that domain, the AC script will be running.
Example of an AC Script
The following script counts the number of entities found in a domain using High Fidelity’s EntityViewer.
var SEARCH_CENTER = {x: 0, y: -10, z: 0};
var SEARCH_RADIUS = 100;

var isInitialized = false;
var timeout = 1000;

var update = function(deltaTime) {
    if (!isInitialized) {
        if (Entities.serversExist() && Entities.canRez()) {
            EntityViewer.setPosition(SEARCH_CENTER);
            EntityViewer.setCenterRadius(SEARCH_RADIUS);
            EntityViewer.queryOctree();

            Script.setTimeout(function(){
                var foundEntities = Entities.findEntities(SEARCH_CENTER, SEARCH_RADIUS).length;

                print("AC Script found: " + foundEntities + " entities within " + SEARCH_RADIUS + "m of " + JSON.stringify(SEARCH_CENTER));

            }, timeout);

            isInitialized = true;
            Script.update.disconnect(update);
        }
    }
};

Script.update.connect(update);
See Also
Avatar Scripts
Avatar scripts are bound to an avatar. This means that they run when a user puts on a specific avatar. Likewise, avatar scripts stop running when the avatar is removed or changed. Other users in the domain will be able to see the script in action, but they will not be able to run the script themselves.
With avatar scripts, you can do things like make your hair flow or create particle clouds around your avatar.
On This Page
Add an Avatar Script
There are two different ways you can add an avatar script to your FST file: either by using our Package Model tool or by manually adding the script.
Note
You cannot add scripts to avatars you have purchased from the Marketplace. You can add scripts to custom avatars only.
To add an avatar script using the Package Model tools:
- Create a folder called
scriptsin the same location as your FBX file. - Copy your avatar script into this new folder.
- In Interface, go to Edit > Package Model as .fst
- For ‘Script Directory’, enter the path to the
scriptsfolder you created above.
To add an avatar script manually:
- Open the FST file for your avatar in the text editor of your choice.
- Add a line telling the avatar where to find the script file using the syntax
script = [SCRIPT URL].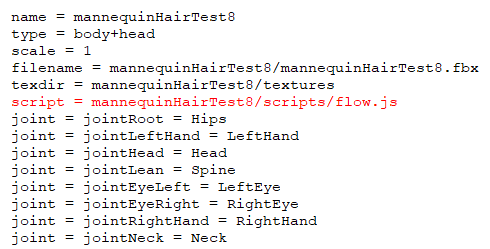
You can add multiple scripts to your avatar by adding multiple script = url lines.
Example of an Avatar Script
The following script makes your avatar throw balls when its right hand moves.
function(){
    var triggerDistance = 0.0;
    var TRIGGER_THRESHOLD = 0.9;
    var LOAD_THRESHOLD = 0.6
    var init = false;
    var rightHandIndex = MyAvatar.getJointIndex("RightHand");
    var rightArmIndex = MyAvatar.getJointIndex("RightArm");
    var distance = 0.0;
    var triggered = false;
    function fireBall(position, speed) {
        var baseID = Entities.addEntity({
            type: "Sphere",
            color: { blue: 128, green: 128, red: 20 },
            dimensions: { x: 0.1, y: 0.1, z: 0.1 },
            position: position,
            dynamic: true,
            collisionless: false,
            lifetime: 10,
            gravity: speed,
            userData: "{ \"grabbableKey\": { \"grabbable\": true, \"kinematic\": false } }"
        });
        Entities.editEntity(baseID, { velocity: speed });
    }
    Script.update.connect(function() {
        rightHandPos = MyAvatar.getJointPosition(rightHandIndex);
        rightArmPos = MyAvatar.getJointPosition(rightArmIndex);
        fireDir = Vec3.subtract(rightHandPos, rightArmPos);
        var distance = Vec3.length(fireDir);
        triggerDistance = distance > triggerDistance ? distance : triggerDistance;
        if (!triggered) {
            if (distance < LOAD_THRESHOLD * triggerDistance) {
                triggered = true;
            }
        } else if (distance > TRIGGER_THRESHOLD * triggerDistance) {
            triggered = false;
            fireBall(rightHandPos, Vec3.normalize(fireDir));
        }
    });
    MyAvatar.scaleChanged.connect(function () {
        triggerDistance = 0.0;
    });
})()
This example script uses the MyAvatar namespace to determine if your avatar’s hand moves. Upon detecting movement, the script makes your avatar launch balls. It also uses some other namespaces such as Entities (to create the ball you will launch) and Vec3 (to determine the right positions and distances). Add it to your avatar to see how it works.
See Also
Client Entity Scripts
You can make content in High Fidelity interactive by attaching scripts to entities. Client entity scripts are entity scripts that run locally on each user’s computer. When a user comes into contact with the entity, it will “preload” (or run) the script, then “unload” (or stop) the script when the user leaves.
There can be (and typically are) multiple entities in a domain, and each one can have a different client entity script associated with it.
On This Page
Attach a Client Entity Script to an Entity
To attach a client entity script to an entity:
- In Interface, pull up your tablet or HUD and go to Create.
- Select the entity you’d like to script by either clicking on it in Interface or finding it in the ‘Entity List’.
- In the Create app, go to the ‘Properties’ tab and scroll down to the ‘Behavior’ section.
- For Script, enter the URL to your client entity script.
Note
For client entity scripts, the URL content must be available to every user who visits the domain. This means the URL should be a public http(s) URL, or an Asset Server (ATP) URL for the domain. It cannot be a file URL. The script property also accepts a string as input, allowing you to insert the code directly.
Example of a Client Entity Script
The following script changes the color of a non-model entity (such as a box or a sphere) when you click on it:
(function () {
    var clicked = false;
    this.clickDownOnEntity = function (entityID, mouseEvent) {
        if (clicked){
            Entities.editEntity(entityID, { color: { red: 0, green: 255, blue: 255} });
            clicked = false;
        } else {
            Entities.editEntity(entityID, { color: { red: 255, green: 255, blue: 0} });
            clicked = true;
        }
    };
})
This example is written as a JavaScript class prototype function, and it uses the mouse event clickDownOnEntity(). When the user clicks on an entity, clickDownOnEntity() triggers the function associated with that click event. In this case, it changes the entity’s color back and forth between yellow and magenta.
See Also
Server Entity Scripts
You can make content in High Fidelity interactive by attaching scripts to entities. Server entity scripts are entity scripts that run on the server (or domain) that hosts the entity. These scripts run persistently in a domain, even if there are no users present. This means that there is only one instance of the script is running at a time, and it is running on the server. Any behavior that is controlled by your script will be seen and heard by everyone in the domain.
On This Page
Attach a Server Entity Script to an Entity
To attach a server entity script to an entity:
- In Interface, pull up your tablet or HUD and go to Create.
- Select the entity you’d like to script by either clicking on it in Interface or finding it in the ‘Entity List’.
- In the Create app, go to the ‘Properties’ tab and scroll down to the ‘Behavior’ section.
- For ‘Server Script’, enter the URL to your server entity script.
Note
An entity can have multiple server entity scripts attached to it, but all of these must be through a single file URL.
Example of a Server Entity Script
The following script modifies the intensity of a light entity, so that it flickers tea lights.
(function() {
    var MINIMUM_LIGHT_INTENSITY = 100.0;
    var MAXIMUM_LIGHT_INTENSITY = 125.0;

    // Return a random number between `low` (inclusive) and `high` (exclusive)
    function randFloat(low, high) {
        return low + Math.random() * (high - low);
    }

    var self = this;
    this.preload = function(entityID) {
        self.intervalID = Script.setInterval(function() {
            Entities.editEntity(entityID, {
                intensity: randFloat(MINIMUM_LIGHT_INTENSITY, MAXIMUM_LIGHT_INTENSITY)
            });
        }, 100);
    };
    this.unload = function() {
        Script.clearInterval(self.intervalID);
    }
});
This script is a good example of a server entity script because it only needs one actor to update the intensity of the light. The same script could be attached as an entity client script, but all clients who could see the tea light would be editing the entity to vary the intensity of the light to flicker it.
Script API
The Entity Script Server does not have access to all of the listed components of the API. APIs for avatars, controllers, recording, overlays, and mouse and keyboard events are not available in the Entity Script Server.
Learn more about what APIs are available to server entity scripts here.
See Also
Tutorial: Transfer Money and Items
While you can transfer money and items using the Inventory app, sometimes you may want to use scripting to help automate your gifting process. This page will walk you through some examples that programmatically transfers money and items using the High Fidelity Commerce APIs.
Note
Experimental API Notice: The High Fidelity Commerce APIs introduced in this document are Experimental APIs and thus are subject to the following:
- Commerce APIs on the High Fidelity Metaverse may be modified or removed at any time until Beta Release 81;
- The Commerce APIs referenced in this document and related examples are subject to change or removal without notice until Beta Release 81;
- Upon release of Beta 81, changes to the High Fidelity Commerce APIs will be subject to the standard API deprecation process.
On This Page:
- Transfer Money to Someone
- Transfer Marketplace Items
- Purchase Marketplace Items
- Verify Your Inventory
- Add a Tip Jar
- Create a VIP Access Zone
- Add a Slot Machine Game
Transfer Money to Someone
To transfer money to someone, you need to use an entity script or client script to open an end-user’s tablet to the “Send Money” screen. The script must specify a recipient and an amount of HFC. It can specify a message to the user if desired.
var tablet = Tablet.getTablet("com.highfidelity.interface.tablet.system");
tablet.loadQMLSource("hifi/commerce/common/sendAsset/SendAsset.qml");
tablet.sendToQml({method: 'updateSendAssetQML',
	assetCertID: "",
    amount: "10",
    username: "steve",
    message: "Pay me 10 HFC and I will unlock this door!"
});
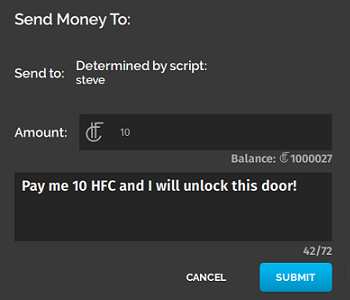
Transfer Marketplace Items
To transfer Marketplace items to someone, you need to use an entity script or client script to open an end-user’s tablet to the “Send Item” screen. The script must specify a recipient and an item’s Certificate ID. The user running the script must own the specified item Certificate ID. Optionally, the script can specify a message to the user if desired.
var tablet = Tablet.getTablet("com.highfidelity.interface.tablet.system");
tablet.loadQMLSource("hifi/commerce/common/sendAsset/SendAsset.qml");
tablet.sendToQml({method: 'updateSendAssetQML',
	assetCertID: "ABCDEFGHIJKLMNOPQRSTUVWXYZ1234567890", // This is a fake Certificate ID!
    amount: "1", // Amount will always be "1" regardless of what is specified here
    username: "steve",
    message: "Send me the item you've previously bought!"
});
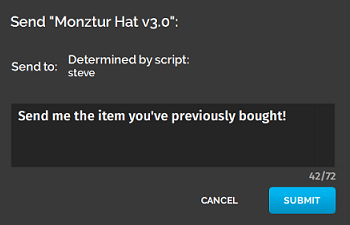
Purchase Marketplace Items
To purchase a Marketplace item for yourself, you need to use an entity script or client script to open an end-user’s tablet to the “Marketplace Checkout” screen. The script must specify the Marketplace Item ID.
var tablet = Tablet.getTablet("com.highfidelity.interface.tablet.system");
tablet.loadQMLSource("hifi/commerce/checkout/Checkout.qml");
tablet.sendToQml({method: 'updateCheckoutQMLItemID', params: {itemId: "399921f6-bf26-4bba-8654-75d1b30f9442"}});
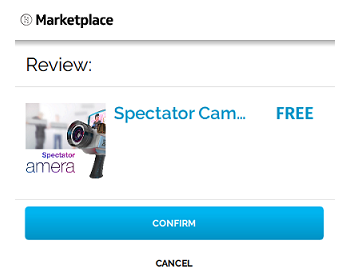
Verify Your Inventory
If a script has the proper credentials, it can check a user’s Recent Activity and Inventory on their behalf. You can use this to verify that another user has sent you money, sent you an item, or purchased your item from the Marketplace.
This feature in used in the tutorial to create a VIP zone.
Add a Tip Jar
In this example, we walk through creating an entity that, when clicked, will prompt a user to send you 10 HFC. This tutorial uses a client entity script to transfer money.
Here are the steps for this tutorial:
- Create a “Tip Jar” in Your Domain
- Write an Entity Script for the Tip Jar
- Add the Entity Script to the Tip Jar
Note
To create this content, you'll need access to a High Fidelity domain that you own and where you have full permissions. Examples of such a domain include your private Sandbox or a DigitalOcean domain.
Prerequisites
Consider getting familiar with the following concepts before starting this tutorial:
Create a Tip Jar in Your Domain
You need a jar that accepts money. In this simple example, we will use a cube entity as our tip jar. Create your tip jar in the Create app:
- In Interface, pull up your HUD or Tablet and go to Create.
- Click the cube icon to create a cube entity.
- Move the Tip Jar to where you want it.
Write an Entity Script for the Tip Jar
We need to write a script to put on the Tip Jar entity or cube. When a user clicks the cube, a message will prompt them to pay a specified username (you) 10 HFC. The message will be, “Here’s a 10 HFC tip for doing a cool thing!”.
Click here to download a pre-made “Tip Jar” entity script. Follow along with the comments in the code to understand what it’s doing!
Add the Entity Script to the Tip Jar
You’ll have to add the entity script to the Tip Jar cube entity.
- Change the
DESTINATION_USERNAMEvariable intipJar.jsto match your username. - Upload the
tipJar.jsscript to your domain’s ATP server.- In Interface, go to Edit > Asset Browser > Choose File.
- Right-click the script file, then select ‘Copy URL’.
- In Interface, pull up your HUD or Tablet and go to Create.
- In the ‘Entity List’, select the Tip Jar cube entity.
- In the entity’s ‘Properties’, scroll down to ‘Script’ and paste the URL you copied, into the text box. Press Enter.
- Lock the entity so nobody can change its attributes.
Close the Create app and click on the Tip Jar cube entity. A window pops up, prompting you to pay 10 HFC to the username specified in the script.
Create a VIP Access Zone
In this example, we walk through creating an exclusive VIP zone that is accessible only to paid VIPs. This tutorial uses a client entity script to transfer money and an assignment client script to verify payments.
Here are the steps for this tutorial:
- Place a VIP Zone in Your Domain
- Write an Entity Script for the VIP Zone
- Add the Entity Script to the VIP Zone
- Obtain the Auth Token
- Write an Authenticated AC Script
- Run the AC Script in Your Domain
- Optional: Create a Box to Accept Payments
Note
To create this content, you'll need access to a High Fidelity domain that you own and where you have full permissions. Examples of such a domain include your private Sandbox or a DigitalOcean domain.
Prerequisites
Consider getting familiar with the following concepts before starting this tutorial:
Place a VIP Zone in Your Domain
You need an area (or zone) in your domain that will be designated the “VIP Zone”. Only users who have paid you 10 HFC in the current server session have access to enter this zone. If the server restarts, users will have to pay for VIP status again.
- In Interface, pull up your HUD or Tablet and go to Create.
- Click the ‘Zone’ icon to create a zone entity.
- Move the zone to where you want it.
Write an Entity Script for the VIP Zone
We need to write an entity script to put on the VIP Zone. This script will check to see whether the user entering the zone is a VIP or a domain admin. If they aren’t, the script will remove them from the zone. In addition, the script will change change a user’s status to VIP if they pay 10 HFC.
Click here to download a pre-made “VIP Zone” entity script. Follow along with the comments in the code to understand what it’s doing!
Note
All users who load the VIP Zone entity will be individually running this script as if it were a client script.
Add the Entity Script to the VIP Zone
To add the entity script to the VIP zone:
- Upload the
vipZoneEntityScript.jsscript to your domain’s ATP server.- In Interface, go to Edit > Asset Browser > Choose File.
- Right-click the script file, then click ‘Copy URL’.
- In Interface, pull up your HUD or Tablet and go to Create.
- In the ‘Entity List’, select the ‘VIP Zone’ entity.
- In the entity’s ‘Properties’, scroll down to ‘Script’ and paste the URL you copied into the text box. Press Enter.
- Lock the zone entity so nobody can change its attributes.
Obtain the Auth Token
You need to get a High Fidelity authentication token that has the commerce scope. You will use this token while writing an Assignment Client (AC) script to check your Recent Activity for recent transactions of 10 HFC made in your domain.
To obtain this auth token:
- Go to https://highfidelity.com/user/tokens/new.
- Name the token something memorable.
- Select the
commercescope. - Click ‘Create Token’.
- Copy and save the token.
Write an Authenticated AC Script
Now, write an Assignment Client (AC) script containing the authentication token you copied and saved. This AC script checks your Recent Activity for recent transactions of 10 HFC made in your domain.
Click here to download a pre-made “VIP Zone” AC script. Follow along with the comments in the code to understand what it’s doing!
Run the AC Script in Your Domain
To run the above AC script in your domain from ATP:
- Set
HIFI_COMMERCE_TOKENto the token you saved in thevipZoneACScript.jsscript. - Upload your
vipZoneACScript.jsscript to your domain’s ATP server. In Interface, go to Edit > Asset Browser > Choose File. Right-click and select ‘Copy URL’. - Navigate to the Domain Settings page of your domain (for a local sandbox, this is http://localhost:40100/).
- Click ‘Content’ at the top of the page, then scroll to the ‘Scripts’ section.
- Under ‘Persistent Scripts’, click the
+button on the right column. - Under ‘Script URL’, paste the ATP URL you copied.
- Click ‘Save and restart’ at the top right of the page.
(Optional) Create a Box to Accept Payments
This step is optional as it doesn’t matter how a user sends you 10 HFC to earn VIP status. For example, if a user (in Interface) went to Inventory > Send Money > Nearby to send you 10 HFC while you were in your domain, they would still get “VIP status”.
However, to make it easier to people to pay you, you can create an box that collects payment. Simply follow the directions to create a tip jar above. You should now have a working “VIP Zone” in your domain. Only users with VIP status can enter this “VIP Zone”. You should also have a “Tip Cube” in your domain that helps users pay you HFC to become VIPs.
Add a Slot Machine Game
In this example, we walk through creating a slot machine game that pays out HFC. Players will pay you (the domain owner) 1 HFC to start playing, and the slot machine will pay out 25 HFC if the payer wins. This tutorial uses coupons to reserve HFC ahead of time, client entity scripts to control the mechanics of the slot machine, and an assignment client script to handle the slot machine game logic.
Here are the steps for this tutorial:
- Create a Slot Machine in Your Domain
- Create a Coupon to Authorize Winnings
- Add the Coupon Credentials to a Database
- Allow Users to Start the Slot Machine
- Add the Entity Script to the Slot Machine
- Allow Users to Pull the Reels
- Obtain Auth Token
- Write a Game Logic AC Script
- Run the AC Script on Your Domain
Note
To create this content, you'll need access to a High Fidelity domain that you own and where you have full permissions. Examples of such a domain include your private Sandbox or a DigitalOcean domain. You will also need a Google account for access to Google Sheets.
Prerequisites
Consider getting familiar with the following concepts before starting this tutorial:
Create a Slot Machine in Your Domain
You need a slot machine that your users can play. You can create your own or use the one that we created for you.
To use the one that already exists:
- Download the following JSON: basicSlotMachine_noScripts.json
- In Interface, pull up your tablet or HUD and go to Create.
- In the Create Tools app, click ‘Import Entities’. Browse to and select
basicSlotMachine_noScripts.json.
You should now see a slot machine entity in your domain. This example entity consists of:
- Three “reels” (red, green, and blue cubes).
- A “spin arm” that players will use to start the game.
- A “play text” text entity that will display the game status to players.
- A “pay-in text” text entity that will instruct users to add credits to the slot machine.
Create a Coupon to Authorize Winnings
By creating a coupon, you are authorizing High Fidelity to take out funds from your account even if you are not present in the domain. Follow these instructions to create a coupon. Copy the Authorization ID and the Coupon ID.
Add the Coupon Credentials to a Database
Later, you will write an Assignment Client (AC) script for the Slot Machine game logic, including payout logic. When the Slot Machine pays out, it needs to know the Authorization IDs and Coupon IDs associated with your pre-authorized payout funds.
In this step, you will put the “Authorization ID” and “Coupon ID” into some sort of database. Here, we use a Google Sheet to store the data, and a Google Script to access the data in the Sheet.
To create the Google sheet:
- Log into Google Sheets, and create a new spreadsheet. Give it a filename you want, such as “Slot Machine Payouts”.
- Name the current sheet “Authorizations” using the arrow on the tab at the bottom left of the screen.
- Give the header row (the first row) the following labels in this order:
- Used
- HFC
- Authorization ID
- Coupon ID
- In the second row, under the HFC column, put
25. - In the second row, under the ‘Authorization ID’ column, paste your saved Authorization ID.
- In the second row, under the ‘Coupon ID’ column, paste your saved Coupon ID.
To create the Google script
- At the top of the Google Sheets window, click Tools > Script editor.
- Name your currently untitled project “Slot Machine Authorization Handler”.
- Copy and paste the contents of this example GS script into the Script Editor.
- Change
var SPREADSHEET_IDto match the Spreadsheet ID of your spreadsheet above.- The Spreadsheet ID is embedded in the URL of the Google Sheets page and is visible in the following screenshot (part of the URL is blocked out for privacy purposes).

- The Spreadsheet ID is embedded in the URL of the Google Sheets page and is visible in the following screenshot (part of the URL is blocked out for privacy purposes).
- Save the script, using whatever filename you wish.
- Click ‘Publish’, then ‘Deploy as Web App…’
- Follow Google’s instructions to deploy your script as a web app. Ensure you set ‘Who has access to the app’ to ‘Anyone, even anonymous’. When finished, copy the URL you’re given at the end of the process and save it somewhere you’ll remember for later. The web app URL will look something like
https://script.google.com/macros/s/ABCDEFGHIJKLMNOP_QRSTUVWXYZ1984373/exec
Note
Make sure you keep the web app URL and the Google Sheet URL private, or your authorization data will be visible to anyone with access to the sheet.
Allow Users to Start the Slot Machine
You need to provide your users with a way to add slot machine play credits. You can do this by adding a client entity script to the Slot Machine entity.
This script will display a message “1 Slot Machine Play Credit” when they click the text or border around the text on the slot machine. They can pay the specified user (you) 1 HFC to play.
Click here to download a pre-made “Add Credits” entity script. Follow along with the comments in the code to understand what it’s doing!
Add the Entity Script to the Slot Machine
To add the entity script to the slot machine:
- Change the
DESTINATION_USERNAMEto your username inaddCreditsButton.js. - Upload the
addCreditsButton.jsscript to your domain’s ATP server. In Interface, go to Edit > Asset Browser > Choose File. Right-click the script file, then click ‘Copy URL’. - In Interface, use the Create app to select the ‘Click Here to Add Credits’ text entity on the Slot Machine entity.
- In the entity’s ‘Properties’ tab, scroll down to ‘Script’ and paste the URL you copied in step 2 into the text box. Press Enter.
- Lock the entity so nobody can change its attributes.
- In Interface, use the Create app to select the border entity around the ‘Click Here to Add Credits’ button on the Slot Machine entity.
- In the entity’s ‘Properties’ tab, scroll down to ‘Script’ and paste the URL you copied in step 2 into the text box. Press Enter.
- Lock the entity so nobody can change its attributes.
Allow Users to Pull the Reels
Next, you need to provide your users with a way to start the slot machine’s reels. Here, we will write an entity script to put on the slot machine’s Spin Lever. This script will send a message to an Assignment Client (AC) script to kick off the rest of the game logic.
Click here to download a pre-made “Spin Lever” entity script. Follow along with the comments in the code to understand what it’s doing!
To add the entity script to the reels:
- Upload the
slotMachineSpinLever.jsscript to your domain’s ATP server. In Interface, go to Edit > Asset Browser > Choose File. Right-click the script file, then click ‘Copy URL’. - In Interface, use the Create app to select the red Spin Lever sphere entity on the Slot Machine entity.
- In the entity’s ‘Properties’ tab, scroll down to ‘Script’ and paste the URL from step 1 into the text box. Press Enter.
- Lock the entity so nobody can change its attributes.
Obtain Auth Token
You’ll have to get a High Fidelity authentication token that has the commerce_ro scope. You will use this token while writing an Assignment Client (AC) script to check your Recent Activity for recent transactions of 1 HFC made in your domain with a specific memo (“1 Slot Machine Play Credit”).
To get this auth token:
- Go to https://highfidelity.com/user/tokens/new.
- Name the token something memorable.
- Select the
commerce_roscope. - Click ‘Create Token’.
- Copy and save the token.
Write a Game Logic AC Script
Now, write an AC Script that will handle the slot machine game logic, including:
- Knowing when to start a new spin.
- Knowing whether a user who attempted to spin has paid.
- Changing the slot machine reel colors during a spin.
- Checking the end state of the reels to determine win/loss.
- Paying out pre-authorized funds.
Click here to download a pre-made “Slot Machine” entity server script. This script is quite long and is arguably the most important element of this project! Follow along with the comments in the code to understand what it’s doing.
Run the AC Script on Your Domain
To run the AC script on your domain from ATP:
- Change your
slotMachineACScript.jsas follows:- Set
HIFI_COMMERCE_TOKENto your HiFicommerce_rotoken. - Set
SLOT_MACHINE_REEL_1_IDto the Entity ID of the leftmost slot machine reel. - Set
SLOT_MACHINE_REEL_2_IDto the Entity ID of the middle slot machine reel. - Set
SLOT_MACHINE_REEL_3_IDto the Entity ID of the rightmost slot machine reel. - Set
SLOT_MACHINE_PLAY_TEXT_IDto the Entity ID of the “Play Text” text entity right below the slot machine reels. - Set
GOOGLE_SHEET_AUTH_SCRIPTto the URL of the Google Script Web App created earlier. - Set
SLOT_MACHINE_AREAto the coordinates around which the slot machine entity will be placed. See the comments in the code for more details about why this is necessary.
- Set
- Upload your
slotMachineACScript.jsscript to your domain’s ATP server. In Interface, go to Edit > Asset Browser > Choose File. Right-click the script file, then click ‘Copy URL’. - Navigate to the Domain Settings page of your domain (for a local sandbox, this is http://localhost:40100/).
- Click ‘Content’ at the top of the page, then scroll to the ‘Scripts’ section.
- Under ‘Persistent Scripts’, click the
+button on the right column - Under ‘Script URL’, paste the ATP URL from step 2.
- Click ‘Save and restart’ at the top right of the page
You should now have a basic but fully working slot machine in your domain, that you and anyone else in your domain can play.
Note
In this example, a user could change the colors of the unlocked reels to match just before the game ends, and thus force a payout. This example does not cover anti-cheat or anti-tampering methods for securing your slot machine or funds!
See Also
Tutorial: Use MIDI to Control Your Environment
MIDI (Musical Instrument Digital Interface) is a protocol (with electrical connectors and a digital interface) that allows digital tools and electronic devices (virtual and physical) to communicate with each other. MIDI is usually used as a music sequencer. Originally, this format was created in the 80s as a way for instruments to communicate with each other, but over the last 30 years, it has evolved into a highly organized specification that is heavily tested and adopted for a multitude of purposes.
We created a MIDI class (with the help of one of our community members, Brainstormer) that can be used to control your environment in High Fidelity. For example, we used MIDI to control lighting in a domain for a music show.
Note
Currently, we support the MIDI class only on Windows.
On This Page
MIDI Class Basics
Our MIDI class works by passing a DWORD (double word), a data type specific to Microsoft Windows, as a message. It is an unsigned 32-bit unit of data and can contain an integer value ranging from 0 to 4,294,967,295.
Every time you move a lever, rotate a knob, press/release a key, or push down a pad, you are creating a MIDI message that says what channel, what note, what velocity, and what is the status/command to run.
Each byte in this message describes a different type’s value.
| 00000000 | 0vvvvvvv | 0nnnnnnn | 1sss | cccc |
Where:
- v = velocity
- n = notes
- s = status
- c = channel
The number in the higher order bit (the first number) denotes whether it is a command (1) or data (0). The rest of the numbers determine the value of the type. This means that the velocity and note can represent 128 unique values (1+2+4+8+16+32+64), status can represent 8 unique values, and channel can represent 16 values.
The different status types we support are:
| Status | Types |
|---|---|
| 08 | note off |
| 09 | note on |
| 10 | polyphonic key pressure |
| 11 | control change |
| 12 | program change |
| 13 | channel pressure |
| 14 | pitch bend |
| 15 | system message |
Connect Your Controller Device
You can either connect a real controller device that you use to control your environment in High Fidelity, or create a virtual one that will help you connect to other virtual devices.
Connect Ableton Live to Interface
To connect Ableton Live directly to High Fidelity’s Interface client, we recommend the following virtual tools:
Connect an iPad or iPhone to Interface
You can use your iPad or iPhone as a touch screen controller with buttons, knobs, and sliders. Read the sections Configure Your MIDI Device and Example: Change the Color of a Cube using MIDI before reading these instructions.
- Download our recommended app touchosc.
- Download the Windows bridge.
- Set up either through USB or through your local WIFI network in the settings menu.
- If you setup your onEventReceived to log the messages coming in, you can see which knobs send what information that you can use to call custom functions.
- There are some interesting components like the accelerometer which you can use as well!
Configure Your MIDI Device
Once you’ve set up your MIDI Controller Device, you need to configure it.
Here is a general recommended MIDI config function you can run in a script. With it, you can see a list of MIDI devices that are currently connected:
// Some helpful constants
const INPUT = false;
const OUTPUT = true;
const ENABLE = true;
const DISABLE = false;
function midiConfig(){
    Midi.thruModeEnable(DISABLE );
    Midi.broadcastEnable(DISABLE );
    Midi.typeNoteOffEnable(ENABLE );
    Midi.typeNoteOnEnable(ENABLE );
    Midi.typePolyKeyPressureEnable(DISABLE);
    Midi.typeControlChangeEnable(ENABLE);
    Midi.typeProgramChangeEnable(ENABLE);
    Midi.typeChanPressureEnable(DISABLE);
    Midi.typePitchBendEnable(ENABLE );
    Midi.typeSystemMessageEnable(DISABLE);

    // get a list of the available  in and  out device IDs
    midiInDeviceList = Midi.listDevices(INPUT);
    midiOutDeviceList = Midi.listDevices(OUTPUT);
    print(JSON.stringify(midiInDeviceList));
    print(JSON.stringify(midiOutDeviceList));
After you run the configuration function, you will want to connect to
midiMessages:Midi.midiMessage.connect(onEventReceived); // Your message handler will look like the following: /// @param {int} device: device number /// @param {int} channel: channel number /// @param {int} type: 0x8 is noteoff, 0x9 is noteon (if velocity=0, noteoff), etc /// @param {int} note: MIDI note number /// @param {int} velocity: note velocity (0 means noteoff) function onEventReceived(eventData){ // functions you run in response to different MIDI events }
Example: Change the Color of a Cube using MIDI
Let’s change the color of a cube entity in High Fidelity using MIDI.
Use this method to figure out the MIDI range of
0to127to be any other output range you want using linear interpolation:function lerp(InputLow, InputHigh, OutputLow, OutputHigh, Input) { return ((Input - InputLow) / (InputHigh - InputLow)) * (OutputHigh - OutputLow) + OutputLow; } lerp (0,127,0,360,eventData.velocity); // the 0 would be 0, and the 127 would be 360.
Since colors go from
0to255, we could do the following:var red = 0; function changeCubeColor(redValue){ var entityColorProps = Entities.getEntityProps(cubeID, ["color"]).color; entityColorProps.red = redValue; Entities.editEntity(cubeID, entityColorProps); }
Then use
onEventReceivedto change the color of the cube:// eventData.device, eventData.channel, eventData.type, eventData.note, eventData.velocity function onEventReceived(eventData){ changeCubeColor( lerp(0,127,0,255,eventData.velocity) ); }
Print the eventData in your onEventReceived function to see each controller and its output. This will tell you everything you need to know about how to route the right key, slider, knob, or button to to your intended JavaScript functions.
If you want to use to control something outside of High Fidelity, or to directly call a MIDI event to control something in Hifi, you can use the function:
// event similar to the above
Midi.playNote(Status, Note, Velocity);
Other Ways to Use MIDI in High Fidelity
- Use Ableton to sequence out entire animations of your domain.
- Control real world devices by the movements things make in Hifi and vice versa (think update loop)
- Setup your iPad to be a whole group of buttons that you can press at any time to trigger events in your domain at will.
See Also
Host
High Fidelity’s vision is a decentralized network of virtual worlds, created and controlled by our users. To achieve this vision, we want you to have the power to express your creativity, build your own virtual worlds, and be a part of an expanding metaverse.
Throughout this chapter, learn what its like to create your own domain, host it on a server, and maintain it so that it can be enjoyed by users for years to come.
Get Started with Hosting
We are thrilled you’ve decided to host a custom domain with us on the metaverse! We also understand that setting up a server, configuring it, and creating a domain takes some time and technical knowledge. Hopefully, this section will help you become familiar with the basics of hosting domains in High Fidelity, so that you can create the space you want and be a part of building a bigger, more expansive metaverse.
Overview of Hosting
High Fidelity’s hosting interface consists of the following components that work together to create an immersive VR experience for your visitors:
- The Sandbox is a testing environment hosted locally on your computer that gives you a space to play around and build content without affecting any domains in the metaverse. Note that it is possible to configure High Fidelity so that your Sandbox is also a registered domain that is hosted directly from your local computer. The Sandbox application can be download from the High Fidelity website.
- A domain is a registered location in the metaverse. Each domain is assigned a unique ID to identify it. You can sign up for a new domain in one of two ways: either by setting up a High Fidelity server or by logging into your account via the High Fidelity website.
- A server hosts a domain, and processes incoming network requests for the domain. The server for your domain is either a physical computer or a cloud-hosted server.
- A droplet or cloud domain is a cloud server hosted by our partner, DigitalOcean.
- A content set is the content that you’ve designed to make your domain unique and pretty.
The Hosting Process
Here is an overview of the steps you’ll need to take to host your domain up and running on the metaverse:
- Choose your hosting platform (local server or cloud services)
- Set up your server and create your domain
- Add content to your domain
- Set up user permissions
- Invite users to your domain
Once your domain is running, we’ll cover how to configure your domain settings, from the most basic to the more advanced, and how to maintain your domain.
Set up a Domain Server
Depending on your requirements, you can host your domain on a physical computer (by turning it into a local server) or on cloud servers. In general, we recommend using local servers for private events and gatherings, and cloud services for larger public venues. To help with hosting your domains, we have a partnership with DigitalOcean to provide affordable, integrated cloud domain services for your use.
| Pros | Cons | |
|---|---|---|
| Local Server |
|
|
| DigitalOcean Droplet |
|
|
Once you’ve decided what hosting platform to use, you’re ready to set it up:
Host a Domain from a Local Server
A local server lets you use your own computer to host your virtual domain on the metaverse.
Warning
Hosting any kind of server from your home means exposing your network to the world. Therefore, we recommend using local servers only for private events and small gatherings. If you want to host a public domain or advertise your domain in the GoTo app, we recommend using a hosting provider such as DigitalOcean.
On This Page
Set Up Your Server
Before you set up a local server, you should have a basic understanding of computer and networking concepts. Specifically, familiarize yourself with:
- Your system and hardware configuration
- Your network configuration
At a minimum, the computer that you use for your server should meet our minimum system requirements. However, keep in mind that as you add more visitors to your domain, the demand on your resources will increase. Therefore if you wish to invite a large group (over 15 visitors) or create a complex content set, we encourage you to increase your memory and network bandwidth.
To host a domain, you must be running High Fidelity’s open source Client + Sandbox software.
Note
While we do not publish an installer for Linux computers, you can still run a local domain server on a Linux machine. To do so, you will need to build the application from our code base. For more information, see our Linux Build Guide.
Create a Domain
To set up a domain and host it on your local server:
Open the Setup Wizard (Domain Server Settings).
- For Windows: Click on the High Fidelity icon in the system tray, then click ‘Settings’.
- For Mac: Right-click the High Fidelity icon on the top menu bar, then click ‘Settings’.
- For any OS: Open a browser and enter the URL http://localhost:40100/settings.
Follow the steps of the Wizard to create a domain on the metaverse and connect it to your local server.
- Step 1: Connect your High Fidelity account: When you connect your account, you become the owner of the new domain that is created for your server. The security token that you copy and paste gives High Fidelity access to your domain settings, which are stored on your local server.
- Step 2: Identify place name: Your place name is how users will visit your domain in the metaverse. By default, you are assigned a temporary place name for your domain, such as turquoise-bandwidth-8162.
Note
Your temporary place name is only active while your domain is being staged. Permanant place names can be purchased on a subscription basis, and are renewed yearly. Learn how to purchase a custom place name for your domain.
- Step 3: Set up basic permissions: By default, anyone logged on to your computer will have access to the domain settings for your domain. If you would like to extend administor privileges to remote users (or allow yourself access from a remote location), then add the High Fidelity usernames here. In addition, choose who will be able to connect or rez items.
- Click Finish to close the Setup Wizard. You will automatically be redirected to the Domain Settings for your domain.
At this point, you have staged a domain in the metaverse and connected it to your server. However, it is not yet “live”, meaning that it exists only as a temporary or “draft” domain in the metaverse.
Activate Your Domain
To activate your domain:
- Return to the Domain Settings for your domain. If it isn’t open, open a browser window and type http://localhost:40100/settings/ into the URL bar.
- Click ‘Advanced Settings’ under Metaverse/Networking.
- Click the ‘Create new domain ID’ button.
This will assign your domain with a permanent, unique identification code that registers it in the metaverse. Your temporary place name will no longer work, and your domain is accessible through its purchased place name or your server’s IP address.
Note
If you did not purchase a permanent place name, the only way to access your domain is by your server’s IP address. However, note that when your IP address changes, so too will the address of your domain and you will need to manually restart your domain each time you change networks. Therefore, if you are hosting your domain on a laptop or on a computer with a frequently changing IP address, we strongly recommend that you purchase a permanent place name for your domain. Learn how to purchase a custom place name for your domain.
Now, your domain is officially part of the expanding metaverse!
What’s Next?
| Visit Your Domain | Personalize Your Content | Configure More Settings |
|---|---|---|
Host a Domain with DigitalOcean
Hosting your domain with a cloud service, such as DigitalOcean, removes the need to set up, maintain, and secure a hosting server. For large domains with lots of visitors, it also eliminates the need to invest in high-end hardware and network capabilities.
High Fidelity has a partnership with DigitalOcean so that we can provide you with hosting services. All you need to do is create a new cloud domain, and configure your permissions and settings - let us do the rest!
On This Page
Create a New Cloud Domain
When you create a new cloud domain directly from High Fidelity, we do a lot of the “behind the scenes” work for you. All you need to do is log in to High Fidelity, sign up and/or log in to a DigitalOcean account, and choose the specs for your droplet. A DigitalOcean droplet is simply a scalable virtual machine that we use to host your domain.
To create a new cloud domain:
Log in to your High Fidelity account at https://highfidelity.com.
Hover over your username, and click ‘Cloud Domains’.
Click ‘Create New’.
At this step, you must log in to your DigitalOcean account and verify that billing information is set up with DigitalOcean.
- If you do not have a DigitalOcean account, follow Step 1 and click the button ‘Sign Up for DigitalOcean’. Through DigitalOcean’s website, sign up for a new account, verify your account, and set up billing information. Once you’ve signed up for an account, you can close out of DigitalOcean’s website.
- If you already have a DigitalOcean account, we strongly encourage you to log into your account on DigitalOcean’s website and verify that your billing information is set up correctly. If you do not have accurate billing information in your DigitalOcean account, all new cloud domains creation attempts will silently fail.
- After you have signed up for a DigitalOcean account and/or verified your billing information, follow Step 2 and click ‘Connect your DigitalOcean Account’ to link your High Fidelity and DigitalOcean accounts.
Choose the DigitalOcean droplet you would like to host. Prices per month vary based on the specifications for the virtual machine. Depending on the number of users you expect in your domain, we recommend:
Users Memory VCPUs Transfer SSD Disk Price 2-3 2GB 1 vCPU 2TB 50GB $10/mo 5-6 2GB 2 vCPU 3TB 60GB $15/mo 10-15 8GB 4 vCPU 5TB 160GB $40/mo 25-30 16GB 6 vCPU 6TB 320GB $80/mo 40-50 32GB 8 vCPU 7TB 640GB $160/mo 160 48GB 12 vCPU 8TB 960GB $240/mo Choose the geographical location for your droplet. Ideally, this is a server nearby you and your domain’s visitors.
Click ‘Launch your cloud domain’, then accept the billing notification.
At this point, High Fidelity will not only create your DigitalOcean droplet, but we will also create and register a domain for you on the metaverse. Once the status bar goes away, your domain is set up and ready to go. Feel free to test it out by visiting it via its IP address!
Note
On the Cloud Domains webpage, the status may say “Setup is incomplete”. Note that the set up did not fail in any way and at this point, you have a fully functional, running domain. This message is there to remind you that there are additional configuration settings you may wish to customize, such as user permissions or place names. To learn more about configuration, continue to the next section.
Configure Your Domain
After you create a new cloud domain (remember, the “Create New Domain” button creates both a DigitalOcean droplet and a domain on the metaverse), you have the option to configure its settings. At a minimum, we strongly encourage you to set up basic permissions and define how people will be able to get to your domain.
This process assumes that you are configuring a domain that you just created.
On the Cloud Domains page, locate your new cloud domain and click ‘Configure your domain’. If you don’t see the button, click the menu (3 dots), then choose ‘Configure your server’.
This opens the Setup Wizard (Domain Server Settings). Note that the Wizard only opens the first time you go to the domain settings.
Step 1: Identify place name: Your place name is how users will visit your domain in the metaverse. By default, all cloud domains are accessed by their IP address. Custom place names can be purchased on a subscription basis, and are renewed yearly. Learn how to purchase a custom place name for your domain.
Step 2: Set up basic permissions: By default, you are the only person with any sort of access to your domain (and you are automatically given administor privileges). If you would like to extend administor privileges to other users, then add their High Fidelity usernames here. In addition, choose who will be able to connect or rez items in your domain. Learn about setting user permissions.
Step 3: Set up server settings authentication: Because your domain settings are stored on a remote server, we want to ensure that they are protected. To do so, we require that you set up a unique username and password. In order to access your domain settings, you will need to enter this username and password. Learn about securing your domain settings.
Note
This username and password is not connected in any way to your High Fidelity account, and is used only to access the settings for this specific cloud domain.
Click Finish to close the Setup Wizard.
Now, your domain is officially part of the expanding metaverse.
What’s Next?
| Visit Your Domain | Personalize Your Content | Configure More Settings |
|---|---|---|
Configure Your Domain Settings
Your domain comes with a comprehensive set of configuration options that let you customize its networking properties, security, behavior, and more. To access your domain settings:
- For cloud hosted domains, go to https://metaverse.highfidelity.com/user/cloud_domains. Click the “More Options” menu (3 dots on the right-side of the row), then click ‘Domain Server settings’. Log in when prompted.
- For local servers running on any OS, go to http://localhost:40100/settings.
- For local servers on Windows: Click on the High Fidelity icon in the system tray, then click ‘Settings’.
- For local servers on Mac: Right-click the High Fidelity icon on the top menu bar, then click ‘Settings’.
In This Section
Define Your Network Settings
The Metaverse/Networking section of the Domain Settings defines all of the network settings for your domain.
Warning
Changing any network settings will affect how High Fidelity’s servers connects to your domain. Before making any changes to the settings, ensure that you have a basic understanding of networking concepts (IP, UDP, ports, etc) as changing these settings can impact visitors or (if you’re running a local server) put your system at risk.
On This Page
Linked High Fidelity Account
Every domain is linked to one High Fidelity account, who is the owner of that domain. When you link your account, an OAuth access token is created and grants your account access to modify domain settings, and access groups necessary for domain operations. In addition, you can access your account-specific settings and purchases, such as place names.
The status of your linked High Fidelity account is reflected at the top of the Metaverse/Networking section of the domain settings. You can also view your access token on this page (under ‘Advanced Options’).
Automatic Networking
The automatic networking settings define how other nodes in the metaverse connect to your domain. These nodes include the avatar mixer, audio mixer, entity server, asset server, entity script server and messages mixer.
Warning
Do not change any network settings for cloud hosted domains. These are configured as part of the automatic setup process that occurs when you purchase a DigitalOcean droplet through High Fidelity. Changing any of these network settings may cause your cloud hosted domain to not work as intended.
Choose from the following automatic networking options:
- None: The network address and port displayed will be used to connect your domain. They are never automatically updated, and your domain must be reachable at the address and port you set.
- IP Only: Your domain will update the network address displayed to whatever it detects as your current IP address. The port displayed will not be automatically changed, so your domain must be reachable on the specified port. This option is recommended for a local server running on a home network with a dynamically changing public IP address.
- Full: Your domain will provide the networking information to High Fidelity’s servers, so that new clients can connect to it via UDP hole punch without needing to make any changes to NAT or firewall settings. This may not work for all networks.
Depending on the automatic networking method you choose, define the network address and/or port in the fields provided.
Note
If you intend to host multiple domains on the same network and router, be sure to set each domain to a separate UDP port. You can use the value “0” to have your domain select a random port, which will help prevent port collisions.
Domain ID
Each domain on the metaverse is assigned a unique domain ID. High Fidelity uses this ID to track where certified Marketplace items are rezz’d, to link domains to place names, to identify domain owners and more.
If you don’t want your domain to be registered in the metaverse, leave the Domain ID field blank.
Warning
Do not change the domain ID for cloud hosted domains. This is assigned to your domain when you purchase a DigitalOcean droplet through High Fidelity, and changing it may result in errors on your domain.
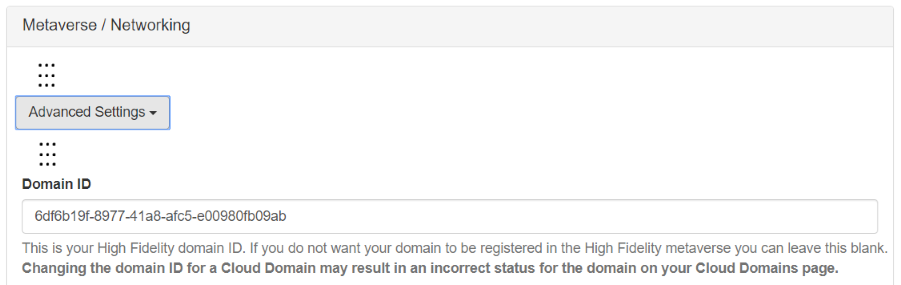
Enable Packet Verification
When ‘Enable Packet Verification’ is turned on, High Fidelity sends secure checksums on communications that use the High Fidelity protocols. This increases security in your domain, but may slightly decrease domain performance for your visitors.
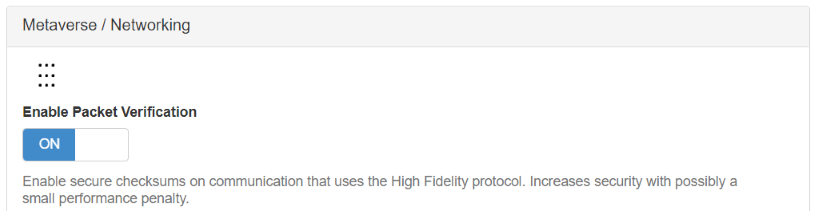
Set Up a Place Name
While you can travel to a domain using its IP address, IP addresses are difficult to remember, often change depending on your network setup, and are not very attractive sounding. Telling a friend “Meet me in 20 minutes at IP address …” just doesn’t cut it in a fun, virtual environment.
Place names, on the other hand, make it easy to travel to your domain. They’re memorable, and give context to visitors to remember your virtual world. Imagine someone saying “Wow, I had a great time at Deerhaven last night!” and you can smile knowing that they’re talking about your domain, Deerhaven.
Purchase a Place Name
Place names are purchased from High Fidelity for $20/year. Once purchased, a place name can be transferred freely between any of your domains.
Note
If you would like to use HFC to purchase a place name, schedule an appointment with the High Fidelity banker. Here, you can purchase a coupon that can be used to purchase a place name using the process below.
- Go to https://highfidelity.com/user/places to purchase a place name. If you’re not logged in, you will be prompted to do so.
- Click ‘Create a Place Name’.
- Type in your new Place Name. Place Names must be 4-64 characters in length. Letters, numbers and hyphens are allowed. You can use any place name that has not been already purchases; however, please note that High Fidelity reserves the right to reject any registration we deem obscene, offensive, or a copyright violation, and refund the corresponding registration fees.
- Click ‘Checkout Now’.
- Enter your credit card number, PayPal account information or a coupon code to complete the purchase.
Configure Your Place Name
A place name points to a specific coordinate in the metaverse. Not only does it point to a domain, but it also defines the exact position in your domain where your visitors will spawn in. There are two different ways to configure your place name settings, and they achieve the same thing.
Method 1 - Use the Domain Settings
This sets up your place name directly from your domain settings.
Open your domain settings.
- For cloud hosted domains, go to https://metaverse.highfidelity.com/user/cloud_domains. Click the “More Options” menu (3 dots on the right-side of the row), then click ‘Domain Server settings’. Log in when prompted.
- For local servers on Windows: Click on the High Fidelity icon in the system tray, then click ‘Settings’.
- For local servers on Mac: Right-click the High Fidelity icon on the top menu bar, then click ‘Settings’.
- For any OS: Open a browser and enter the URL http://localhost:40100/settings.
Scroll to ‘Places’.
In the grid, click the
+icon to add a place name to this domain.Choose the place name you want to use from the dropdown list.
For ‘Path or Viewpoint’, enter the coordinates where your visitors will spawn.
Click ‘Save’.
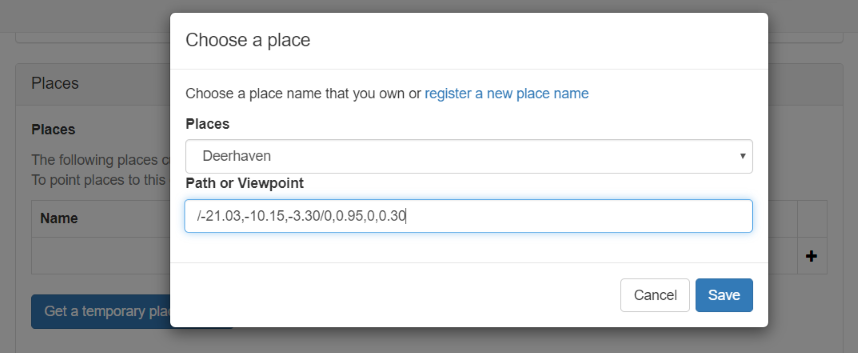
Method 2 - Use ‘My Places’
This sets up your place name from your High Fidelity account. Before moving forward, make sure you have the domain ID of your domain. You will need this to point your place name to your domain.
- Go to https://highfidelity.com/user/places. If you’re not logged in, you will be prompted to do so.
- Click the ‘Edit’ icon next to the place name you want to configure.
- For ‘Points to’, enter the domain ID of your domain.
- For ‘Path’, enter the coordinates where your visitors will spawn.
- (Optional) Enter a description for your domain. This shows up when a user clicks the info icon if your domain is displayed in the GoTo app.
- (Optional) Upload a preview image of your domain. This shows up when your domain is displayed in the GoTo app.
- Click ‘Update Place’.
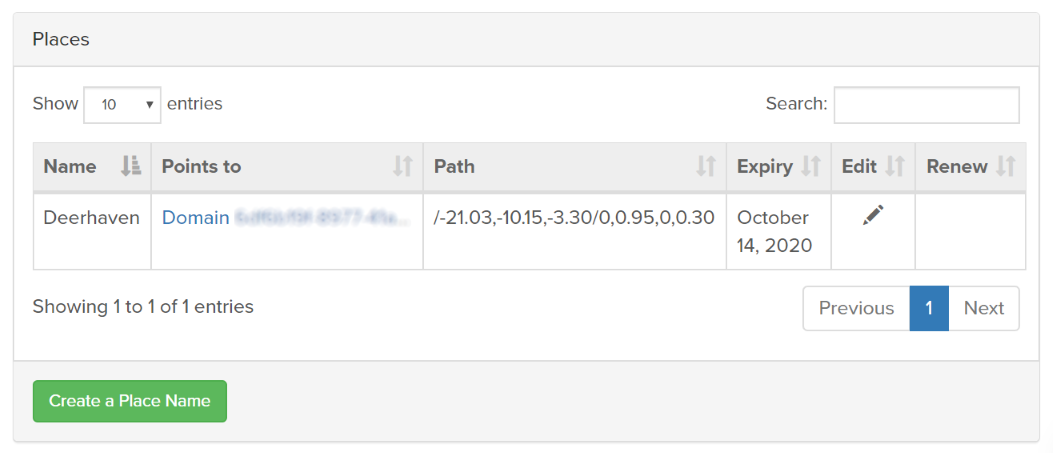
Custom User Groups
You can create user groups to include your own list of High Fidelity users. Once a user group is set up, you can assign it permissions as you would any of the standard user types above. The permissions are applied to every member of the group.
Custom user groups are purchased from High Fidelity for $5/year.
Create a User Group
To set up a custom group:
Go to https://highfidelity.com/user/groups. If you’re not logged in, you will be prompted to do so.
Click ‘Create New Group or List’.
Enter a name for your custom user group.
Click ‘Checkout Now’.
Enter your credit card number, PayPal account information or a coupon code to complete the purchase.
High Fidelity offers two types of user groups. Choose the type that best fits your needs:
- Group: Members will receive an invitation to join the group. It is up to the invited user whether or not they join, and they are free to leave the group at any time. Groups are recommended for clubs, bands, teams, etc.
- List: The owner of the user group adds each member account without notifying the user. Lists are recommended for blacklists and whitelists.
Click ‘Create New Group’ or ‘Create New List’ (depending on the selection above).
Confirm your purchase.
Set Up Ranks
Within a group, you can create sub-groups to restrict permissions even further. These sub-groups are called “ranks”. For example, a group for a band boosters club may have ranks for “youth” and another for “parents” - two different groups of members within the same organization, each requiring different permissions.
To set up ranks:
- Go to https://highfidelity.com/user/groups. If you’re not logged in, you will be prompted to do so.
- Click on your user group or list.
- For ‘New Rank Name’, enter a name for your rank (for example “Youth”).
- Click ‘Create New Rank’.
- (Optional) Update the group, rank, and member permissions for this rank. These permissions affect whether members can view and/or edit any part of the group, including the group properties, its ranks or its members. If you made any modifications, click ‘Update Rank’.
Add Members to Groups and Lists
Now that your user group (and ranks) are created, you need to add members to your user group. To add users:
- Go to https://highfidelity.com/user/groups. If you’re not logged in, you will be prompted to do so.
- Click on your user group or list.
- Scroll to ‘Members’.
- For ‘New Member Name’, enter the username of the user you want to add.
- Select the rank you’d like the member to have.
- Click ‘Add Member’.
Assign User Permissions
You can protect your domain by setting user permission for the visitors in your domain. In your domain settings, you control the types of users that have access to your domain, and the permissions granted to them. For example, you can let anyone connect to your domain, but only give friends access to edit your domain content.
Set User Permissions
Permissions can be assigned to standard user groups, custom user groups, specific users, users from a specific IP, and users from specific computers.
The permissions for a user will be the sum of all groups that the user is in. For example, let’s say that all logged in users can connect and only localhost users can rez entities. If a user is both logged in and on ocalhost, then they will be able to both connect and rez entities. Additionally, when you assign user permissions to a specific user, it will supersede any group-level permissions that otherwise might apply to that user.
To assign user permissions:
Open your domain settings.
- For cloud hosted domains, go to https://metaverse.highfidelity.com/user/cloud_domains. Click the “More Options” menu (3 dots on the right-side of the row), then click ‘Domain Server settings’. Log in when prompted.
- For local servers on Windows: Click on the High Fidelity icon in the system tray, then click ‘Settings’.
- For local servers on Mac: Right-click the High Fidelity icon on the top menu bar, then click ‘Settings’.
- For any OS: Open a browser and enter the URL http://localhost:40100/settings.
Scroll to ‘Domain-Wide User Permissions’.
First, set any permissions for the standard user groups. Check the box of all permissions you’d like to grant.
To assign all other permissions, you need to add a custom group, specific user, etc individually to the correct permissions table:
Add Group: Enter the name of the custom group or list, then click the
+icon. Save your domain settings to load ranks. Check the box of all permissions you’d like to grant or deny (depending on the permissions table you are adding the group to).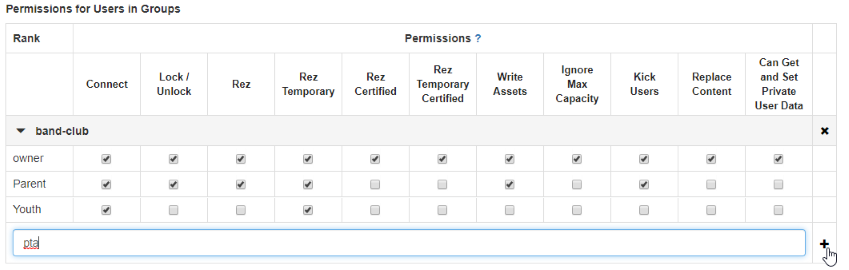
Add Specific User: Click the
+icon, then enter a specific user name. Check the box of all permissions you’d like to grant.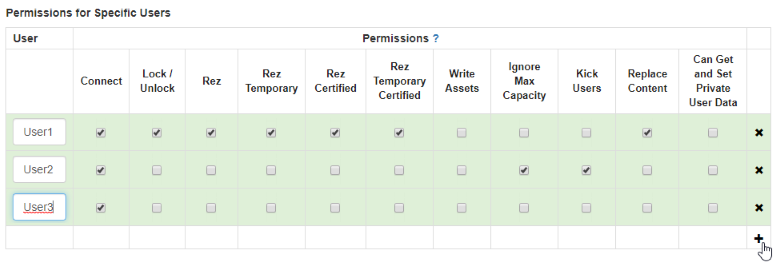
Add IP Address, MAC Address, or Machine Fingerprint: Click the
+icon, then enter the information (based on the permissions table you are adding permission to). Check the box of all permissions you’d like to grant.
Click ‘Save’ to save your domain settings.
Standard User Groups
Your domain comes with four basic security groups that are already set up, based on the people that you will interact with in the metaverse. They are:
| User Type | Description |
|---|---|
| anonymous | A person who is not logged in and is using an instance of High Fidelity’s Interface. This is the default user type for someone who has downloaded Interface for the first time. |
| friends | A user that you have connected with by shaking hands with their avatar and clicking on the ‘Friends’ checkbox in your People app. Connections are different from Friends. By default, Friends have more permissions in your domains than your Connections. Connections are treated like anonymous users. |
| localhost | A user who is running Interface on the same machine where the server is hosted. Localhost users do not need to be logged in and have permissions that override non-user-specific permissions. |
| logged-in | A user that is logged into their High Fidelity account while using Interface. They do not need to be a Friend or a Connection to have server rights. Permissions that are granted to a specific user override all other permissions. |
The ‘Connect’ permission for these standard user groups determine the privacy level of your domain:
- Public: A public domain allows ‘anonymous’ and/or ‘logged-in’ users to connect to it. These domains may be featured in the GoTo app and in other places around the metaverse.
- Private: A private domain does not allow ‘anonymous’ and/or ‘logged-in’ users to connect to it. Domain owners are responsible for promoting their domains to other users and maintaining connect permissions for users to enter their domain.
User Permissions
The actions that you can secure for each type of user are as follows:
| Permissions | Definition |
|---|---|
| Connect | Sets whether a user can enter the domain. |
| Lock/Unlock | Sets whether a user can change the “locked” property of an entity to prevent it from being modified. |
| Rez | Sets whether a user can permanently create (or rez) new entities in the domain. These users will also have full access to the Create app. |
| Rez Temporary | Sets whether a user can create (or rez) new entities with a finite lifetime (the lifetime is set in Domain Settings > Entities > Advanced Settings > Maximum Lifetime of Temporary Entities). These users will also have full access to the Create app. |
| Rez Certified | Sets whether a user can permanently create (or rez) new entities that were purchased from the Marketplace. |
| Rez Temporary Certified | Sets whether a user can create (or rez) new entities from the Marketplace for a finite lifetime (the lifetime is set in Domain Settings > Entities > Advanced Settings > Maximum Lifetime of Temporary Entities). |
| Write Assets | Sets whether a user can add assets (models, audio, or other files) or make changes to the domain’s asset server (your domain’s file storage space). |
| Ignore Max Capacity | Sets whether a user can enter a domain even if it has reached or exceeded the specified capacity limit. |
| Kick Users | Sets whether a user is allowed to ban other users from a domain. |
| Replace Content | Sets whether a user can change the entire content set of a domain by wiping the existing content. |
| Can Get and Set Private User Data | Sets whether a user can access and write to the ‘Private User Data’ property
of entities in the domain. Private user data is a property of entities that
can only be set and retrieved through scripting via the privateUserData
property of the EntityProperties type
definition. |
Secure Your Domain Settings
Add authentication (i.e. a username and password) to protect your domain settings from being modified by unauthorized users. Anyone who tries to modify your domain settings will need the username and password to make changes.
For cloud domains, you are required to set up a username and password as part of the setup process. Authentication is optional for domains running local servers.
To set up and/or change the authentication for your domain settings:
Open your domain settings.
- For cloud hosted domains, go to https://metaverse.highfidelity.com/user/cloud_domains. Click the “More Options” menu (3 dots on the right-side of the row), then click ‘Domain Server settings’. Log in when prompted.
- For local servers on Windows: Click on the High Fidelity icon in the system tray, then click ‘Settings’.
- For local servers on Mac: Right-click the High Fidelity icon on the top menu bar, then click ‘Settings’.
- For any OS: Open a browser and enter the URL http://localhost:40100/settings.
Scroll to ‘Security’.
For ‘HTTP Username’ and ‘HTTP Password’, enter a username and password for basic HTTP authentication.
Note
This username and password is not connected in any way to your High Fidelity account, and is used only to access the settings for this specific cloud domain.
- Re-enter your password into ‘Verify HTTP Password’.
Protect Your Domain’s Content
Entity filters are specialized JavaScript functions that prevent unwanted modifications to entities in your domain. They can be applied to a whole server or to specific zones within a domain.
On This Page
Add an Entity Filter to Your Domain
Your domain can connect to any entity filter that is hosted on your Asset Server or the cloud. Once you’ve written a script (or use one of our own), upload it to your ATP server or a cloud hosting service of your choice. Then:
Open your domain settings.
- For cloud hosted domains, go to https://metaverse.highfidelity.com/user/cloud_domains. Click the “More Options” menu (3 dots on the right-side of the row), then click ‘Domain Server settings’. Log in when prompted.
- For local servers on Windows: Click on the High Fidelity icon in the system tray, then click ‘Settings’.
- For local servers on Mac: Right-click the High Fidelity icon on the top menu bar, then click ‘Settings’.
- For any OS: Open a browser and enter the URL http://localhost:40100/settings.
On the top menu bar, select Content > Entities.
Click the ‘Advanced Settings’ button.
Under ‘Filter Entity Edits’, enter the URL of your entity filter script.
Add an Entity Filter to a Zone in Your Domain
You can choose to apply an entity filter to a specific zone within your domain, rather than to the entire domain. To do this:
- In Interface, pull up your HUD or Tablet and go to Create.
- In the Entity List, locate and select the zone you want to protect.
- In the Create Tools, click on the ‘Properties’ tab.
- For ‘Filter’, enter the URL of your entity filter script.
Included Entity Filters
High Fidelity comes installed with a number of sample entity filter scripts. These are located in the following directories:
- Windows: %Program Files%/Local/High Fidelity/scripts/tutorials/entity_edit_filters
- Mac: ~/Applications/High Fidelity/interface/Contents/Resources/scripts/tutorials/entity_edit_filters
These sample scripts show you how protect domain content by doing things like:
- Keep an entity inside a bounding box
- Only allow entities to be moved 5 meters or less
- Prevent the addition of entities named “Bob”
- Prevent entities from being deleted
Feel free to use these entity filters as-is or modify them to meet your own security needs for your domain.
Additional Script Examples
Here are a few more script examples to help you create your own entity filters:
// Only allow changes to entity's basic physics; reject all other changes including adds and deletes
(function() {
        function filter() {
        return false;
        }
        filter.wantsToFilterAdd = true; // run on adds
        filter.wantsToFilterEdit = true; // run on edits
        filter.wantsToFilterPhysics = false; // don't run on physics
        filter.wantsToFilterDelete = true; // do run on deletes
        filter;
});

// Reject all changes to your domain
function filter(properties, filterType, originalProperties) {
    // doesn't matter here if rejectAll is set to true
}
// If reject all is true.  Any of the filterType changes won't go through
filter.rejectAll = true; // default false
Define Your Audio Environment
Audio is an integral part of a visitor’s experience in your domain. Quality audio is essential for easy communication between real people, and it has a meaningful impact on a user’s sense of immersion and presence in the world.
You define exactly how High Fidelity’s 3D immersive, stereo audio is implemented in your domain. Not only can you control the audio mixer’s server configuration to a certain degree, you have full control over the attenuation and reverb levels throughout the entire domain. By defining zones, you can define sound-proof areas for private meetings and amplified stages for presentations. All of this is possible by changing the audio settings in your domain settings.
Audio Environment
The audio environment defines how sound carries throughout your domain. We’ve designed our default audio settings to mimic reality - that is, we attempt to achieve a sense of presence by reflecting voices and sounds off of the surfaces in the virtual space. In addition, we adjust the volume of sound based on the distance between the source and the listener.
However, we understand that our equation may not match exactly what you’re looking for in your domain. You can change your domain-wide audio settings by adjusting the attenuation and the reverb levels (go to Domain Settings > Content > Audio Environment).
- Attenuation determines how much quieter sounds get over distance. The default domain attenuation is the amount of noise reduction that is enabled across the domain environment. High Fidelity domains default to a distance attenuation curve roughly like the real world. If you see two avatars talking in the distance, you can hear them, but not very well. If you approach them, they become more audible in a manner that approximates what you’re likely to be used to. If the default attenuation is 0, no matter how far away a sound source is, it still plays at full volume. Likewise, the default attenuation for a domain can be set very high (to a max value of 1), making only things very near to you audible.
- Reverb enables echo-like effects in your domain. It can give the effect of sounding like you are in a large empty room, deep inside a large cave, or inside a tiny room like a tiled shower. The ‘Reverb Decay Time’ defines how long you can hear an echo after the initial sound. ‘Wet/Dry Mix’ sets the percentage mix of the reverb tail relative to the original “dry” signal. Levels between 5-25% will generally give you useful results. For a very thick reverb, you might try a value as high as 50% where the reverb is nearly as loud as the original signal.
A “zone” is a 3D area where you can define custom properties. In the case of an audio zone, it is a 3D area with its own unique attenuation and reverb properties defined. For example, an audio zone could be used to create two separate rooms in the same domain, where the sound does not migrate over into the other room.
To define an audio zone:
Open your domain settings.
- For cloud hosted domains, go to https://metaverse.highfidelity.com/user/cloud_domains. Click the “More Options” menu (3 dots on the right-side of the row), then click ‘Domain Server settings’. Log in when prompted.
- For local servers on Windows: Click on the High Fidelity icon in the system tray, then click ‘Settings’.
- For local servers on Mac: Right-click the High Fidelity icon on the top menu bar, then click ‘Settings’.
- For any OS: Open a browser and enter the URL http://localhost:40100/settings.
On the top menu bar, select Content > Audio Environment.
Under ‘Zones’, click the
+icon.Enter a name for the zone, along with the zone’s coordinates.
(Optional) If you have more than one zone, then you can set up the attenuation relationship between two specific zones. This relationship is known as the “attenuation coefficient”. When the attenuation coefficient is 0, there is no change to the attenuation between zones; at 1, you won’t be able to hear someone in another zone.
Under ‘Reverb Settings’, click the
+icon, enter the zone name from step 4, and define the reverb levels for the zone.Save your domain settings.
Audio Threading and Buffers
The ‘Audio Threading’ and ‘Audio Buffer’ sections of the Domain Settings define the server configuration for the audio mixer. Here, you can determine the number of threads the audio mixer uses to process audio, and when to throttle or buffer a heavy-loaded system.
Note
These are advanced domain server settings. Do not modify without prior technical knowledge of servers.
Add Content to Your Domain
Your domain is your own personal virtual world. In it, you can express your creativity and create your own content, then share it with the world. Whether you’ve created a domain to host an event, as a place to hang out with friends, or even an office space, we invite you to create your own High Fidelity experience by tailoring the content to your needs.
In This Section
Build and Add Your Own Content
Maybe you’ve wandered around the metaverse, and you’re inspired by the creativity of others. Or maybe none of the other domains really fit the atmosphere of what you have in mind. Whatever the reason, you’re ready to branch out and build content of your own. If you don’t know where to begin, this is a great place to start.
On This Page
Tools for Creating Content
A content set is simply a collection of many different entities, models and scripts working together to form an interactive environment. Visit our Create section to learn more about the available tools and examples of how to make your environment more alive:
Techniques for Creating Content Sets
Creating a content set can be complicated because you’re designing an entire environment, rather than one single item. Its like building an entire city, which is comprised of many buildings, trees and roads. Some artists want to share their progress, each step along the way. Others want to wait to show off their creation until the final build is complete.
We let you choose how you want to build and deploy your content. The process for updating the content set on your domain will differ based on the approach you use to build your content. Choose the method that fits you best to learn more:
| Method | Description |
|---|---|
| Make Live Updates | As you make a change to your content, it will show up immediately in your domain in the metaverse. This means that any visitors in your domain will see the changes as they happen. |
| Under Construction | During the time that you’re constructing your content set, your domain is offline to outside visitors. Users will be unable to visit your domain while it is under construction. |
| Create and Deploy | Here, you prefer to create your content in an offline environment. Once it is completed, you will need to export your content set to an external file, then deploy it to your domain. Visitors can continue visiting your domain with any placeholder content while you design your custom content. |
Live updates are made anytime you or any other user in your domain makes changes to the content. In order to make changes, a user must have the ‘Rez’ permission turned on.
Before going this route, decide on who (if anyone) you would like to change your content set, and verify that their rez permissions are set correctly. If you’re going to be the one making changes, then ensure that you have rez rights. To update your content, all you need to is visit your domain and start making changes using the Create Tools.
Your server makes regular archives of the content in your domain. Visit your Domain Settings to view and download the backups of your content sets over time.
Note
Tip: It is possible to “lock down” content that you’ve created, so that visitors can create new content without modifying your custom content. For example, you can lock down the walls and floor of a room, but let your visitors create their own tables and chairs. To protect your own custom content set, lock the entities you created. When you configure your permissions for your visitors, deny them access to ‘Lock/Unlock’, but grant them permission to ‘Rez’. They will be able to create their own content in your domain, but not be able to change your domain’s content set.
While you make changes to your content set, you can take down your domain temporarily and prevent users from visiting while it is under construction.
To do this, simply the remove the ‘Connect’ permission for all users other than yourself (and any other co-creators working alongside you). When you are done, all you need to do is re-enable the ‘Connect’ permission.
Open your domain settings.
- For cloud hosted domains, go to https://metaverse.highfidelity.com/user/cloud_domains. Click the “More Options” menu (3 dots on the right-side of the row), then click ‘Domain Server settings’. Log in when prompted.
- For local servers on Windows: Click on the High Fidelity icon in the system tray, then click ‘Settings’.
- For local servers on Mac: Right-click the High Fidelity icon on the top menu bar, then click ‘Settings’.
On the top menu bar, select Settings > Security.
Scroll to ‘Standard Permissions’.
For each Permissions group, uncheck the ‘Connect’ permission for all users and groups (except yourself and anyone else working on the content).
Click ‘Save’ and close the Domain Settings page.
Once you have set the permissions, visit your domain and begin building your content set using the Create Tools. We recommend locking all of your content so that it cannot be modified by visitors to your domain.
Note
Your server makes regular archives of the content in your domain. Visit your Domain Settings to view and download the backups of your content sets over time.
When you’re done, follow the above steps to re-enable the Connect permission for your visitors. These users will be able to visit your domain again with the server’s IP address or place name.
The final technique for building a content set follows a basic development workflow:
- Build content in an offline environment
- (Optional) Build and test it
- Export the content set to a file
- Upload the exported content set to your domain
We recommend using this method if you want to avoid interruption to your domain while you build your content, deploy your content set to multiple domains, or test your content before you deploy.
- Install High Fidelity’s open source Client + Sandbox software on a computer that is _not_ running as a local server.
- Open a Sandbox not connected to a local server.
- Build your content set in the Sandbox.
- Export your content to JSON.
- (Optional) To optimize your content set, bake your content.
- (Local servers only) Transfer the downloaded archive file or the baked JSON to your local server. Switch computers so you’re back on your local server.
- Log in to your server’s domain settings and upload your exported or baked JSON to your domain.
Once your content is uploaded, your domain will automatically restart with your new custom content.
Bake Your Content
Most content (avatars, entities, etc) in High Fidelity references external resources such as textures, models, scripts, and materials. When a user encounters any content in the domain, they need to download the content’s resources. Many of these resources are not optimized and can take a while to download. Baking is the process of optimizing these resources to make them easier to transmit, store, and render, reducing load time significantly.
On This Page
The Oven
The Oven is a standalone application that is packaged as part of High Fidelity Client + Sandbox installer. Once installed, locate oven.exe (Windows) or oven.app (Mac).
With the oven, you can bake the following types of content:
| Type | Description |
|---|---|
| Textures | When you bake a texture, the resulting folder will contain a .texmeta.json file, various .ktx images, and the original texture. Baking might introduce some compression artifacts, but these are usually minor. Baking a texture produces mipmaps, which allow you to progressively load textures, and compresses the results. Baking large textures like skyboxes can take a while, but the benefits at runtime for everyone loading the skybox image will be significant. For the best experience, we recommend using PNG or JPEG (JPG) textures. However, we also support textures in following formats: TGA, TIF, and TIFF. |
| Materials | Baking a material will produce a .baked.json file and will also bake all of the textures in the material. Currently, we only support baking a material entity JSON file. |
| 3D Models | Baking a model will produce a Draco compressed geometric mesh and will also bake all of the materials in the model. The mesh compression can slightly alter the geometry of the original model, but it is usually minor. Your output folder will contain a .baked.fst file, a .baked.fbx file (the original format of your model can be different), and a .baked.json file (materials). Because the baked materials JSON file references the baked texture files, all textures are removed from the .baked.fbx file. This JSON file is referenced in the materialMap field in the .baked.fst file. We support the following formats: FBX, OBJ, and FST (that points to a supported type). |
| Avatars | As avatars are 3D models, you can bake avatars with the same results as above. Use the resulting .baked.fst file to host and wear your baked avatar. |
The Oven has two different interfaces: an application and a command line interface. Use the one that best fits your needs.
The Oven application has three baking options:
- Bake all assets in your domain
- Bake individual 3D models and avatars
- Bake skybox files
After you choose what you would like to bake, you’ll need to fill in some information:
| Field | Baking Option | Description |
|---|---|---|
| Domain Name | Domain | Enter your domain’s name. |
| Entities File | Domain | Upload a .json or .json.gz of the assets in your domain. This can be done by exporting your content to JSON. |
| Model File(s) | Model | Enter the file or URL path for your model file(s). |
| Skybox File(s) | Skybox | Enter the file or URL path for your skybox file(s). |
| Output Directory | Domain, Model, Skybox | This is where the baked content will be saved. |
| Destination URL Path | Domain | Enter the absolute paths of where your resources will be uploaded after baking. For example, if you store custom 3D models on a cloud hosting service, enter that URL here. |
| Re-bake Originals | Domain | Check if you want to re-bake any baked content that the oven finds in your content archive. |
Note
After baking a domain, don’t forget to upload all baked content (3D models, skyboxes, etc.) to the URL specified for ‘Destination URL Path’. This ensures that all content will load correctly when you upload the baked content set to your domain.
You can also use a command line interface instead of the GUI to bake single assets (not domains). We support the following attributes:
- i: Path to file that you would like to bake.
- o: Path to folder that will be used as the output directory.
- t: Type of asset. The value can be “model” (for any model type) and “material” (for a material JSON description). For textures, the values differ based on the type of texture you want to bake, such as default, strict, albedo, normal, bump, specular, metallic, roughness, gloss, emissive, cube (same as skybox), skybox, ambient, occlusion, scattering, and lightmap.
- disable-texture-compression: Disables texture compression for any type. Use this only if the texture compression is introducing too many artifacts.
To bake a 3D model through the Oven’s command line interface:
>> oven.exe -i %path to model% -o %output directory% -t model
To bake a material through the Oven’s command line interface:
>> oven.exe -i %path to material json% -o %output directory% -t material
Export Your Content
To create a backup of your content, you need to export it to an external file. This file contains all of the information about the assets that make up your domain: the asset types, dimensions, positions, physics, resource URLs and every other property entity property.
Many domain creation and maintenance tasks require content backups, including:
- Baking content for optimization
- Importing content sets to new domains
- Restoring content in case of corruption
- Sharing content with others
- Uploading content sets to the Marketplace
On This Page
Export Entities to JSON
The first method to export your content is to select specific entities from the Entity List and export them to a JSON file. Use this method if you want to:
- Bake your domain’s content
- Back up content that is not yet live on a domain
- Export only specific entities, rather than the entire domain’s content set
To export entities:
- In your Sandbox, pull up your tablet or HUD and go to Create.
- In the Entity List, select the entities you want to export. To select all of the entities, use the keyboard shortcut
Ctrl+A. To select more than one adjacent entity, click on the first entity, press hold down theShiftkey, then click the last entity. To select more than one non-adjacent entity, hold down theCtrlkey while clicking the entities you want to select. - Once you’ve selected all of the entities you want to export, click ‘Export Selection’.
- Browse to a folder location and enter a name for the exported JSON file.
- Click ‘Save’.
Retrieve Automatic Content Archives
By default, High Fidelity creates regular content archives of all active domains on the metaverse. This means that if you have a registered domain on the metaverse (either via a local server or DigitalOcean), then we have already created a backup of the content that is installed in your domain. These backup files are called content archives.
To retrieve these backups:
Open your domain settings.
- For cloud hosted domains, go to https://metaverse.highfidelity.com/user/cloud_domains. Click the “More Options” menu (3 dots on the right-side of the row), then click ‘Domain Server settings’. Log in when prompted.
- For local servers on Windows: Click on the High Fidelity icon in the system tray, then click ‘Settings’.
- For local servers on Mac: Right-click the High Fidelity icon on the top menu bar, then click ‘Settings’.
- For any OS: Open a browser and enter the URL http://localhost:40100/settings.
On the top menu bar, select Content > Content Archives.
Under ‘Automatic Content Archives’, locate the archive you would like to download.
From the Actions menu, click ‘Download’.
When you upzip the content archive, locate models.json.gz. This file contains all of the assets in your domain, along with their properties.
Create a Manual Content Archive
The final method of exporting your content is to create a manual content archive of your domain. This is recommended if you want to:
- Deploy your content to multiple domains
- Share a copy of your custom content set with others
- Sell your environment on the Marketplace
To create a content archive and download it:
Open your domain settings.
- For cloud hosted domains, go to https://metaverse.highfidelity.com/user/cloud_domains. Click the “More Options” menu (3 dots on the right-side of the row), then click ‘Domain Server settings’. Log in when prompted.
- For local servers on Windows: Click on the High Fidelity icon in the system tray, then click ‘Settings’.
- For local servers on Mac: Right-click the High Fidelity icon on the top menu bar, then click ‘Settings’.
- For any OS: Open a browser and enter the URL http://localhost:40100/settings.
On the top menu bar, select Content > Content Archives.
Under ‘Manual Content Archives’, click ‘Generate New Archive’.
Enter a name for your archive and click ‘Generate Archive’. It will appear just below the ‘Generate New Archive’ button.
From the Actions menu, click ‘Download’.
The content archive includes models.json.gz, along with other backup files. From here, you can upload your content archive to another domain, send it to others or upload it to the Marketplace.
Upload Content to your Domain
Whether you’ve created your own content set, baked some content, or gotten a content set from a friend, you’ll need to upload it to your domain. Once you upload a content set, you will overwrite all existing content in your domain. Keep in mind that the existing backup files of your domain’s content will not immediately be changed, so if you don’t like your domain’s new look, you can restore your old content at any time.
To upload and install new content to your domain:
Open your domain settings.
- For cloud hosted domains, go to https://metaverse.highfidelity.com/user/cloud_domains. Click the “More Options” menu (3 dots on the right-side of the row), then click ‘Domain Server settings’. Log in when prompted.
- For local servers on Windows: Click on the High Fidelity icon in the system tray, then click ‘Settings’.
- For local servers on Mac: Right-click the High Fidelity icon on the top menu bar, then click ‘Settings’.
- For any OS: Open a browser and enter the URL http://localhost:40100/settings.
On the top menu bar, select Content > Upload Content.
Under ‘Upload Content’, click ‘Choose File’.
Browse to your content file. This can be a .json of exported entities, a .json.gz from an extracted content archive, or a content archive itself.
Click ‘Upload Content’.
Confirm that you are sure that you want to replace your current content with the new content set.
At this point, your domain server will restart and the new content will be deployed in your domain.
Get an Environment from the Marketplace
We and our users have designed multiple environments that are available for your use in the Marketplace. If you don’t want to create your own or you want to use pre-built content sets while you’re building a custom environment, then browse our Marketplace and find the perfect scene for your domain.
Before proceeding, ensure that you have rez permissions for your domain.
- Visit your domain by its place name or IP address.
- Pull up your Tablet or HUD and go to Market.
- Under ‘Categories’, choose ‘Environments’.
- You’ll see a list of different environments available. Click on the cost to purchase the item.
- Confirm your purchase and click ‘Get Item’.
- Click ‘Replace Content Set’ to overwrite the current content set with the one you purchased.
Note
Rezzing this content set will replace all of the existing content in your domain. If you want to save the current state of your domain, create a backup before proceeding. You can restore backup files at any time.
- Click ‘Confirm’.
At this point, your domain server will restart and the new content will be deployed in your domain.
Bring Visitors to Your Domain
Now that you have a domain up and running, its time to invite people in to your domain and create your community in the virtual world. Here are some ways to bring more visitors in to your domain.
On This Page
Invite Your Friends
Nothing is more inviting than a personal invitation to come check out an exciting, new place in the metaverse! Invite your friends with a personal message to visit your domain.
Share your domain by giving out its IP address or place name. Anyone with a High Fidelity account can enter the IP address or place name directly into the GoTo app to teleport directly to your domain.
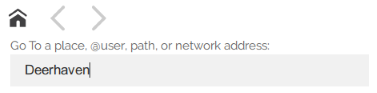
Note
TIP: You can send other High Fidelity users clickable URLs that send them directly to your domain. Simply send them the URL https://hifi.place/<domain IP | place name>. When they click the link, they will be prompted to open Interface.exe and land at the spawn point in your domain.
Add Your Domain to the GoTo App
The GoTo app is designed to advertise public domains across the metaverse.
In order to be featured on High Fidelity’s GoTo app, your domain must have a purchased place name and it must be open to logged in users or everyone. This means that, in your Domain Settings, under ‘Standard Permissions’, either the ‘anonymous’ or ‘logged-in’ group must have the Connect permission.
To restrict access to your domain, you will need to create a blacklist of users without permission to connect to your domain. This can be set up by username, IP address, MAC address or machine fingerprint. We do not currently have a way to advertise your domain in the GoTo app, while restricting access to a specific guest list.
Promote Your Community Event with High Fidelity
To get your event or experience added to the calendar on our website and added as a Feature Card in GoTo, you can submit it to us by filling out this form.
Provided it is approved, it will be:
- Added to High Fidelity’s Events Calendar
- Promoted on High Fidelity’s social channels
- Advertised in the Featured section of the GoTo app
Blast to Connections
If you want to let all of your High Fidelity colleagues know about something that’s happening right now, you can blast an announcement to all of your connections. Within about a minute, all of your interested connections and friends will get notified whenever they come online.
To send a blast notification:
Take a snapshot of your domain.
- In Interface, pull up your Tablet or HUD and go to Snap.
- In the Snapshot app, press the large red circle to capture a snapshot.
Choose to ‘Share: Blast to Connections’.
When a friend or connection clicks on the notification, it will open the GoTo app with your snapshot available. Clicking on the snapshot will take them directly to the place where the picture was taken within the metaverse.
Post a Snapshot on Social Media
You can also share your domain directly to Twitter or Facebook. To do so:
Take a snapshot of your domain.
- In Interface, pull up your Tablet or HUD and go to Snap.
- In the Snapshot app, press the large red circle to capture a snapshot.
Choose to ‘Share to Facebook’ or ‘Share to Twitter’.
Log in to your social media account.
When someone clicks the story in their Facebook or Twitter feed, they are taken to a page that gives them more info about the domain. Clicking the picture or “visit” button on that page will bring them to the place where the picture was taken within the metaverse (if they have Interface installed).
Maintain Your Domain
Domain servers are generally managed and maintained by admins. As the domain owner, it is likely that you’ll need to take some responsibility to keep your server running in good shape. Some of these tasks include creating backups, managing unruly visitors, updating software, and cleaning the domain of unnecessary entities and extraneous content.
Backup and Restore Your Domain
We recommend that you do backups of your domain in case of data loss or griefing. While your domain server does perform automatic backups periodically of your domain’s content, it is up to you to configure the frequency these backups that are performed. In addition, we recommend that you periodically download copies of these backups to your computer as a secondary backup.
On This Page
Automatic Content Archives
Your domain server makes regular archives of the content in your domain. By default, it saves a backup rolling every 30 days, every week, every day, and every half hour. To change the frequency of these backups:
Open your domain settings.
- For cloud hosted domains, go to https://metaverse.highfidelity.com/user/cloud_domains. Click the “More Options” menu (3 dots on the right-side of the row), then click ‘Domain Server settings’. Log in when prompted.
- For local servers on Windows: Click on the High Fidelity icon in the system tray, then click ‘Settings’.
- For local servers on Mac: Right-click the High Fidelity icon on the top menu bar, then click ‘Settings’.
- For any OS: Open a browser and enter the URL http://localhost:40100/settings.
On the top menu bar, select Settings > Automatic Content Archives.
Under ‘Rolling Backup Rules’, click the
+icon.Enter a name for the rule, along with the backup interval (in seconds) and the number of backups to store on the server.
Click the
Xicon next to any rule you want to delete.Save your domain settings.
To access your content archives:
- Open your domain settings.
- On the top menu bar, select Content > Content Archives.
The automatic backups will be listed under ‘Automatic Content Archives’.
Manually Backup Your Domain Content
In the case you need a backup on demand, you can create one:
Open your domain settings.
- For cloud hosted domains, go to https://metaverse.highfidelity.com/user/cloud_domains. Click the “More Options” menu (3 dots on the right-side of the row), then click ‘Domain Server settings’. Log in when prompted.
- For local servers on Windows: Click on the High Fidelity icon in the system tray, then click ‘Settings’.
- For local servers on Mac: Right-click the High Fidelity icon on the top menu bar, then click ‘Settings’.
- For any OS: Open a browser and enter the URL http://localhost:40100/settings.
On the top menu bar, select Content > Content Archives.
Under ‘Manual Content Archives’, click ‘Generate New Archive’.
Enter a name for your archive and click ‘Generate Archive’.
It will appear just below the ‘Generate New Archive’ button.
Download Content Archives
To download any content archive (automatic or manual):
Open your domain settings.
- For cloud hosted domains, go to https://metaverse.highfidelity.com/user/cloud_domains. Click the “More Options” menu (3 dots on the right-side of the row), then click ‘Domain Server settings’. Log in when prompted.
- For local servers on Windows: Click on the High Fidelity icon in the system tray, then click ‘Settings’.
- For local servers on Mac: Right-click the High Fidelity icon on the top menu bar, then click ‘Settings’.
- For any OS: Open a browser and enter the URL http://localhost:40100/settings.
On the top menu bar, select Content > Content Archives.
Locate the content archive you want to download.
From the Actions menu, click ‘Download’.
Restore a Domain’s Content
To restore content to a previous archive on this domain:
Open your domain settings.
- For cloud hosted domains, go to https://metaverse.highfidelity.com/user/cloud_domains. Click the “More Options” menu (3 dots on the right-side of the row), then click ‘Domain Server settings’. Log in when prompted.
- For local servers on Windows: Click on the High Fidelity icon in the system tray, then click ‘Settings’.
- For local servers on Mac: Right-click the High Fidelity icon on the top menu bar, then click ‘Settings’.
- For any OS: Open a browser and enter the URL http://localhost:40100/settings.
On the top menu bar, select Content > Content Archives.
Locate the content archive you want to restore.
From the Actions menu, click ‘Restore from here’.
Confirm that you are sure that you want to replace your current content with the restored content set. At this point, your domain server will restart and the new content will be deployed in your domain.
To restore content from a downloaded content archive:
- Open your domain settings.
- On the top menu bar, select Content > Upload Content.
- Under ‘Upload Content’, click ‘Choose File’.
- Browse to the downloaded content archive.
- Click ‘Upload Content’.
- Confirm that you are sure that you want to replace your current content with the restored content set. At this point, your domain server will restart and the new content will be deployed in your domain.
Backup Your Domain Settings
To backup your domain’s so you can quickly configure another domain or restore them later:
Open your domain settings.
- For cloud hosted domains, go to https://metaverse.highfidelity.com/user/cloud_domains. Click the “More Options” menu (3 dots on the right-side of the row), then click ‘Domain Server settings’. Log in when prompted.
- For local servers on Windows: Click on the High Fidelity icon in the system tray, then click ‘Settings’.
- For local servers on Mac: Right-click the High Fidelity icon on the top menu bar, then click ‘Settings’.
- For any OS: Open a browser and enter the URL http://localhost:40100/settings.
On the top menu bar, select Settings > Setting Backup /Restore.
Click ‘Download Domain Settings’.
Maintain Domain Visitors
Occasionally, you may get users who you don’t want in your domain. Whether you forgot to set the correct user permissions, or the person is being rude and uncooperative, you have the ability to silence or ban users from your domain.
Note
These administrative functions of silencing and banning users from a domain require the ‘Kick Users’ permission. Ensure you have this user permission enabled before attempting to monitor the users in your domain.
Silence a User in Your Domain
Many times, a visitor in your domain simply does not have the correct audio settings defined on their computer. As a result, they may output uncomfortable sounds into your domain (heavy breathing, typing, background noise, and white noise are audio issues people have when they first download High Fidelity).
To silence a specific user in your domain:
- Visit your domain.
- In Interface, pull up your Tablet or HUD and go to People.
- Locate the user you would like to silence.
- Under the ‘Admin’ section, click the icon in the ‘Silence’ column.
This will mute the user for everyone in the domain.
Ban a User from Your Domain
In some cases, a user may cause themselves to be unwelcome in your domain.
To permanently ban a visitor from your domain:
- Visit your domain.
- In Interface, pull up your Tablet or HUD and go to People.
- Locate the user you would like to silence.
- Under the ‘Admin’ section, click the icon in the ‘Ban’ column.
The user will not be able to enter the domain using the same account; however, they will still have access to other High Fidelity domains.
Update to the Latest Version
High Fidelity is always changing, as we work to improve performance and add features that will enhance your experience in the metaverse. If a new version has been released, all of our users will be prompted to update to the latest (and most stable) release.
Protocol Compatibility
High Fidelity requires that the client and server (the visitor’s installed software and the server’s software) maintain protocol compatibility across versions. Most of our beta releases include protocol changes, and will affect the visitors who can visit your domain.
- An updated client version will be unable to connect to a domain that is not updated.
- A client running an older version will be unable to connect to a domain that is running a new version.
Both of these will result in an error message “Protocol Mismatch”.
Upgrade Your Domain Server
Because all of our users are prompted to update to the latest release, it is highly likely that the majority of your visitors are running the newest version of High Fidelity. Therefore, if there has been a protocol change (check the Release Notes for your version), we strongly recommend that you upgrade your domain server to the newest release. The process will be different for local servers versus cloud-hosted domains.
To upgrade a cloud-hosted domain:
- Go to https://highfidelity.com/user/cloud_domains to view your DigitalOcean droplets. If you’re not logged in, you will be prompted to do so.
- If the menu (3 dots) is yellow, then a new High Fidelity version is available for download. Click this menu, and select ‘Update High Fidelity’.
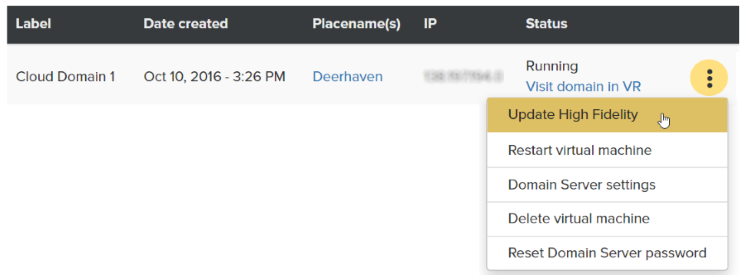
To update a local server:
- Download the latest Client + Sandbox installer from High Fidelity’s website or download the upgrade when prompted to on your server.
- On your local server, quit Sandbox:
- On Windows: Click on the High Fidelity icon in the system tray, then click ‘Quit’. Alternatively, end the ‘server-console’ background process using the Task Manager.
- On Mac: Right-click the High Fidelity icon on the top menu bar, then click ‘Quit’.
- Run the installer.
After installation, check your local server’s domain settings to ensure that its running the most recent version.
Maintain Your Domain with Scripts
You can “clean up” your domain using an assignment client script that regularly performs maintenance tasks on your domain. For example, a script can remove entities that are not part of your default content set, load tools to help you inspect the contents of your domain, or identify loud avatars and them in your domain.
On This Page
Write a Script
With scripts, you are free to use our expansive JavaScript API to code any task that your programming expertise and creativity can come up with. Here, we’ve written an example assignment client script that returns our domain content to its default state every 1 hour. This means that any other entities rezz’d in our domain will be deleted within the hour by the script:
var SEARCH_CENTER = {x: 0, y: 0, z: 0};
var SEARCH_AREA = 60000; // search area (sphere) in meters radius
var CLEANUP_INTERVAL_MIN = 60;

var MINUTES_TO_MILLISECONDS = 60000;
var ENTITIES_TO_KEEP = ["{ENTITY_ID1}", "{ENTITY_ID2}"]

var initialized = false;
var interval;

Agent.isAvatar = true;
Avatar.skeletonModelURL = "AVATAR_FST_URL";
Script.update.connect(initialization);

function cleanup() {
  EntityViewer.queryOctree();
  var foundEntities = Entities.findEntities(SEARCH_CENTER, SEARCH_AREA);
  print("Found: " + foundEntities.length + " entities");
  foundEntities.forEach(function(entityID){
    if(ENTITIES_TO_KEEP.indexOf(entityID) === -1) {
      print("Need to delete: " + entityID);
      Entities.deleteEntity(entityID);
    }
  });
}

function initialization(deltaTime) {
  if (!initialized) {
    if(Entities.serversExist() && Entities.canRez()) {
     Entities.setPacketsPerSecond(60000);
       EntityViewer.setPosition(SEARCH_CENTER);
       EntityViewer.setCenterRadius(SEARCH_AREA);
       Script.setInterval(function() {
         EntityViewer.queryOctree();
       }, 1000);
      initialized = true;
      interval = Script.setInterval(cleanup, CLEANUP_INTERVAL_MIN * MINUTES_TO_MILLISECONDS);
      Script.update.disconnect(initialization);
    }
  }
}

Script.scriptEnding.connect(function(){
  Script.clearInterval(interval);
});
Add Assignment Client Script to Domain
To run your script on your domain:
- Save and upload your script to a cloud hosting site.
- Open your domain settings.
- For cloud hosted domains, go to https://metaverse.highfidelity.com/user/cloud_domains. Click the “More Options” menu (3 dots on the right-side of the row), then click ‘Domain Server settings’. Log in when prompted.
- For local servers on Windows: Click on the High Fidelity icon in the system tray, then click ‘Settings’.
- For local servers on Mac: Right-click the High Fidelity icon on the top menu bar, then click ‘Settings’.
- For any OS: Open a browser and enter the URL http://localhost:40100/settings.
- On the top menu bar, select Content > Scripts.
- Under ‘Persistent Scripts’, click the
+icon. - Paste the URL to your script under ‘Script URL’.
- Save and restart your domain.
Now, the script will be running persistently on your domain until you either remove it or shut down the domain entirely.
View Domain Server Logs
Your domain server logs list the different events relevant to your High Fidelity domain. These can help you troubleshoot any issues with your domain and understand how the different parts of your domain communicate with each other.
Server logs are stored directly on the server in the following directories:
- Windows: %AppData%/Local/High Fidelity/Server Console/logs
- Mac: ~/Library/Application Support/High Fidelity/Server Console/Logs
Sell
High Fidelity encourages you to create and build experiences that you can share with others. Take the opportunity to share your creations, sell them to others, and make money in the metaverse with the Marketplace.
There is no fee to post your items for sale on the Marketplace. We help you host and certify your content, and we process your transactions and payments. In return, you retain 90% of each sale of your item, while we keep a 10% revenue share.
Throughout this chapter, learn how you can upload your items to the Marketplace and make them available for purchase to all users in High Fidelity:
Add Items to the Marketplace
Once you’ve created an avatar, wearable or entity, you have the option to sell it in the Marketplace. This guide walks you through the steps to upload it to the Marketplace so that you can start the process of having it reviewed and published.
Note
Prior to adding your item to the Marketplace, we recommend that you use the Marketplace Item Tester to ensure that your item works the way you expected and does not have any script errors.
On This Page
In This Section
Add Your Avatar
Once you create an avatar, it should contain the following files:
- An FST file
- An FBX file
- Scripts folder (optional)
- Textures folder
You will need to upload all these files to the Marketplace.
On This Page
Add Your Avatar’s Files
Go to https://highfidelity.com/marketplace/items/new to create a new item. If you’re not logged in, you will be prompted to do so.
Enter your avatar’s name and select your category as ‘Avatars’. You can add the metadata now or later.
Click ‘Save Draft’.
Scroll down to the ‘Assets’ section.
Click ‘Choose Folder’ and navigate to where your avatar is saved on your computer. Select the folder that contains your FBX file, click ‘Upload’ twice and wait for it to upload.
Click on the uploaded FBX file, and copy the Marketplace path including the unique hash for your avatar. Do not copy your folder name or the name of the file.
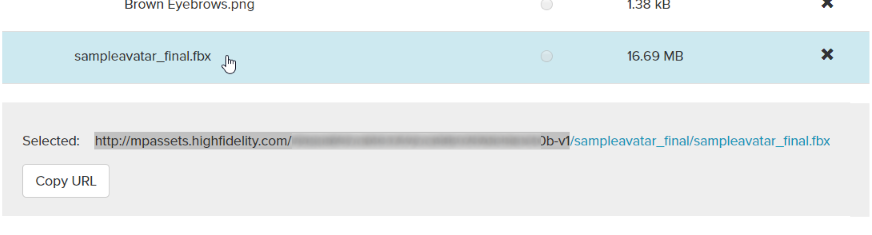
Open your FST file in the text editor of your choice. (Note that the FST file is a local file on your computer)
Locate the relative path references to the FBX file, textures directory, and script file(s). Replace these with the absolute path references of the uploaded content.

Note
Absolute paths are entire URLs that generally begin with 'https://' and contain a website address, such as 'https://website.com/resources/scripts/interact.js'. Relative paths drop the beginning of the path and only specify how to get to a resource from the location of the script. Relative paths usually look something like '/resources/scripts/interact.js'.
Return to your avatar submission on the Marketplace.
In the ‘Assets’ section, click ‘Choose Files’ and navigate to where your avatar is saved on your computer. Select your updated FST file, click ‘Open’ and wait for it to upload.
Note
Be sure you do not have any files or folders selected in the asset viewer so that the uploaded file goes to the right place. Any selected files and folders will be highlighted blue.
Click the FST file as your root file in the Asset Viewer.
Save your submission.
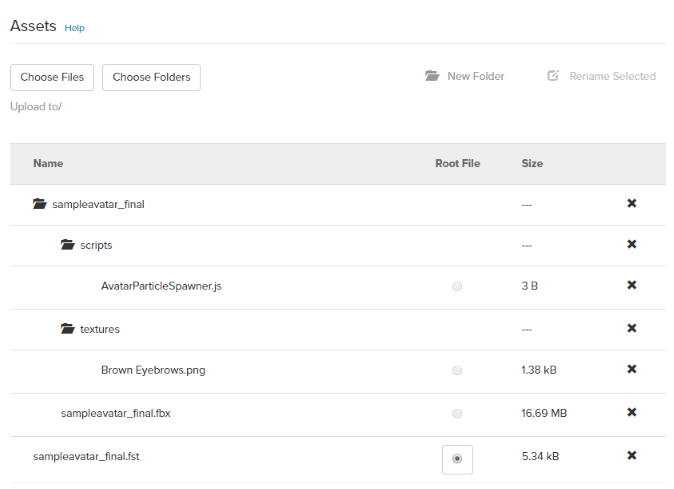
At this time, we recommend that you test your avatar using the Marketplace Item Tester. If your avatar re-imports into High Fidelity without any issues, it is now ready to be uploaded to the Marketplace.
Find Your Avatar’s URL
Now you are ready to use your avatar! To locate the URL for your avatar:
- Go to https://highfidelity.com/marketplace. If you’re not logged in, you will be prompted to do so.
- Click on your user name, then on ‘My Items’.
- Locate your avatar in Draft mode and click on it.
- Click ‘Edit’.
- Scroll down to the Assets section.
- Click on the FST file. Below it, click the ‘Copy URL’ button.
This is the URL you will use when you change your avatar in High Fidelity.
If you wish to sell your avatar on the Marketplace, be sure to fill out your metadata. You can format your item’s description using Markdown syntax. Click “Submit for Review” to be verified and certified on the Marketplace.
See Also
Add Your 3D Model
Once you’ve created your 3D model, you need to add the item and its assets in the Marketplace. At a minimum, your model will need the following assets:
- FBX file
- JSON file
You will need to upload these files to the Marketplace, along with any supporting files, such as textures.
On This Page
- Prepare Your FBX File
- Add Your 3D Model Assets
- Generate Your Item’s JSON File
- Upload Your Item’s JSON File
Prepare Your FBX File
- Export your file as an FBX file from your 3D modeling program. Do not export it as a default file type such as .mb or .blend.
- If supported by your 3D modeling software, embed your textures into your FBX file to keep the process simpler.
- As a practice and to catch any errors, re-import your FBX back into a new scene and check that it still looks right. Look for things like missing textures or normals, and smoothing issues. You may need to tweak your export settings if the re-imported model does not look right.
Note
If you intend to upload and sell your 3D model to the Marketplace, you need to set your base material color to white (some apps default to grey). This ensures that the model renders correctly for all users and that it will be accepted into our Marketplace.
Add Your 3D Model Assets
If your model could be re-imported without any issues, it is now ready to be uploaded to High Fidelity.
- Go to https://highfidelity.com/marketplace/items/new to create a new item. If you’re not logged in, you will be prompted to do so.
- Enter your model’s name and select your category. You can add the metadata now or later.
- Click ‘Save Draft’.
- Scroll down to the ‘Assets’ section.
- If your 3D model contains only an FBX file, click ‘Choose Files’ and navigate to where your 3D model has been saved on your computer. Upload your FBX file. If your 3D model contains multiple files like scripts or textures, click ‘Choose Folder’ and navigate to where your 3D model has been saved on your computer. Upload all related folders, including your FBX file.
- Click your uploaded FBX file and copy the new Marketplace URL for the FBX file.

At this time, we recommend that you test your item using the Marketplace Item Tester. If your model re-imports into High Fidelity without any issues, it is now ready to be uploaded to the Marketplace.
Generate Your Item’s JSON File
- In Interface, pull up your tablet or HUD and select Create.
- In the Create app, click on the ‘Model’ icon to import your 3D model.
- Enter the URL you copied in step 6. You can only do this in a domain where you have the permission to add an entity.
- Once your model appears before your avatar, check it and make any adjustments needed. Look for missing textures or normals, smoothing issues, issues with the scale of the model, and rotation problems. Make any changes in your 3D modeling software. Once your model looks as expected in High Fidelity, you are now ready to export your model data into a JSON file. Keep in mind that different types of software render models differently.
- Back in the Create Tools app, find your model in the Entity List. While holding the CTRL, select any other files that are are associated with your item.
- Click ‘Export Selection’ and enter a name for your JSON. This JSON file contains information on how High Fidelity can access your item and its files, and needs to contain a reference to your item’s location.
- Open your JSON file in a text editor and check if the variable
modelURLcontains your FBX file’s Marketplace URL. If it doesn’t, you can edit it and paste the correct URL.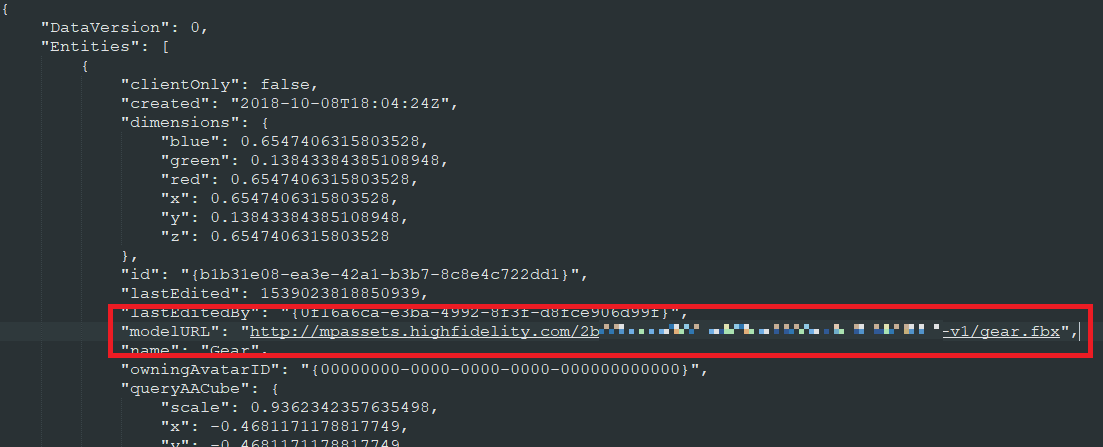
Upload Your Item’s JSON File
- In High Fidelity, verify that your model looks correct. Open the Create Tools app, then click ‘Import Entities (.JSON)’ and navigate to your model’s JSON file.
- Go to https://highfidelity.com/marketplace. If you’re not logged in, you will be prompted to do so.
- Click on your user name, then on ‘My Items’.
- Locate your 3D model in Draft mode and click on it.
- Click ‘Edit’.
- In the ‘Assets’ section, click ‘Choose Files’ and navigate to where your model’s JSON file is saved on your computer. Select your JSON file, click ‘Open’ and wait for it to upload.
Click the JSON file as your root file in the Asset Viewer.
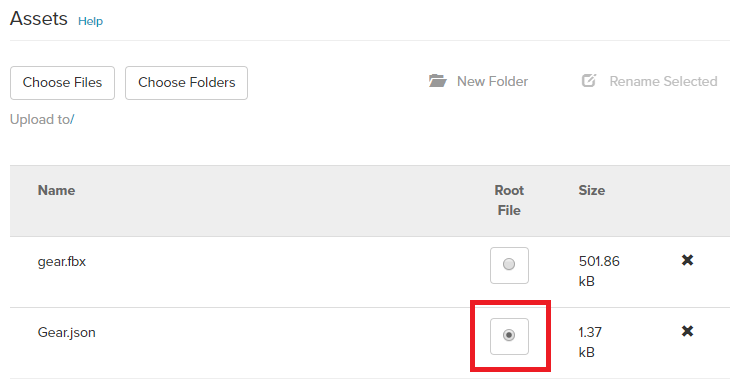
- Save your submission.
If you wish to sell your 3D model on the Marketplace, be sure to fill out your metadata. You can format your item’s description using Markdown syntax. Click “Submit for Review” to be verified and certified on the Marketplace.
See Also
Add Your Wearable
Once you’ve created your wearable, you need to add the item and its assets in the Marketplace. At a minimum, your wearable will need the following assets:
- FBX file
- JSON file
You will need to upload these files to the Marketplace, along with any supporting files, such as textures.
On This Page
- Prepare Your FBX File
- Add Your Assets
- Generate the JSON File for Your Wearable
- Upload Your Wearable’s JSON File
Prepare Your FBX File
- Export your file as an FBX file from your 3D modeling program. Do not export it as a default file type such as .mb or .blend.
- If supported by your 3D modeling software, embed your textures into your FBX file to keep the process simpler.
- As a practice and to catch any errors, re-import your FBX back into a new scene and check that it still looks right. Look for things like missing textures or normals, and smoothing issues. You may need to tweak your export settings if the re-imported model does not look right.
Add Your Assets
If your wearable could be re-imported without any issues, it is now ready to be uploaded to High Fidelity.
- Go to https://highfidelity.com/marketplace/items/new to create a new item. If you’re not logged in, you will be prompted to do so.
- Enter a name for your wearable and set the category to ‘Wearable’. You can add the metadata now or later.
- Click ‘Save Draft’.
- Scroll down to the ‘Assets’ section.
- If your wearable contains only an FBX file, click ‘Choose Files’ and navigate to where your model has been saved on your computer. Upload your FBX file. If your wearable contains multiple files like scripts or textures, click ‘Choose Folder’ and navigate to where your model has been saved on your computer. Upload all related folders, including your FBX file.
- Click your uploaded FBX file and copy the new Marketplace URL for the FBX file.
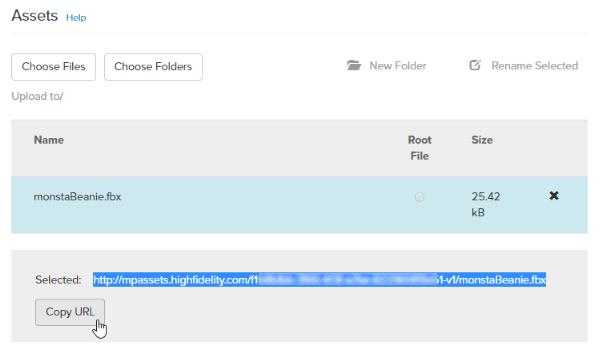
Generate the JSON File for Your Wearable
In Interface, pull up your tablet or HUD and click on Avatar.
In the Avatar window, click the hat icon next to ‘Wearables’.
Click ‘Add custom’ at the top of the window.
Select the joint you’d like to use for your wearable. For example, a hat would be on your head, and fairy wings would be on your spine.
Click ‘Save’.
Using the Create app, make any adjustments to your wearable. For example, you can give your wearable more depth, height or angle it differently.
Note
If you're creating a wearable to add to the Marketplace, make sure it will fit the default wooden mannequin avatar (unless you are specifically making it to go with a very specific base avatar model). This will ensure that the wearable will work with most avatars in High Fidelity.
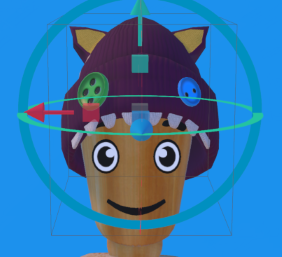
Back in the Create app, find your model in the ‘Entity List’ and click on it.
Click ‘Export Selection’ and enter a name for your JSON. This JSON file contains information on how High Fidelity can access your item and its files, and needs to contain a reference to your item’s location.
Open your JSON file in a text editor and check if the variable
modelURLcontains your FBX file’s Marketplace URL. If it doesn’t, you can edit it and paste the correct URL.
Upload Your Wearable’s JSON File
- Go to https://highfidelity.com/marketplace. If you’re not logged in, you will be prompted to do so.
- Click on your user name, then on ‘My Items’.
- Locate your wearable in Draft mode and click on it.
- Click ‘Edit’.
- In the ‘Assets’ section, click ‘Choose Files’ and navigate to where your wearable’s JSON file is saved on your computer. Select your JSON file, click ‘Open’ and wait for it to upload. Click the JSON file as your root file in the Asset Viewer.
- Save your submission.
If you wish to sell your wearable on the Marketplace, be sure to fill out your metadata. You can format your item’s description using Markdown syntax. Click “Submit for Review” to be verified and certified on the Marketplace.
See Also
Upload Your Environment
Before uploading your environment to the Marketplace, make sure that you created the environment in a domain where you have access to the Domain Settings. Keep in mind that all content in the domain will be included in your upload. Once your domain is set up, you are ready to upload your environment.
- Create and download a manual content archive.
- Go to https://highfidelity.com/marketplace/items/new to create a new item. If you’re not logged in, you will be prompted to do so.
- Enter a name for your environment.
- Under Categories, select ‘Environments’.
- Click ‘Save Draft’.
- Scroll down to the ‘Assets’ section.
- Click ‘Choose Files’ and navigate to where your environment download is saved on your computer. Select the ZIP file, click ‘Open’ and wait for it to upload.
- Save your submission.
If you wish to sell your environment on the Marketplace, be sure to fill out your metadata. You can format your item’s description using Markdown syntax. Click “Submit for Review” to be verified and certified on the Marketplace.
See Also
Add Your Audio
Once you’ve created music or ambient sounds for your domain, you need to add the sound and its assets to the Marketplace. To sell audio on the marketplace, you will need the following assets:
- WAV or MP3 file
- Script file (sound emitter script)
- FBX file (for the entity to which you will attach the sound emitter script)
- JSON file
On This Page
- Prepare Your Entity’s FBX File
- Prepare Your Script File
- Add Your Assets
- Generate the JSON File for Your Entity
- Upload Your Entity’s JSON File
Prepare Your Script File
- In Interface, pull up your HUD or Tablet and go to Create.
- Click on the entity you previously created to edit its properties.
- In the ‘Properties’ tab, scroll down to ‘Script’ and your script’s path or URL.
- Test your script file to see if your audio plays in High Fidelity.
If you don’t have a sound emitter script, you can create one by modifying this sample: soundLoopEmitter.js.
Add Your Assets
If your model could be re-imported without any issues, it is now ready to be uploaded to High Fidelity.
- Go to https://highfidelity.com/marketplace/items/new to create a new item. If you’re not logged in, you will be prompted to do so.
- Enter your audio’s name and select your category as ‘Audio’. You can add the metadata now or later.
- Click ‘Save Draft’.
- Scroll down to the ‘Assets’ section.
- Click ‘Choose Folder’ and navigate to where your 3D model and audio file have been saved on your computer. Upload all related folders, including your FBX file and script file (in the scripts folder).
- Click your uploaded FBX file and copy the new Marketplace URL for the FBX file.
Upload Your Item’s JSON File
- In High Fidelity, verify that your model looks correct. Open the Create Tools app, then click ‘Import Entities (.JSON)’ and navigate to your model’s JSON file.
- Go to https://highfidelity.com/marketplace. If you’re not logged in, you will be prompted to do so.
- Click on your user name, then on ‘My Items’.
- Locate your Audio in Draft mode and click on it.
- Click ‘Edit’.
- In the ‘Assets’ section, click ‘Choose Files’ and navigate to where your model’s JSON file is saved on your computer. Select your JSON file, click ‘Open’ and wait for it to upload.
- Click the JSON file as your root file in the Asset Viewer.
- Save your submission.
See Also
Limited Edition Items
You can choose to create a “limited edition” item by setting the quantity available. This ensures that only a specific number of your item is available for purchase on a first-come, first-serve basis.
To create a limited edition item, simply check the box “Item is a limited edition” when you fill out the form to submit your item to the Marketplace. Then, enter the number of items you want available for purchase. If you enter a number, say 25, you are saying that only 25 copies of your item will be available for purchase.
Unlimited Rezzing of Your Item
When you submit your item to the Marketplace, you can allow users to rez your item multiple times within a single domain. This allows users to create forests from a single tree (that they purchased) or to rez multiple streetlights from a single item in their inventory.
This setting is exposed in the item’s JSON file. To allow your item to be added multiple times within a domain, add "certificateType": "domainUnlimited" to your item’s root JSON file prior to submitting your item.
Marketplace Categories
All items submitted to the Marketplace must fall under one or more pre-defined categories. It’s important to correctly categorize your items as it helps other users find your content in the Marketplace.
Note
Our Marketplace team reviews each submission to ensure items are correctly labeled. Items may be declined if they are not accurately described or extraneous categories are marked.
Below, you’ll find descriptions of each Marketplace category and examples of items they include.
| Category | Description | Examples |
|---|---|---|
| Animals | Items depicting animals, including static 3D models of animals and functional content. | Fetch App, 3D Animal Models |
| Animations | Scripts and apps that modify or add animations to avatars, including inverse kinetics and flow manipulation. | Dance App |
| Apps, Scripts, Tools | Items composed primarily of JavaScript that add or modify functionality to High Fidelity’s content and/or Interface. These can range from a single line of code that will change an entity’s color to a full application that enables your avatar to dance. Proper apps must include an app.json root file. | Sit Point, TTS |
| Architecture | Structures or materials used to create structures including doors, walls, and flooring. This category does not include full environments like cities. | Apartment Building |
| Audio | Scripted items that produce sound effects and/or music. | Boombox, Looping Sound Emitter |
| Avatars | 3D models that are specifically rigged to work as an avatar. Proper avatars must include a .fst avatar root file. | Artemis, Mountain Ogre |
| Education | Used to promote educational materials for anything through the medium of Virtual Reality. | Laser Pointer Flashlight |
| Environments | A collection of items meant to fill a domain, providing a complete setting or a base to build a new setting from. Environments must be entity archives, as produced by backup files from High Fidelity domains. | Desert Oasis |
| Fun & Games | Interactive games and content, typically a scripted entity or app. | Beach Ball, Holiday Blaster |
| Furnishings | Items used to decorate a space, usually furniture and other props for decoration. | Mirror, Chairs |
| Light Systems | Items that emit light, including furnishings and other content. | Lamp, Torch |
| Materials and Shaders | Items users can use to customize shading or materials, including color and texture, on other entities. | Materials Sets |
| Misc | Items that do not fit into any of the other categories. If marked Misc, items should not be marked with any other category. | Particle Packs |
| Nature | Items relating to or depicting nature and the outdoors. | Plants & Pots |
| Open Source | Free content available for the community to use and build upon. Items in this category require a source code link. | Digital Picture Frame, Drumset |
| Pets & Companions | Items with scripted behavior or attachments that mimic a pet or companion. This category does not include static 3D models of animals commonly kept as pets. | Jimi the Snail, Spirit Cat |
| Vehicles | Items that are rideable and/or appear rideable through attachments or scripted functionality. This category does not include static 3D models of vehicles. | Skool Flyer |
| VR Only | Items that require a VR headset and/or controllers to function properly and will not work with Interface in desktop-mode. | Painting Set |
| Weapons | Items depicting any kind of weapon, usually attachable. Both deadly and fun-loving weapons are permitted. | Bow, Ping Pong Gun |
| Wearables | Items that attach to your avatar including hats, glasses, jewelry, and more. | Cat Tail, Backpack, Friendship Bracelet |
| Zones & Skies | Items primarily utilizing zone entities in High Fidelity. | Constellation Skybox, Moon Skybox |
Additional Notes
Follow these guidelines when uploading content to the Marketplace:
- Use only content which you are legally entitled to.
- Do not use a code obfuscator, our review team needs to be able to read your scripts.
- Audio should sound clean and be 16-bit uncompressed WAV or MP3 files.
- Items may not have .js root files. You should either make an app to run scripts, or attach scripts to entities that will be rezzed through a .json file.
- All entities must have a name, even if they are invisible or simple primitives.
- Please use English in your package description, support text, and code comments.
- If needed, you may use Markdown syntax in your description text.
Update Your Marketplace Item
Once you’ve added an item to sell on the Marketplace, you can update it at any time. This ability lets you offer your customers a new and improved version of your item. When an item is updated, we create a chain of related certificates between old and new versions of your item.
Update Your Item in the Marketplace
All updates to your item must be reviewed, verified and certified by our Marketplace team. Once you have the new assets, you are ready to update your item. The process is similar to when you first added your item.
Go to https://highfidelity.com/marketplace/items/new to create a new item. If you’re not logged in, you will be prompted to do so.
Enter the name of your item and select your category.
Update the metadata for your item.
Click ‘Save Draft’.
Scroll down to the ‘Updates’ section. Check the box ‘Updates Existing Item’ and select the old version from the drop-down.
Scroll down to the ‘Assets’ section and upload your assets.
Note
Once you’ve created a new item and checked ‘Update Existing Item’, the Marketplace URL for your item will change. At this point, you need to manually edit all files that point to the URL, such as scripts and JSON files.
Click ‘Submit for Review’ to be verified and certified on the Marketplace.
Once your update is approved, a new certificate will be generated. The previous version of the item will be hidden from new customers on the Marketplace and replaced with the new version.
Additional Notes
You cannot reference existing URLs in your updates. If you create an update, you must upload all the assets the product uses, even if they remain the same. For example, if the new version of your product uses a .wav file that has not changed in the updated version, you must upload it again in the new item. This is because the certificate system needs to recertify all files used in the product together.
Once the update hits the blockchain, your customers will receive notification that an updated version is available. A red dot on the Inventory icon of your Tablet or HUD indicates there is an update available on at least one Marketplace item.
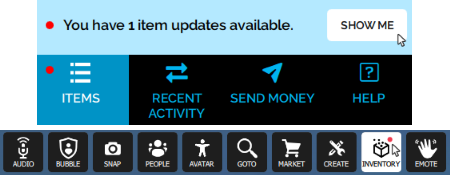
If a customer chooses not to update to the latest version, the old version will still be valid and listed in their Inventory.
Once a customer has updated an item to the latest version, they will not be able to retrieve an older version.
Rezzed items will not be automatically updated to the latest version. This means that an object in-world will remain intact (as the previous version). To update a rezzed item, the customer needs to manually import the new version of the item.
If a customer purchased mulitiple instances of an item, each one needs to be individually updated in their Inventory. This allows users to update one item, but leave the other ones as-is.
All of the above policies also apply to limited edition items.
See Also
Ownership of Your Items
In the metaverse, it can be tricky to verify the legitimacy or ownership of a piece of property. High Fidelity implemented a blockchain tracking system that allows content creators to certify their creations and records all transactions made using HFC.
Blockchain Protection
A blockchain is a type of database, one that is maintained by thousands of different people and companies, at the same time. Information written to that database is permanent, so it can’t be changed and it can’t be lost.
High Fidelity’s blockchain allows creators to permanently attach digital certificates to their creations that securely identifies their origin and unique ownership when they are later encountered anywhere in the virtual world. The blockchain also gives control over the sale, ownership and transfer of certified goods completely over to their creators and owners — there is no way for intermediary agents (such as a company like High Fidelity or a VR server operator) to take action to change the status of something you own.
Once your Marketplace item is certified, you are permanently and indelibly recorded as its creator. Any instance of that item in the metaverse has a corresponding entry in the blockchain, and its authenticity, history, value, and ownership can be verified at any time. This makes it easy to differentiate the real deal from a counterfeit copy, and allows your property to retain its value.
PoP License and Certificate
High Fidelity uses a Proof of Provenance License (PoP License) and certification to protect any digital goods or assets that you have created and sold. In its simplest form, Proof of Provenance (PoP) documents an asset’s chain of ownership, its characteristics, and its entire history, from certification onward.
When you put up an item for review on the Marketplace, it has to be approved by the digital asset registry to ensure that it is functional, that it is not obviously violating copyright laws, and that it is not a copy of any other item previously approved by the registry.
Once an item is approved by the registry, you (the user) will receive a PoP Certificate of edition 0 of the item. This PoP Certificate contains static properties about the item and cannot be altered. This means all the descriptors will always remain the same and your item’s Certificate cannot be changed. It can only be changed when the PoP Certificate is transferred.
If you place this item on sale on the Marketplace, any other users purchasing your item will receive subsequent editions of your item. Every time a user purchases your item, it is certified and cryptographically signed by the Marketplace. The PoP Certificate proves that you possess an item through legal means.
Attributions
Attributions are often used to credit other users who have contributed to an item. They can also link to an external portfolio to display more of your work.
For some submissions, attributions are legally required by other content. Some third party content will use licenses like MIT or Creative Commons, which require special attributions. When using third party content in your own items, make sure you understand the license (if any) used by the content and respect attribution requirements accordingly.
When you add your item to the Marketplace, the form includes fields to insert any attributions for your submission.

Note
Depending on the requirements of third party content licenses, you may need to include further information in the item’s description, your code, or elsewhere as specified.
See Also
Marketplace Bill of Rights
The Marketplace Bill of Rights states the privileges given to our creators and the rights High Fidelity holds over content.
High Fidelity will:
Enforce the Marketplace Guidelines fairly, without giving preference or other advantages to High Fidelity staff or affiliates.
Review all submissions within seven (7) business days of their submission to the Marketplace, and communicate the result of the review to the creator.
- If 7 business days is not possible, we will contact the seller within this time frame to discuss any problems.
Keep content in Draft mode accessible for 30 days. If an item is in Draft mode for longer than this, it will be removed. We strongly recommend keeping local backups of your content for this reason.
Take action when we detect manipulative Marketplace practices, such as, but not limited to:
- Flooding the market with sub-par items
- Pricing manipulation
- Misleading description and other presentation inconsistencies
- Attempting to maliciously break or hack the Marketplace
Notify Marketplace creators via email and/or the High Fidelity forums in cases of major changes of policy, extended Marketplace downtime, and delays in review time.
Ensure that no offensive, sexual, or generally NSFW content appears on the Marketplace and guarantee that anywhere this kind of content exists has ample warnings requiring explicit permission.
See Also
Marketplace Submission Rules
All your submissions to our Marketplace must adhere to these rules.
On This Page
General Rules
- The Marketplace Admin Team will have the final say on the publishing of all content.
- Any content that follows all technical rules may still be rejected if it has severe quality issues.
- Any content attempting to exploit loopholes or work around these rules will be rejected.
Note
Content found to infringe on copyrights and content found to be malicious after being accepted will be invalidated. This will halt all access to the item and it will no longer be available for purchase or rezzing.
Presentation
Preview Image
A preview image must be included with all items.
- Preview images must clearly show what is included in the package. Images providing context (avatars holding the item, nice backgrounds etc.) are permitted as long as it is still clear what the item is.
- If the item doesn’t have visual elements, the preview image must show context for the functionality of the item (e.g. including an image of a VR controller for a script that adds controller functionality).
Description Text
The description text must clearly state what is included in the item and describe all relevant functionality.
- Descriptions must be in English and use proper grammar, spelling, and capitalization.
- The Marketplace Admin Team may make minor modifications to the description for corrections or to provide clarity.
Titles
Item titles must be properly capitalized and only include the item name.
- Do not include subtext, taglines, or descriptive text in your title; these belong in the description text. This includes adding your username to the title as branding.
Documentation
- Any item that requires any kind of setup, special functionality, or important technical information must include documentation. This can be included in the description text and/or appear for the user when the item is rezzed in High Fidelity.
- If your item requires any special rez permissions, this must be included in the documentation
Licensing
All Marketplace items are under the Proof of Provenance License (PoP License) v1.0. Custom or alternative licenses are not permitted, unless they are compatible with the PoP license, in which case the additional licenses need to be added to the description or as a comment in the code. You can read more about the PoP license here.
Items may make use of Creative Commons, Open Source, and other free public content. However, the item cannot be primarily composed of such free content. The free content must be either substantially modified or complement content that is entirely your own.
Copyright and Trademark
Sellers must have absolute rights to the content submitted to the Marketplace. No material in violation of copyright law will be permitted.
Inappropriate Content
- Nudify/Pornography: No pornographic or overtly sexual content is permitted. Nudity in non-sexual context is permitted at the discretion of the Marketplace Admin Team. This can include content such as nude statues or paintings.
- Disturbing Content: Content made to be excessively violent or cause extreme discomfort to users is not permitted. This includes excessive violence or gore.
- Hate Speech: Absolutely no hate speech or imagery of any kind is permitted, including, but not limited to attacking race, religion, ethnic origin, national origin, gender, disability, or sexual orientation.
Restricted Content
We accept limited versions of content that allow the user to experience the product prior to purchasing the full version (demo, trial, lite etc.) For these submissions, the item must be free and the description text must clearly state all limitations of the item.
Submissions with Scripts
Your scripts must work as described in the Description Text of your item. All code must be self-contained, and all libraries must be uploaded to the Marketplace alongside your item.
Root File
All submissions must have a legitimate root file, based on the type of submission:
| Category | Root File Type | Description |
|---|---|---|
| Avatar | FST | The main avatar file, which contains information about the skeleton, blendshapes, FBX file and textures used by an avatar. |
| Environment | TAR.GZ | A content archive file containing all of your domain content. |
| Tablet Apps | APP.JSON | A JSON file that defines the absolute paths of your JavaScript and HTML files. |
| Wearables | JSON | A JSON file, which contains information on how High Fidelity can access your wearable and its files. |
| 3D Models | JSON | A JSON file, which contains information on how High Fidelity can access your model and its related files. |
Wearable-Specific Requirements
- Wearables must have either a
parentJointNameorparentJointIndexproperty specifying the joint that the wearable will be attached to by default. - Wearables must have
userDatadefined that describes how it is to be worn.
See Also
Marketplace Markdown Guide
When you submit an item to the Marketplace, you can format your item description using Markdown syntax. Markdown is a lightweight markup language with plain text formatting syntax. Its design allows it to be converted to many output formats, including HTML.
Below, you can find the commands that we support for Markdown for Marketplace descriptions.
Headings
| Markdown Syntax | HTML | Output |
|---|---|---|
| # h1 Heading | <h1>h1 Heading</h1> | h1 Heading |
| ## h2 Heading | <h2>h2 Heading</h2> | h2 Heading |
| ### h3 Heading | <h3>h3 Heading</h3> | h3 Heading |
Emphasis
If more than one markdown syntax is listed, feel free to use any of them. The output will be the same.
| Markdown Syntax | HTML | Output |
|---|---|---|
| *italicized text* _italicized text_ |
<em>italicized text</em> | italicized text |
| ** bold text** __bold text__ |
<strong>bold text</strong> | bold text |
| ***bold AND italicized text*** ___bold AND italicized text___ |
<strong><em>bold AND italicized text</em></strong> | bold text |
| ~~strikethrough~~ | <del>strikethrough</del> |
Line Breaks
To create paragraphs, use a blank line to separate one or more lines of text. You should not indent paragraphs with spaces or tabs.
To create a line break, end a line with two or more spaces, and then hit return.
| Markdown Syntax | HTML | Output |
|---|---|---|
| I really like using Markdown. I think I'll use it to format all of my documents from now on. |
<p>I really like using Markdown.</p> <p>I think I'll use it to format all of my documents from now on.</p> |
I really like using Markdown. I think I'll use it to format all of my documents from now on. |
| This is the first line. And this is the second line. |
<p>This is the first line.<br>And this is the second line.</p> | This is the first line. And this is the second line. |
Blockquotes
To create a blockquote, add a > in front of a paragraph.
> This is a blockquote.
The rendered output looks like this:
This is a blockquote
Blockquotes can contain multiple paragraphs. Add a > on the blank lines between the paragraphs.
> This is a blockquote.
>
> It has a second paragraph.
The rendered output looks like this:
This is a blockquote.
It has a second paragraph.
You can also nest blockquotes:
> This is a blockquote.
>> The second paragraph is nested.
The rendered output looks like this:
This is a blockquote.The second paragraph is nested.
Lists
To create an ordered list, add line items with numbers followed by periods. The numbers don’t have to be in numerical order, but the list should start with the number one.
To create an unordered list, add dashes (-), asterisks (*), or plus signs (+) in front of line items. Indent one or more items to create a nested list.
Images
| Markdown Syntax | HTML |
|---|---|
|  | <img src="image.png" alt="alt text" /> |
Links
| Markdown Syntax | HTML | Output |
|---|---|---|
| <https://www.highfidelity.com> | <a href="https://www.highfidelity.com"> https://www.highfidelity.com </a> |
https://www.highfidelity.com |
| [High Fidelity](https://www.highfidelity.com) | <a href="https://www.highfidelity.com">High Fidelity</a> |
High Fidelity |
| <support@highfidelity.io> | <a href="mailto:support@highfidelity.io"> support@highfidelity.io </a> |
support@highfidelity.io |
Code Samples
| Markdown Syntax | HTML | Output |
|---|---|---|
| `inline code` | <code>inline code</code> | Here is some inline code. |
| ``` block of code ``` |
<pre>block of code</pre> |
block |
Horizontal Rules
If there is more than one markdown syntax listed, feel free to use any of them. The output will be the same.
| Markdown Syntax | HTML | Output |
|---|---|---|
| ___ --- *** |
<hr /> |
Certified App Design Guidelines
Before submitting an app, make sure it follows our certified app guidelines below:
- A certified app requires 5 files: JSON, JavaScript, HTML, and two SVG
- A certified app must have a button that appears on the tablet or HUD
- A certified app must display a full screen UI in VR and a window in Desktop
- The UI for the certified app should explain how the app works
- A certified app must handle quitting gracefully
Guideline Details
1. A certified app consists of at least five files:
- A JSON file that points to the location of your app, named
*.app.json - A JavaScript file,
*.jswhich contains the script(s) for your app - An HTML page,
*.htmlthat defines the UI for your app - an SVG or PNG image to display on the app button when the app is active, usually named
appName-a.svg - an SVG or PNG image to display on the app button when the app is inactive, usually named
appName-i.svg
The app.json file has two required properties: “scriptURL” (whose value must be the URL of the uploaded JavaScript file), and “homeURL” (whose value must be the URL to the uploaded HTML file) using explicit paths created upon upload of the files to the Marketplace.
Here is an example of the app.json file. You will need to replace the zeros with the path to your Marketplace item:
{
    "scriptURL": "http://mpassets.highfidelity.com/000000000000-v1/script.js",
    "homeURL": "http://mpassets.highfidelity.com/000000000000-v1/ui.html"
}
To find the URL to your Marketplace bucket, follow these steps:
- First, upload a draft of your app to the Marketplace.
- Click on the app.json file on the Edit screen and the URL will be displayed at the bottom of the screen.
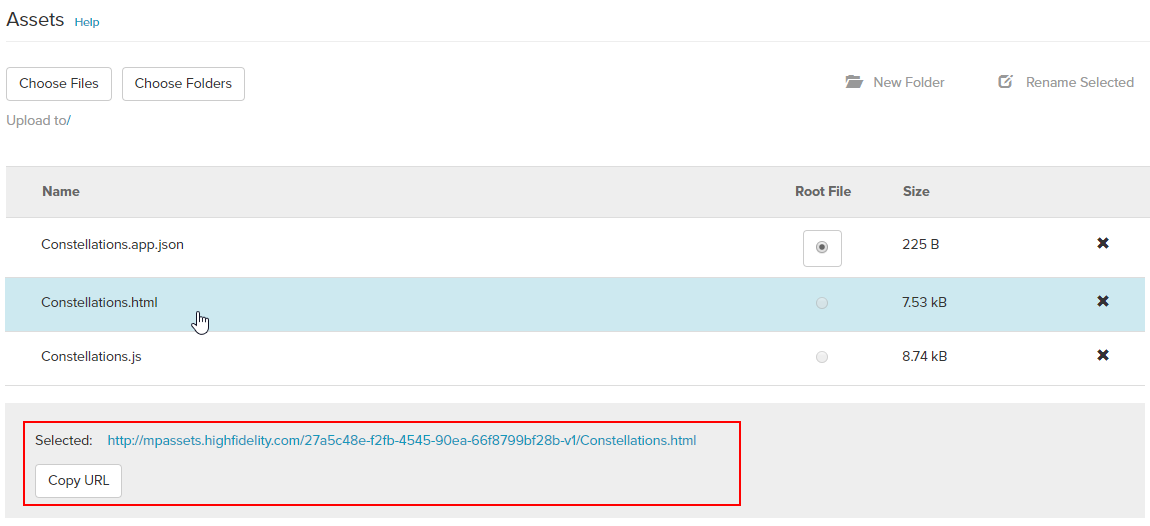
2. A certified app has a button that appears on the tablet in VR, or the app bar in desktop mode.
The button of the app must:
- display an icon
- display the name of the certified app.
3. The app must display a full screen UI in VR and a window in Desktop.
When the user opens the app with the button on the tablet or HUD, you must display a full screen UI in VR and a standard sized window display on the desktop. Use the AppUI module to automatically add your app’s button to the tablet or HUD and wire up handlers.
Below is an example of how to do this in your JavaScript file:
(function () {
// BEGIN LOCAL_SCOPE
var AppUi = Script.require('appUi');

function onOpened() {
    console.log(“hello world!”);
}

var ui;
function startup() {
    ui = new AppUi({
        buttonName: "APP-NAME", // The name of your app
        home: Script.resolvePath("app.html"), // The home screen appears when clicking the app button
        graphicsDirectory: Script.resolvePath("./"), // Where your button icons are located
        onOpened: onOpened // See the simple function above
    });
}
startup();
}());
// END LOCAL_SCOPE
If you want your app to do something specific when it is opened, you can use the AppUI module’s onOpened functionality. For example, you could:
- Query a server to get a response and determine what to show on the UI
- Start displaying a 3D interface separate from the tablet
- Determine the display mode (VR/Desktop) and change things to show on the UI
Here’s an example of using the onOpenedfunctionality:
(function () {
// BEGIN LOCAL_SCOPE
var AppUi = Script.require('appUi');

function onOpened() {
    console.log(“hello world!”);
}

var ui;
function startup() {
    ui = new AppUi({
        buttonName: "APP-NAME", // The name of your app
        home: Script.resolvePath("app.html"), // The home screen that appears when clicking the app button
        graphicsDirectory: Script.resolvePath("./"), // Where your button icons are located
        onOpened: onOpened // See the simple function above
    });
}
startup();
}());
// END LOCAL_SCOPE
4. The UI for the certified app should explain how the app works.
You should provide text on how the app works, and use familiar UI elements that a user knows how to interact with (such as buttons, scroll bars, and links).
Here are some examples of a good app UI:
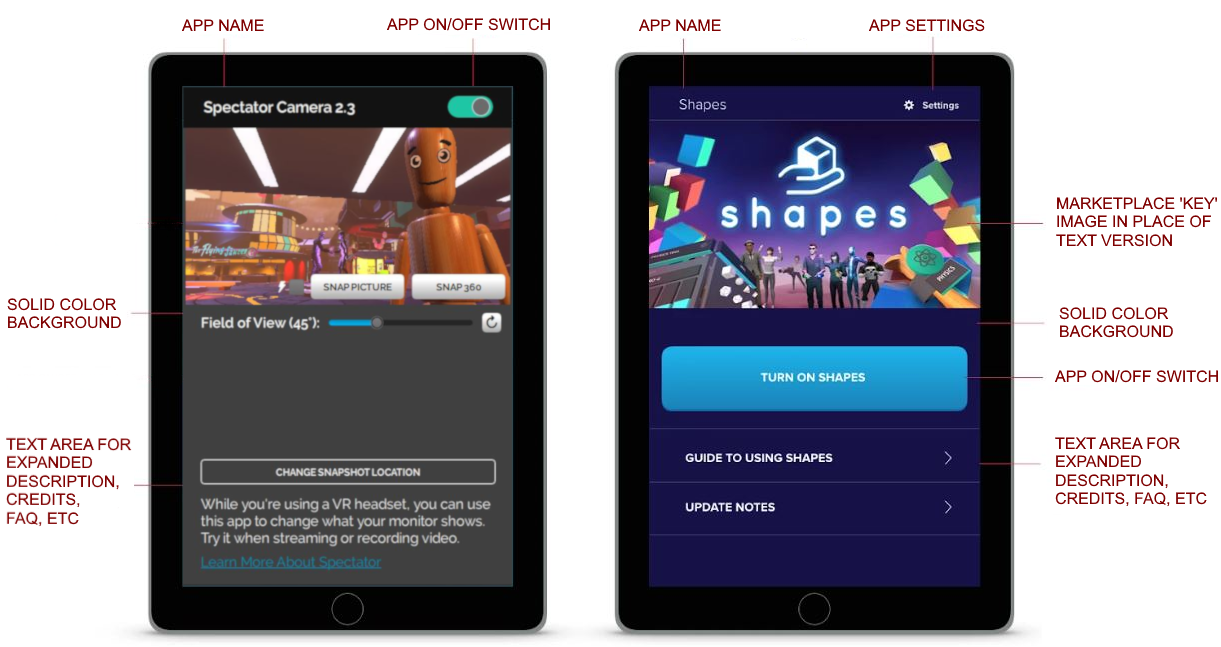
5. When a user closes the app UI, you must close the app gracefully.
To close the app, you have two options:
- Stop the active functionality of the certified app.
- If the app had 3D interfaces on user’s hand, they go away.
- If the app was enhancing or modified the client using a script (e.g. Spectator Camera), that functionality will end.
- Continue running some or all of the functions of the certified app.
- If the app wants to persist the 3D interfaces on a user’s hand, it can keep them turned on.
- If the app wants to keep enhancing or modifying the client using a script, it can keep doing that.
If you choose to stop all functionality (option 1), then the certified app needs to provide an affordance for the user to suspend the functionality of the certified app. For example, you will need to:
- Turn off the 3D user interfaces. This can be achieved either by providing that functionality in the 3D user interface, or surfacing a button in the UI of the certified app that achieves the same function.
- Stop the script from modifying or enhancing the client. This can be achieved by surfacing a button in the UI of the certified app.
See Also
Contribute
High Fidelity is an open-source project, so all of our code and documentation is available for you to look at. You too can contribute to our endeavor!
Our GitHub repository contains the source to many of the components of our software for creating virtual worlds. The project embraces distributed development. If you find a small bug and have a fix, pull requests are welcome.
Build Instructions
All information required to build is found in the build guide:
Contributor License Agreement (CLA)
Technology companies frequently receive and use code from contributors outside the company’s development team. Outside code can be a tremendous resource, but it also carries responsibility. Best practice for accepting outside contributions consists of an Apache-type Contributor License Agreement (CLA). We have modeled the High Fidelity CLA after the CLA that Google presents to developers for contributions to their projects. This CLA does not transfer ownership of code, instead simply granting a non-exclusive right for High Fidelity to use the code you’ve contributed. In that regard, you should be sure you have permission if the work relates to or uses the resources of a company that you work for. You will be asked to sign our CLA when you create your first PR or when the CLA is updated. You can also review it here. We sincerely appreciate your contribution and efforts toward the success of the platform.
Frequently Asked Questions
We get a lot of questions from our users! If you have questions about our product, feel free to browse through this page to learn more. And if you don’t see your answer here, e-mail us at support@highfidelity.com!
On This Page
Content Creation
What video codecs do you support? |
|---|
We support the following video codecs:
|
High Fidelity Coin (HFC)
- How can I get HFC?
- How do I send HFC to other people?
- Why does my HFC balance not update instantly?
- Do I get charged money if a transaction fails?
- How do I convert HFC to other currencies?
How can I get HFC? |
|---|
Currently, you can buy High Fidelity Coins (HFC) using Ethereum, a blockchain app that trades ETH ( Ether). To get HFC:
You can also receive HFC from gifts from your friends or by selling items on the Marketplace. |
How do I send HFC to other people? |
|---|
|
Why does my HFC balance not update instantly? |
|---|
| HFC transactions sometimes take a few seconds to update, as they are backed by a blockchain. If your balance has not updated within 5 minutes, contact our team at support@highfidelity.com and they can help you. |
Do I get charged money if a transaction fails? |
|---|
| No! Your HFC balance only changes when a purchase or transaction is confirmed on the blockchain. |
How do I convert HFC to other currencies? |
|---|
Our goal is to always have an easy way for creators to retrieve the money they’ve earned. Currently, you can cash out your HFC to US Dollars (USD) using PayPal. To cash out your HFC:
The minimum amount of HFC that you cash out is $25 (or 2,500 HFC), and the maximum cashout value is $2000 (or 200,000 HFC) per calendar month. High Fidelity may, at its discretion, issue the occasional exception to the maximum cashout amount. |
Buy from the Marketplace
- The Marketplace content I purchased has disappeared. Where did it go?
- Can I rez multiple copies of a Marketplace item?
- What is Dynamic Domain Verification (DDV)?
- What happens to my Marketplace content when I change my domain ID?
- What happens to my Marketplace content when I export a backup to another domain?
- How do I report a DMCA violation?
The Marketplace content I purchased has disappeared. Where did it go? |
|---|
| Marketplace items behave like items in the real world. You can have only one copy of each item you purchase. An item you bought from the Marketplace will disappear if you rez it elsewhere. This is done using a process called Dynamic Domain Verification (DDV). |
Can I rez multiple copies of a Marketplace item? |
|---|
| Yes, only if the seller has given permission to do so. A seller can modify settings to allow users to rez multiple copies of their item in a single domain. Otherwise, you will need to buy multiple copies of the item. Marketplace items behave like items in the real world. You can have only one copy of each item you purchase unless specified by the seller. |
What is Dynamic Domain Verification (DDV)? |
|---|
| Dynamic Domain Verification (DDV) is a process running on your domain, which ensures that you can rez only one copy of each item purchased on the Marketplace. This is done to protect the intellectual property rights of the creators. DDV will determine if an item has been moved to a new domain and will remove it from the old domain. DDV requires the domain to be running and will delete items from domains with no Place or domain name. Temporary names are accepted. DDV often runs within an hour after you rez a Marketplace item again. Its frequency is controlled by the domain’s control panel. |
What happens to my Marketplace content when I change my domain ID? |
|---|
| When you change your domain ID, it’s the same as creating a new domain. Even though the existing content may temporarily appear in the new domain, the system considers the Marketplace items as existing on the old domain. DDV will remove the Marketplace items from the new domain. You will have to rez the items again in the new domain. |
What happens to my Marketplace content when I export a backup to another domain? |
|---|
| When you restore a backup or exported domain onto a new server with a different domain ID, DDV will consider the Marketplace item as belonging to the old domain, and will delete them from the new domain. You will have to rez the Marketplace items again in the new domain. |
How do I report a DMCA violation? |
|---|
| Email us at support@highfidelity.com to report content violation, and we will take appropriate action. |
Sell on the Marketplace
- What should I charge for my Marketplace Item?
- Does my avatar have too many polys?
- How big can my submission be?
- How do I upload to the Marketplace?
- Can I host content on the Marketplace for personal use?
- What happens after I submit my item to the Marketplace?
- How long does it take to find out about the status of my submission?
- What are the rules for submitting content to the Marketplace?
What should I charge for my Marketplace Item? |
|---|
You are free to price your item however you’d like. We encourage you to consider these questions:
|
Does my avatar have too many polys? |
|---|
| We do not have a hard poly limit on avatars, however we recommend keeping avatars under 80k. Consider normal mapping your models to preserve high detail rather than excessive poly counts. |
How big can my submission be? |
|---|
| Submissions can be as large as necessary for the content you are uploading, but keep in mind that large items can adversely impact loading times for users. If possible, we recommend keeping submissions under 40MB total. |
How do I upload to the Marketplace? |
|---|
| Log in to the Marketplace home page and select ‘New Submission’ from the top-right menu. |
Can I host content on the Marketplace for personal use? |
|---|
You can submit content without putting it up for sale. However, you will still need to go through the certification process and be held to Marketplace standards. Content not submitted for review will expire after 30 days and will no longer be accessible. You should always keep backups of your files, as we cannot ensure the return of your files if they are corrupted or lost. |
What happens after I submit my item to the Marketplace? |
|---|
| Your submission will be evaluated by our team. Once our team has completed evaluation, you will receive an email telling you that your item was accepted or declined with reasons and resubmission guidelines. |
How long does it take to find out about the status of my submission? |
|---|
| The Marketplace team will respond by email within 7 business days. |
What are the rules for submitting content to the Marketplace? |
|---|
| Please refer to our Marketplace Submission Rules. |
Domain Hosting
- How do I get into my domain settings if I set up authentication but forgot my username and/or password?
- Why do Marketplace items keep disappearing from my domain?
How do I get into my domain settings if I set up authentication but forgot my username and/or password? |
|---|
|
Why do Marketplace items keep disappearing from my domain? |
|---|
All Marketplace items are certified to protect the intellectual property rights of the content creators. In many cases, your content is removed by a process called Dynamic Domain Verification (DDV) to prevent illegal use of your purchased items. DDV often runs within an hour after you rez a Marketplace item. Here are some reasons your Marketplace items may disappear from your domain:
|
Troubleshooting
Why can’t I connect to a domain? |
|---|
If you cannot connect to your virtual workplace, follow these steps to resolve the issue:
|
No one can hear me! |
|---|
If other users in the domain can’t hear you, then you are likely muted or your microphone gain is set too low. Here are some steps to troubleshoot your issue:
If your input device is turned on, and you are not muted in the application, device, or operating system, then it is likely that your microphone volume needs to be adjusted or boosted. This is done in your operating system settings:
|
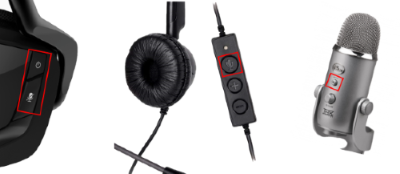
I can’t hear anything in High Fidelity. |
|---|
Here are some reasons you might not have audio:
|
Release Notes
See what’s been released in High Fidelity.
For historical release notes (prior to Beta Release 80), view our forum.
Beta Release 86
We released Beta Release 86 on Thursday November 14, 2019.
Note: There is a protocol change in this version.
New in v0.86.0!
- New “Away From Keyboard” animation: There is a new AFK animation! We’ve moved away from the squatting animation and have updated it with an “I’m busy on my phone” animation. When you press ESC, your bubble will still be activated and you will automatically be muted.
- Blend shape support for ARKit compatibility: We’ve added new blend shapes and add support for up to 10 custom blend shapes with this release. In addition, there are now Controller actions to drive all blend shapes from the input system. See more details for naming conventions in https://github.com/highfidelity/hifi/pull/16400. Details are also mentioned in the notes below.
Improvements
Avatars
- Improved avatar eye tracking in 3rd person camera mode.
- The run/sprint speed for VR mode now matches the run/sprint speed for desktop users. Thanks to orenh1 for the contribution. (Canny: ]https://highfidelity.canny.io/bugs/p/avatar-locomotion-speed-is-unnatural-after-beta-82](https://highfidelity.canny.io/bugs/p/avatar-locomotion-speed-is-unnatural-after-beta-82))
- Walking animations experience less foot sliding when starting and stopping by using WASD input rather than avatar speed to trigger transitions.
- Removed the DDE and FaceTracker Plugins and extended our blend shapes to support ARKit compatibility.
- Removed “AvatarTransit” log spam that was added in a previous release to debug an issue with avatar walk and jump.
- Improved verification of avatar ownership over poor network connections to prevent erroneous avatar theft messages.
Create
- In the Create Tool’s Properties, the ‘Cast Shadow’ tool tip has been updated and now includes a note that computers profiled to medium or low graphic settings will not render shadows.
- In the Create Tool’s Properties, increased the range for a zone’s ‘Haze Base’ and ‘Haze Ceiling’ to (-16000 to 16000). Previously, this was capped to (-5000 to 5000). (Canny issue: https://highfidelity.canny.io/bugs/p/editor-zone-haze-altitude-value-floor-at-5000)
- Incorporated an experimental custom shader feature, which allows users to apply shaders to models and avatars. Thanks to HiFiExperiments for the contribution.
Scripting API
- Added the LODManager.worldDetailQuality type definition to define the level of world detail detail via scripting. Previously, the level of detail was set using a numerical range (0-1), which resulted in inconsistent/unexpected target FPS values. For more information, see https://apidocs.fluffy.ws/LODManager.html#.WorldDetailQuality.
- Moved hasScriptedBlendshapes, hasProceduralBlinkFaceMovement, hasProceduralEyeFaceMovement and hasAudioEnabledMovement to AvatarData class.
- Moved FaceshiftConstants to BlendshapeConstants.
- Deprecated ToolbarProxy#addButton() and ToolbarProoxy#removeButton() methods.
- Deprecated MyAvatar.setForceFaceTrackerConnected() method. Use the MyAvatar.hasScriptedBlendshapes property instead.
- Removed unused FaceTracker and DdeFaceTracker plugins and associated code.
Other Mentions
- Changed the initial size of Interface window on launch for Mac computers to 80% of the screen size.
- Added new option “Headset’s default device” as the recommended and default audio device when running in VR mode.
- Reduced duplicate logging when the audio system detects an invalid configuration.
- Updated error text for invalidated Marketplace items.
- Removed Developer > Tests menu from UI.
Fixes
Audio
- Audio components now properly handle system power management notifications.
- Radio buttons are now correctly selected when using HMD audio devices with High Fidelity.
- Fixed issue where High Fidelity may not shutdown completely when using an HMD audio device.
Avatars
- Fixed a twitch in the head while strafing and moving forward.
- Increased the blend time between randomly selected talk animations to 20 frames. This fixes a bug where talk animations would “pop” during long periods of talking.
- When loading avatar bookmarks, avatar entities are now attached after the skeleton has finished loading. Previously, avatar entities may have erroneously been attached to incorrect joints due to old skeleton structures. Thanks to orenh1 for the contribution.
Create
- Video files played inside web entities are now visible on Mac computers.
- Entities with the link property set can now successfully be clicked in VR mode.
Other Mentions
- Fixed issue where text in the Scripting Console occasionally was not visible on Mac.
Crash Fixes
- Fixed crashes in the following scenarios:
- Calling Recording.stopRecording() while no recording is being made
- Attempting to switch to the same audio device multiple times
- Wireless audio devices going out of range
- Shutting down High Fidelity on Mac with open dialog window(s)
Android
There are no Android-specific fixes in this release.
Beta Release 85
We released Beta Release 85 on Thursday October 17, 2019.
Note: There is no protocol change in this version.
Note
High Fidelity is an unsigned application. Due to Catalina's new security measures, users of Mac computers must now authorize the installation of High Fidelity from the System Preferences panel. We are actively working on signing and notarizing our Mac install in an upcoming release. In the meantime, please refer to our Installation FAQ for steps to install High Fidelity on Catalina.
New in v0.85.0!
- Free Look Camera: The desktop and HMD controls to “look around” now control the camera direction rather than the direction your avatar is facing. For small rotations, the avatar will follow the camera with only its head and shoulders, rather than its entire body. Avatars now have a more natural and relaxed appearance in-world, while allowing you to manipulate the camera more freely in third person camera mode. All movement and camera controls remain the same from previous versions.
- Selfie Mode: Mirror mode (accessible with the “2” key in desktop mode) has been replaced with a new selfie mode. Unlike mirror mode in past versions, you can now move around while looking at yourself and use the camera to look around.
NOTE:Though they are no longer available in the user interface, we did not remove the legacy camera modes from our JavaScript API. If you would like to re-enable the legacy behavior, refer to https://apidocs.fluffy.ws/Camera.html#.Mode.
- Use Computer Default Audio: You now have the option to use your computer’s default input and output devices as your High Fidelity audio settings. For new installations, this is the default. Using this new setting, Interface will use whatever your computer’s audio settings are, even if you change them at the operating system level.
Improvements
Avatars
- Migrated face and eye-tracking from separate classes to a standard input system. See https://github.com/highfidelity/hifi/pull/16157 for details.
- With nametags always on, you will be able to see your own nametag in selfie mode.
Cloud Domains
- Improved error messaging and user flow when setting up cloud domains through High Fidelity’s web interface.
Create
- Removed detection of right-clicks for entities with link properties; previously, right-clicking on an entity with a link would activate the link, now it doesn’t.
- Added support of relative paths to the “link”/”href” property for entities.
- Avatar entities can now be created even if the user is not connected to a domain.
Other Mentions
- Enabled support for the use of port number in host names (for example, hifi://mysampledomain:40102).
- On Mac, Interface no longer triggers the “App Nap” OS feature when minimized.
Fixes
Build System
- Updated our included version of WebRTC to match the appropriate OSX version.
- Suppressed benign warnings being thrown during Windows compilation process.
Audio
- Recording.setPlayerVolume(volume) now correctly sets volume; Recording.setPlayerAudioOffset(audioOffset) is also implemented.
Avatars
- Bugs were fixed when users would incorrectly receive an avatar theft message in the following circumstances:
- Switching networks
- Putting a computer to sleep
- Fixed a bug that would occur when using the Avatar Uploader – scale values were incorrectly being scaled during additive blends.
Create
- Deleted web entities no longer leave behind extra QtWebEngine processes.
- Sound from a web entity no longer lingers when leaving the domain the web entity is in.
- Avatar entities will now respect their “lifetime” property and go away when appropriate.
Rendering
- Meshes with opacity maps will now look consistent regardless of the distance at which they are observed; fixes an issue where transparent objects would disappear at a distance.
Other Mentions
- Fixed issue with extra QtWebEngine processes being created when entering and exiting sleep mode.
- entityTreeRenderer.cpp no longer allows signals to get connected more than once.
- Added code to prevent duplicate copies of ‘controllerScripts.js’ from running.
- Fixed Mat4 methods to return the same values as respective Quat class.
- Assets.initializeCache() now returns the correct value; previously, it always returned false.
- Addressed an error that would occur during baking of FBX meshes with no indices.
- Steam release notes link now correctly directs to our release notes page at https://docs.highfidelity.com/release-notes.html.
- Fixed the functionality of loadWebScreenOnTop in the TabletScriptingInterface.cpp file so it works the same way as loadQmlOnTop.
- The Blocks app and script now works correctly, and the “BACK” or “CLOSE” buttons have been removed from the top of the screen.
Crash Fixes
- Fixed crashes in the following scenarios:
- Selecting the Calibration tab from the Controls window
- On shutting down Interface on Mac computers (NOTE: We have fixed one crash condition that caused 100% crash on shutdown. We are aware of other crash conditions on shutdown that are occurring on occasion, and are actively working to identify their causes and fix them in future releases)
- Addressed a race condition that was causing crashes when using HMDs
Android
There are no Android-specific fixes in this release.
Beta Release 84
We released Beta Release 84 on Monday September 23, 2019.
Note: There is a protocol change in this version.
New in v0.84.0!
- Acoustic Echo Cancellation: In this release, we implemented Acoustic Echo Cancellation (AEC), which improves voice quality by preventing the echo that results in open mic setups. By default, AEC is turned on, and you can turn it off in Settings > Audio. Documentation is available at Acoustic Echo Cancellation.
Improvements
Avatars
- Improved our safe landing code so that avatars will no longer get trapped in the ground or other objects.
- Added feetPosition property to MyAvatar API.
Create
- Added font, textEffect, textEffectColor, and textEffectThickness properties to text entities to allow configuration of the appearance of the text.
- Changed the keyboard shortcut for ‘Duplicate entities’ in Create mode to Ctrl + Click (Windows) or Cmd + Click (Mac).
Rendering
- Improved performance when any entity needs to be re-rendered (thanks to HifiExperiments!).
- Improved performance for Interface’s rendering pipelines.
- Added a check to see if a user’s machine will render cleanly using a higher graphics mode; if not, we will default to “Low”.
- Fixed rendering issue where the sky was a darker color than it should have been for some users with AMD graphics cards.
- Automatically tier computers with Intel videos cards and Mac without secondary video cards into “Low” graphics rendering mode by default.
- Improved rendering of entities on low-end PCs:
- Invisible polylines
- Black fringes surrounding polylines
- Missing blendshapes on avatars
Other Mentions
- Updated High Fidelity branding on the login screen and dialogs throughout the Interface.
- Added setting to keep audio volume settings across sessions.
- Removed Crash sub-menu from the Developer menu in Interface.
- Removed keyboard shortcut (Shift+L) to open LOD tools.
- Provided additional information in the scripting console for debugging picks. This introduces the ability to get:
- the list of created picks (Picks.getPicks())
- the properties that were given to a pick at time of creation (Picks.getPickScriptParameters(id))
- the current properties of a pick (Picks.getPickProperties(id))
- Introduced new build-time environment variable HIFI_VCPKG_BOOTSTRAP that will allow developers using Visual Studio 2019 to build the High Fidelity binaries. See the updated build guide for Windows here: https://github.com/highfidelity/hifi/blob/master/BUILD_WIN.md
- Updated High Fidelity’s copyright on the About dialog.
Fixes
Installer
- Fixed missing api-ms-win-shcore-scaling-l1-1-1.dll installer error introduced in v0.83.0.
- Removed the Sandbox that was inadvertently added to the client-only installer on Windows.
Avatars
- Bugs were fixed when users would incorrectly receive an avatar theft message in the following circumstances:
- Following disconnects of Interface
- Laptops falling asleep with Interface running
- Changing network connections
- Rapidly switching between avatars in Inventory
- User reloads content
- When traveling at higher speeds, whether flying or running, the collision box for the avatar no longer extends outward to hit objects that are more than a meter away
- Fixed an issue where avatars were able to fly through some walls and other objects
- You no longer have to set MyAvatar.hasProceduralEyeFaceMovement = false in JavaScript for MyAvatar.setJointRotation() to function properly on eye joints
Rendering
- Fixed an issue occurring in “Low” graphics mode where some semi-transparent entities would show black artifacts from the objects behind them
- Corrected the sky color on Mac where it would flash a different blue color before settling into the normal sky color
- The in-world representation of “20:20 vision” now more closely matches real-world 20:20 vision, and is set as the default
Other Mentions
- Returned Shield icon to HUD and Interface window in Desktop mode
- Using track pad with Mac no longer gets stuck in “mouse look” mode after releasing the click buttons
- 8-Channel audio output works again in Interface (thanks to ctrlaltdavid!)
- Removed ‘HMD Mute Warning’ option from Settings > Audio > Desktop tab
- Fixed memory leak in the ESS causing a leak of all XMLHttpRequests in the domain server
- Addressed security issue that allowed server scripts using web pages to access files on the local machine
- Fixed crash in the Oven executable for lack of MaterialCache instance in DependencyManager
Crash Fixes
- Fixed crashes in the following scenarios:
- In AudioInjector when Mac laptops go to sleep
- Closing laptop lids and re-opening them while Interface is running (on both Windows and Mac)
- Checking for web page access permissions was not thread safe
- Attempting to stop the audio injector when exiting out of interface on a Mac
- Using ‘originalProperties’ in a Domain filter
- Using the
ScriptDiscoveryService.scriptsModelproperty and trying to access data for a non-existent row in the model - Added a workaround for a bug present in the Qt framework that can cause a crash when multiple threads attempt to serialize rendering of QML surfaces
Android
There are no Android-specific fixes in this release.
Beta Release 83
We released Beta Release 83 on Wednesday July 31, 2019.
Note: There is a protocol change in this version.
Note
As of Beta Release 83, we are only testing on Windows 10 machines and macOS High Sierra or above. Therefore, we will no longer be actively supporting older operating systems for High Fidelity Interface and Sandbox.
New in v0.83.0!
- Many efforts have been made to improve stability and performance in this release:
- Over 75 crashes have been identified and fixed.
- Desktop mode now works on business-class PCs, supporting a wide range of Nvidia, AMD, and Intel graphics cards for Windows PCs.
- Improved Mac stability and performance, including support for MacBook Air:
- Throttling the refresh rate to require less power in a desktop.
- The default screen size is now set to 1/2 scale to decrease the amount of power and improve startup time.
- The default resolution of High Fidelity is now set at 1/2 the screen resolution to reduce pixel processing bottleneck for the low-end Mac computers. Due to retina screen resolution and combination of integrated or low-end graphics cards, a lot of Macs suffer from processing too many pixels due to the high screen resolution. To change this setting, go to Settings > Graphics.
- A lot of attention has been made to improving disconnecting and short disconnects/reconnects. This would manifest in pink Orbs never resolving properly and white orbs sticking around; we rarely see any of those these days!
- Auto-Optimization for Rendering and Graphics: In this release, we add controls for world detail, rendering effects, and refresh rate to optimize your experience. By default, you will be loaded into the recommended settings based on your hardware configuration. You can further refine these settings by going to Settings > Graphics.
- Welcome back the webcam and microphone access! In a previous release, we completely removed any access to webcams and mics due to security concerns. We’ve since addressed and fixed those security issues. In addition, if a webcam or microphone need access at any time, you will see an access control dialogue where you can either grant or deny this. (Canny request: https://highfidelity.canny.io/bugs/p/embeded-chromium-browser-are-not-enumerating-camera-and-microphone-inputs).
- Comfort Mode: Comfort Mode is designed to decrease the effects of motion sickness in VR mode by:
- Decreasing your field of vision by darkening the edges of the screen.
- Adding a ground plane and grid.
- This feature is OFF by default and can be activated and adjusted in Settings > Controls > Calibration.
- Avatar Theft Protection: Users are no longer able to wear certified avatars that they do not own. If someone attempts to wear a certified avatar that they don’t own, they instead will wear a generic avatar and given instructions on how to change to another avatar.
- Baking of Avatars: Avatars uploaded through our Avatar Packager will now be automatically sent through our Oven process and baked. This provides for better optimization and performance.
- Simultaneous Editing of Objects: In Create mode, you can now simultaneously edit multiple entities at once. Select the entities you want to change, then modify the properties. For certain properties (such as color and behavioral properties), changing the value will change it for all selected entities. Other properties (such as spatial properties) will offset the original values by the changed value.
- New User Experience: We’ve returned to our previous start-up behavior so that new users will start their HiFi journey in a local domain by themselves. The updated content introduces the movement controls and teaches users how to use High Fidelity.
- Update to QT 5.12.3: This update fixes bugs and errors related to the outdated QT APIs that were in use.
- New Documentation includes:
Improvements
Avatars
- Avatar bandwidth is decreased by 13.9%. We achieved this by removing faux joints that are not required unless the user is actively grabbing an object.
- We’re continuing to improve our avatars and make them more lifelike!
- Added more talks, idles and fidgets, and polish system to hide loops and repetition of animations, and also to reduce glitches as the component animations blend in and out. See this PR for technical details.
- Reworked the stop and settle animation to be smaller and less bouncy, especially for small adjusts.
- Reworked all locomotions to match movement speeds that were changed by design to be 2.5 m/s for walk and 5.2 m/s for run. Polish the animations to work for authored height (Artemis) and also the short wolf avatars. See this PR for more details.
- We added the ability to override animations for the right and left hand. This enables users to create scripts for custom hand poses. See this PR for more information on hooking in your scripts.
- Improved our safe landing code to properly find local entities when teleporting or entering a domain. This prevents avatars from showing up in undesirable locations when moving around. Many thanks to Oren Hurvitz for the code!
- Added support for morph Targets in GLTF Avatars so that animations can be used, specifically Walk and Jump!
- Set different default run speeds between HMD and Desktop mode for the Analog control scheme (Settings > Controls > Control Scheme Selection).
Create Tools
- The Independent and Entities views have been removed from the View menu in Create mode.
- Introduced shadowBias and shadowDistance as zone properties to allow precision when creating realistic shadows in different lighting conditions. NOTE: We tried to match the default values as closely as possible to the previous hard-coded values, but many existing domains that were already using shadows prior to 83 may now need a little additional adjustment to get these new properties set correctly.
- Added ignorePickIntersection to Create UI.
Rendering
- Improved CPU usage by optimizing avatars and the _Blender tasks associated with rendering. This dropped CPU 10% on Windows. See this PR for more technical information.
- Optimized the way we handle switching between different GL contexts in frames. This will remove the stuttering that could occur when loading content.
- Improve gLTF importer correctness and support for the following features: mesh deformer, unnamed materials and vertex colors, sparse accessors, thin bounding boxes. Many thanks to SaracenOne for your contribution!
- Added Haze to our forward renderers.
- Reduced the complexity of managing/editing our common shaders, and made it easier to add more variants in the future by combining shaders variants in SLP defines.
- Baking FST files with the oven now includes the existing materialMap in a baked FST file.
API Documentation
- Documentation is now updated and complete for the following APIs:
Other Mentions
- Now allow users to disable automatic flying (Settings > Controls > Hover When Unsupported). Many thanks SaracenOne for the contribution.
- When enabled, if you walk off of a tall building (or off the edge of the content so there is only the void below you), you will start to hover.
- When disabled, when you walk off, you will start to fall. If flying is enabled, you will still be able to start flying while you are falling.
- We now call leaveEntity before unloading a script if our avatar is inside the entity.
- Unmuting while away will now remove your away state.
- Cleaned up some warnings in syntax-error.js that were appearing in Visual Studio. Thanks to Oren Hurvitz!
- Improved loading by fixing up some race conditions that could trigger waiting for login to complete, even when it already did, edit.js would fail to load as scripts started running before the Keyboard had been initialized. Thanks Oren Hurvitz!
- Made improvements for Linux users by correctly minimizing (iconizing) Interface. Before this fix, the Interface window would immediately pop back up.
- Added min-listen-port command line parameter to assignment monitor. This will allow users to specify a port range for assignment client UDP ports, allowing easier port forwarding, etc.
- Added vhacd-util and Oven to all installers. VHACDUtil is a content optimization tool like our Oven and is an alternative for content creators.
- Updated our installer icons.
Fixes
Audio
- The Dynamic Jitter Buffer switch in the Domain Admin UI was inverted, causing audio quality degradation. This has disabled dynamic buffers when it’s set to enable them. This now works correctly.
- Adjusted the adaptive audio threshold value we use when Muted. This fix improved the ”MUTED” indicator (which warns when talking while muted) to stop constantly flickering.
- We now persist the mute settings between sessions.
- When unmuting with keyboard shortcut (Ctrl + M) in PTT mode, the icons now correctly indicate the current mute state.
- Plugging and unplugging USB headsets no longer cause Interface to hang or freeze. (Canny request: https://highfidelity.canny.io/bugs/p/unplugging-headphones-with-hifi-open-causes-freeze)
- Fixed an issue in audio where clicks/pops could be heard when gain is rapidly changing.
Avatars
- Fixed an issue where the getJointRotation and setJointRotation were not the same values when you use different overloads of the function. Specifically, the MyAvatar.getJointRotation(index,quat) was working but MyAvatar.getJointRotation(“jointname”, quat) was not.
- In HMD mode, avatars will no longer sink into the floor (this behavior previously manifested in certain hand/shoulder poses).
- In cases where avatars have no eye joints, eyes no longer pop out of joint and the camera view no longer appears inside the avatar’s head. (Canny request: https://highfidelity.canny.io/bugs/p/head-flashes-into-view-while-in-hmd)
- User scripts now correctly override the rotations of the eyes using the MyAvatar.setJointRotation() API.
- Users who change from a GLTF avatar to an FBX avatar now correctly move, rather than floating in the air.
- Limited the amount of data that can be read from a single binary array in an FBX node. This was potentially causing crashes due to corrupt FBX files.
- Changes from AvatarBookmarks.updateAvatarEntities() now appear correctly on remote interfaces.
- Equipping a wearable on a missing joint no longer duplicates the wearable. (Canny request: https://highfidelity.canny.io/bugs/p/clicking-cancel-in-wearable-app-causes-problems)
- Fixed an issue where Head-mounted avatar entities were visible in first-person after releasing from grab when trying on. This would only manifest in HMD mode.
Create Tools
- In the Create app, Copy/Paste now works on grandchildren of entities. Before this fix, only an entity’s direct children were copied, but not their children. Thanks to Oren Hurvitz!
- Fixed a long-standing issue where Undo and Redo were not following the command chain correctly when editing Zones. As a result, some Undo/Redo steps would get skipped.
Rendering
- Transparency of UI elements and graphics now display correctly on Mac computers with AMD chips.
- Avatars no longer freeze in the middle of their transition state, resulting in a partially rezzed avatar. This could occur during log out, on a disconnect, when logging in, or anywhere else where the avatar was in a state of transition.
- Switching between HMD and desktop modes now works seamlessly. Users will no longer be stuck in desktop mode permanently. (Canny request: https://highfidelity.canny.io/bugs/p/fix-moving-between-desktop-and-hmd-on-oculus)
- Fixed the issue where we were artificially clipping the FOV in Oculus devices, resulting in a black border appearing around your field of view. (Canny request: https://highfidelity.canny.io/bugs/p/black-border-appears-at-all-times-in-vr-at-least-on-oculus)
Other Mentions
- The keyboard now correctly scales to your avatar when you reload content or scripts while your avatar is larger or smaller than a default mannequin.
- Special characters in your username no longer causes blank inventory and HFC balance.
- Added size checks for trait packets parsing to ensure we don’t read past the end of packet buffers. This can help prevent certain crash cases when sending/receiving Avatar Skeleton Traits.
- When using the Oven, the materialURL “materialData” is no longer parsed as a URL.
- New users are no longer asked for a wallet passphrase on login.
- Fixed potential error in network code, involving congestion control.
- Fixed an instance where you would upload content to your domain, it would appear to fail but actually succeed. For example, when restoring a content backup, the error message “There was a problem loading your list of automatic and manual content archives, please reload the page to try again” would appear but the content is actually there.
Crash Fixes
- Fixed crashes in the following scenarios:
- Accessing Avatar::getJointIndex or Avatar::getJointNames due to memory corruption in _modelJointIndicesCache
- Accessing flow collision arrays from different threads when touching flow bones or hair on other avatars
- Backing to invalid indices in baker::calculateNormals
- Shutting down while other avatars are rezzing into the domain
- Incorrect material mapping from FST files
Android
- Fixed an instance where the Android app would crash on launch
- Corrected the gamma levels that were set too high and making some content appear washed out.
Beta Release 82
We released Beta Release 82 on Tuesday April 30, 2019.
Note: There is a protocol change in this version.
Hotfix v0.82.1
A hotfix (v0.82.1) was released on April 30, 2019.
Note: There is a protocol change in this version. All Clients and Servers need to update to this latest release.
- A feature to slow the rate that nodes are added to the avatar mixer was introduced with RC82.0. This code path was not working correctly and a server-side fix has been made 82.1. Any domains running should be immediately updated to 82.1.
- A change to Entities was causing a deadlock in the Entity Server. The fix required a protocol change. All clients will need to update to 82.1.
New in v0.82.0!
- Improved Locomotion: With new controls in both VR and Desktop mode, movement is easier and more intuitive! Customize your settings by going to Settings > Controls. (Canny request: http://roadmap.highfidelity.com/feature-requests/p/improved-locomotion-numerous-features)
- Choose from three modes for more granular control over how you move:
- Default: You will always walk at the same speed. To run, fully push the stick forward.
- Analog: Your movement speed is determined by far you push the stick forward on your controller. To run, fully push the stick forward.
- Analog++: This is the same as Analog, except that you can define your maximum walk speed with a slider in the UI.
- Choose what direction you move in while in VR mode: either in the direction your head is facing, or in the direction your hand is pointing.
- In Desktop, hold Shift while using the arrow keys to walk sideways (strafe).
- In VR mode, you can now disable Strafe (walking sideways).
- Choose from three modes for more granular control over how you move:
- New Audio Settings: In this version, we introduced independent volume controls for avatars, ambient background volume, and overall system sound. The audio level meter is smaller and takes up less space in the window. Go to Settings > Audio to change your settings. (Canny Request: http://roadmap.highfidelity.com/feature-requests/p/implement-2-main-volume-sliders)
- Additional Controls for Entities:
- All Entities: Render Layer and Primitive Mode
- Web Entities: New controls for Web Color, Web Alpha, Script URL and Max FPS
- 3D Models: Group Culled
- Particles: Emit Shape Type
- Features Added to Avatar “Hero” Zones: The Hero zone was introduced in v0.79.1, where avatars within the zone receive more bandwidth over other avatars in the domain. Additional features have bene added:
- Hero zones are updated dynamically as you change the zone properties. Creating, deleting, moving and resizing the hero zones will immediately affect the avatar’s hero status.
- Domain owners can now specify the amount of bandwidth that is dedicated to Hero zones set up in their domain. Go to http://localhost:40100/settings > Avatar Mixer > Advanced Settings > Hero Bandwidth to set the bandwidth.
- Hero zone properties are now accessible via scripting and our JavaScript API.
- New Documentation includes:
Improvements
Avatars
- The new Flow app (released in v0.81.0) has been updated to work with the “sim” naming scheme.
Create Tools
- New support for the OpenEXR high dynamic range image file format on skyboxes and ambient maps.
- A damping value is now added by default to dynamic 3D models.
Oven and Baking
- Oven output format has changed from FBX to FST, but remains backward compatible to support our existing baked FBX files.
- Oven now supports baking materials, so that all textures with the material are now automatically baked.
- Oven now supports baking avatars directly.
- Oven now supports Dropbox hosting and correctly reports invalid FBX files.
- View updated documentation at https://docs.highfidelity.com/host/oven.html.
API Documentation
- Documentation is now updated and complete for the following APIs:
Other Mentions
- The privacy bubble has been renamed “shield”. You can turn it on/off using the Tablet/HUD or the new indicator next to the audio level mixer.
Fixes
Avatars and People App
- The High Fidelity Avatar Exporter for Unity includes fixes and improvements to the warnings and errors. Download the updated exporter here (v0.4.1): https://github.com/highfidelity/hifi/raw/57c3620587ae1ec4638a58988909b46602c14633/tools/unity-avatar-exporter/avatarExporter.unitypackage
- Users will no longer see duplicate avatars in a domain after someone else disconnects and reconnects.
- Users can now correctly see a friend’s location when their availability is set to ‘Friends Only’.
- Fixed the People app filter bar. It no longer breaks when you delete connections.
Create Tools
- Grab handles correctly stop pulling object after the trigger or mouse is released.
- Using the DEL key in HMD no longer erases active User Data objects.
Marketplace and Inventory
- Pressing ENTER while searching the Marketplace now initiates the search, rather than removing the search text.
- Pressing the TAB key while searching the Marketplace no longer repeats the current search.
- Updates to a Marketplace item now correctly displays the cost (if applicable), rather than “free”.
- Users can no longer select the URL of a Marketplace item by selecting and dragging the mouse on a Marketplace item in the drop-down list.
- Fixed some text formatting issues in the Marketplace App buttons.
- Fixed an edge case where non-creators could view and purchase items that were not for sale.
- The LOG IN and CANCEL buttons on the Inventory page now correctly respond if the user logs out while Inventory app is open.
- We now check the a user’s HFC balance prior to sending money to another user.
- We added failure handling when sending money via a script fails.
Rendering and Core Engine
- Notifications now render correctly in VR mode, even when an avatar is scaled very small.
- The seek lasers on hands are no longer offset when an avatar is resized.
- Near-grabbed entities now update correctly for the observer.
- Web entities display the correct transparency.
- Fixed an edge case in which the view perspective of avatars disagreed on whether a held entity is kinematic. With this fix, objects look clean to an observer and pass through the Kinematic object smoothly.
Domains
- The ‘Create Temporary Placename’ button now correctly appears when you change the domain ID of a domain.
- Modifications to entities no longer disappear or unexpectedly change when the domain starts up.
- Backups of domain archives no longer fail when content sets are null.
- Fixed an edge obscure case where rezzing an item more than once would cause the following issues:
- Subsequent items were not added to the simulation.
- Parents/children don’t get fixed up.
- The signals addingEntity and addingEntityPointer don’t get emitted.
Other Mentions
- Users can again create logins through Oculus.
- You can now test your voice even when muted or Push to Talk is enabled.
- Restarting scripts will not correctly trigger the ‘Tablet screen changed’ login.
- Fixed an intermittent bug that occurred when equipping a cloneable entity in HMD. The new entity would get created but didn’t actually get equipped. This is now fixed.
Crash Fixes
- Fixed crashes in the following scenarios:
- Closing interactive windows in the Create app
- Using the Appreciate app
Android
Nothing specific for Android in this release.
Beta Release 81
We released Beta Release 81 on Friday, March 29, 2019.
Note: There is a protocol change in this version.
Hotfix v0.81.1
A hotfix (v0.81.1) was released on March 31, 2019. This release disables the ability to create a web view in Interface that enables access to a user’s webcam or microphone audio.
Note: There is a protocol change in this version.
New in v0.81.0!
- Flow Technology: We have migrated High Fidelity’s flow technology from JavaScript to C++. This improves performance across the board and makes it more accessible to non-programmers. To use it, download the new Flow app from the Marketplace, adjust the settings to configure physics such as gravity and elasticity, and copy the resulting code directly into your avatar’s FST file.
- Microphone and Mute Experience:
- Push-to-Talk: Push-to-Talk will keep you muted except when you are pressing buttons on either your keyboard or your controllers. Go to Settings > Audio > Push to Talk to enable. To talk in Desktop mode, press and hold the “T” button. To talk in VR, press and hold the grip triggers on both of your controllers.
- Mute Notification: We now provide visual feedback when you try to speak in a muted state. You will see the word “MUTED” in red on your screen if you try to talk while muted.
- Test Microphone Settings: You can now test your microphone settings from within Interface. Go to Settings > Audio > Test Your Voice. You will see your voice input on the Audio Level Meter.
- Your mute state is now correctly saved when reopening Interface.
- Track Hand Controllers in Oculus Home: When leaving High Fidelity to the Oculus Home, we now continue to track your hand position rather than putting your in an “Away” state. Go to Settings > Controls > Calibration to turn this on or off. Thank you to our user Saracen! (Canny request: http://roadmap.highfidelity.com/feature-requests/p/track-hands-in-oculus-dash)
Improvements
Avatars
- The High Fidelity Avatar Exporter for Unity has been updated:
- You can adjust the avatar’s scale prior to exporting it from Unity.
- Better error detection now notifies you of scale and material errors you may encounter while using the tool.
- Download the updated exporter here (v0.4.0): https://github.com/highfidelity/hifi/raw/77ea47a9dbbb49c626e3ccae79fbcd34645fffd1/tools/unity-avatar-exporter/avatarExporter.unitypackage
- In the Avatar Packager, click on any error messages you encounter to view troubleshooting tips on how to resolve the error prior to uploading your avatar.
- Improved UI to clarify that uploading your avatar to High Fidelity’s servers via the Marketplace does not automatically put it up for sale. You can always put your Avatar for sale by going through our Marketplace process.
Security
- Your personal bubble will automatically be enabled when “Away” to prevent avatar harassment.
- When someone is banned from a domain, we now send a message to the owner or admin of the domain to confirm the ban, assuming they have kick rights. This ensures that users cannot be banned using unsolicited scripts within a domain.
Other Mentions
- Far grab now uses two hands to reduce accidental activation.
- Choose whether wearables can be grabbed while being worn using the Lock icon on the Avatar app. (Canny request: https://highfidelity.canny.io/bugs/p/wearables-can-get-moved-by-grabbing)
- We’ve removed grab scaling. We’ll work on ways to improve this in a future release and turn it back on. (Canny request: http://roadmap.highfidelity.com/feature-requests/p/ability-to-prevent-grab-scaling)
- New toggle determines whether or not wearables can be adjusted by hand (Canny request: http://roadmap.highfidelity.com/bugs/p/wearables-are-detaching-from-avatars)
- Marketplace items now have the ability to be rezz’d multiple times within a single domain. For example, someone can buy a single tree, then rez it multiple times to create a forest. When submitting an item to the Marketplace, content creators control whether or not an item can be rezz’d multiple times in the JSON file (Read documentation here). Coming in future releases: We’ll make it easier to mark which items can be rezz’d multiple times, along with visual indications of these items in your inventory. (Canny request: http://roadmap.highfidelity.com/feature-requests/p/allow-marketplace-items-to-specify-the-number-of-copies-or-infinite-a-buyer-can-)
Fixes
Avatars
- Fixed a bug in which wearables became detached from your avatar.
- Fixed a bug where avatars occasionally shifted into flying pose while on the ground.
- Fixed a bug which caused avatar entities to not persist. (Canny requests: http://roadmap.highfidelity.com/bugs/p/entity-bones-reset-locally-on-teleport-but-not-remotely and http://roadmap.highfidelity.com/bugs/p/windowdomainchanged-does-not-work-on-avatar-entities)
Other
- The Escape key now consistently places the user in “Away” mode. (Canny request: http://roadmap.highfidelity.com/bugs/p/escape-key-doesnt-set-avatar-to-away-mode)
- Ambient Occlusion works again! We inadvertently broke this a couple of releases ago.
- In a web entity, you can now input text in a web text box or text field. This fixes the ability to use the 3D keyboard to type in web entities. (Canny request: http://roadmap.highfidelity.com/bugs/p/web-entity-keyboard)
- Hand lasers no longer disappear when selecting another avatar’s sphere with the People app open. We inadvertently introduced this bug in v0.79.0.
- When multiple entities are selected, using the arrows or dragging numerical fields will now display the correct value, rather than the minimum value.
Android
Nothing specific for Android in this release.
Beta Release 80
We released Beta Release 80 on Tuesday, March 19, 2019.
Note: There is a protocol change in this version.
New in v0.80.0!
- Added Clock to Tablet: Local time is displayed in the upper right of the tablet in HMD, above the username (or log in, if not logged in).
- Downloadable Assets: Content creators can now download their assets for their Marketplace items, including both approved and invalidated items. This is supported on the web-based Marketplace by opening it in a browser; it is not yet supported using the Market app.
- Digital Ocean Password Reset: Domain Admin users can now reset their admin username and password on Digital Ocean Domain Servers. Go to highfidelity.com/user/cloud_domains, sign in to High Fidelity, and select the Reset Domain Server password option from the menu.
- Avatar Doctor: The Avatar Packager now contains error detection, aka the “Avatar Doctor”. This tool will notify you of common errors before you upload your avatar files to our server for hosting. Coming in future releases: click on the error to view troubleshooting tips on how to resolve the error prior to uploading your avatar.
- Creators Stocking Inventory: Allows creators to stock their inventory with their own NFS certified items and gift them to others.
- New and Updated Documentation:
- The API Reference has been updated to a new, easy-to-read style that helps developers find what they’re looking for more easily, complete with a comprehensive search. It is available at https://apidocs.fluffy.ws.
- New documentation will include (clear cookies if you’re getting 404 errors):
- Firewall Settings
- Using High Fidelity with Android (Canny request: http://roadmap.highfidelity.com/feature-requests/p/requested-documentation-more-info-for-high-fidelity-on-android)
- Improved Documentation for Entity Filters and ‘Protecting Your Domain Content’ (Canny request: http://roadmap.highfidelity.com/feature-requests/p/improve-filter-documentation)
- Add Your Place to the GoTo Menu
- Tutorial: Build a Boom Box
- Tutorial: Create an Avatar Scaling Button
- Tutorial: Open Web Page with Entities
- Tutorial: Build a Painting Set
- Tutorial: Create a Purchase Button for Marketplace Sales
This release completes the overlay work we began a couple of releases back. We have converted our internal use of overlays to local entities and are moving toward deprecation of 3D overlays.
Content Creators: From now on, please use local entities instead of overlays. Any work you have that uses Overlays should be migrated to use local entities.
Improvements
Avatars
- The High Fidelity Avatar Exporter for Unity has been updated to notify you of texture and file errors you may encounter while using the tool. Download the updated exporter here: https://github.com/highfidelity/hifi/tree/master/tools/unity-avatar-exporter
Create Tools
- The ‘Entity Types’ dropdown of the Entity List has new buttons for Select All (check all entity types) and Clear All (uncheck all entity types).
Rendering
- We added the ability to load GLB (GLTF binary) format assets with on our ongoing work to support glTF.
- The Market tablet app is rewritten in QML (from HTML) to support future mobile-compatible devices.
Other Mentions
- When you update a Marketplace item, the number of likes now carries over from the original item to the updated item in the Marketplace.
- During a custom install, you now have the ability to install only the Sandbox or only the Interface without uninstalling the other.
- The list of live-speakers in the People tablet app are sorted live. You no longer need to refresh or close the PAL to re-sort the list except in very noisy or low-level places.
- We’ve added new text to warn when sending an inventory to the Trash is an irreversible action.
Fixes
Avatars
- UTF-8 characters are read correctly in FST files. This fixes a bug where Japanese characters in FST files were incorrectly read, causing the avatars to fail while loading.
- We continue to address the “white orb” issue where avatars appear as white orbs when loading into a domain and never fully load as avatars.
Create Tools
- Fixed the ability to change animations of an FBX model entity by a script or via the Create menu (Canny Request: http://roadmap.highfidelity.com/bugs/p/fix-entity-model-animations).
- Sorting entity and files lists now correctly sorts alpha and non-alphanumeric characters.
- Drop-downs now close when a user clicks outside of the list.
- Users can now change a particle effect’s URL by typing into the field directly.
Rendering
- Tablet no longer disappears due to LOD issues (Canny Request: http://roadmap.highfidelity.com/bugs/p/make-overlayslocal-entities-not-effected-by-current-lod)
- Entity properties are respected during far/near grab while in HMD (Canny Request: http://roadmap.highfidelity.com/bugs/p/entity-properties-not-set-in-vr)
- Fixed an issue where avatars drop through the floor when loading, because they were able to move too soon. We now don’t allow avatar movement until the floor renders and physics is enabled.
- Fixed an issue where you could fly in zones that had “Flying Allowed” set to off when creating a Zone in Create tool. (Canny Request: http://roadmap.highfidelity.com/bugs/p/avatar-dont-fall-and-can-start-to-fly-when-the-zone-is-set-to-no-fly).
- Continuing to improve and work on the issue of soft wearables flickering when worn.
- Keylights now update correctly when a zone is rotated.
- Procedural entities now render both sides of their triangles correctly. This fixes a bug that was introduced in a recent release.
- As part of overlay work, we’ve deprecated Overlays.keyboardFocusOverlay in favor of Entities.keyboarFocusOverlay which can be used to set keyboard focus via scripting.
Other
- Fixed a long-standing issue that would sometimes occur where an ESS script couldn’t get the properties of its parent. There has a been a workaround in place where a blank javascript function was placed inside of the parent entities serverScripts property. After this fix, you should no longer need to use this workaround.
- Fixed an issue in the PAL where index numbers would append after display names for users even if they were the only user with that name in the domain. This was occurring due to an issue with refreshing content, re-entering a domain, or recovering from crashes.
Crash Fixes
Fixed crashes in the following scenarios:
- Resizing entities
- Parsing AvatarEntity data with too many LocalJointTranslations
- On Mac Desktop computers
Android
Nothing specific for Android in this release.
Socialize with Others
High Fidelity is all about the people you meet and the experiences you have with them. High Fidelity enables people connected by interest, community, and friendship to come together from anywhere in the world.
On This Page
Make Connections and Friends
In High Fidelity, you can establish a connection with someone else by shaking hands with them. With your hand controllers, place your hands near each other and hold the grip button. Desktop users can press and hold
Xon their keyboard.Once you make a connection with someone, they will appear under Connections in the The People app. You will also appear on their list of connections. You will be able to see where they are in the metaverse, and you can travel to them at any time.
To mark a connection as a friend, check the box next to their name in the People app. You can make yourself available to only your friends using the People app.
The People App
The People app provides a set of tools that help users manage their interactions with people in the metaverse. It gives you a list of the people nearby (in the same domain as you), and gives you easy access to all of your connections. From the People app, you can:
As an administrator in a domain, you will have privileges to maintain a domain. The People app will have an additional column that allows an admin to silence and ban users in the same domain.
Your Privacy Shield
You can enable a privacy shield that protects your personal space in the metaverse. When it is enabled, other people will disappear if they get too close to you. Your privacy shield is disabled by default. To enable it, pull up your tablet or HUD and click Shield. In Desktop mode, you can also use the keyboard shortcut
CTRL+N.There is also a Shield icon on the top-left corner of your Interface window, next to the audio icon, that can be used to toggle your privacy shield.
Attend Live Events
One of the great things about virtual reality is that you can attend events. High Fidelity regularly hosts events such as workshops, lectures on VR, and town hall meetings to meet our team. Click here to view all upcoming events. Events are a great place to meet others and share experiences with others around the world.
To attend an event, simply go to the hosted domain at the time of the event.
Express Yourself
There are many ways you can express yourself in High Fidelity, such as animating the mouth of your avatar or using gestures in the Emote app.
By default, all avatars will use a standard set of animations, such as your eyes blinking or your mouth opening and closing as you talk. When you are using a VR controller, your avatar will automatically mimic your hand gestures and movements.
The Emote App
The Emote app is a way for desktop users to express themselves without using VR controllers. With this app, you can display feelings by: crying, acting surprised, dancing, cheering, waving, falling, pointing, clapping, sitting, or showing love.
Chat with Users
High Fidelity doesn’t yet have a default text chat option that works well for both HMD and desktop users as most HMD users can’t type easily. Our extensible open-source scripting and UI gives you the ability to create the features you want, including text chat. There are some great scripts for chat that have already been built by community members, and a few are described below.
HiFi Local Chat
This clean, reliable, and well-written chat script was created by alpha user ctrlaltdavid.
To run the script:
The script will start running and display a text chat window pop-up. You can use this window to chat with other users in the same domain who are running the same script. If text chat is important to you, you can add this to your default scripts so it’s always there.
COM Script Version 1
AlphaVersionD has authored an equally powerful and friendly script that runs on a domain. All users that visit a domain with the script can chat with one another, without installing a separate app or script. With this script, you have the power to enable chat on any of your own domains.
Note
You can run a script only in a domain where you have the right permissions. Ensure that you have the right permissions in a domain where you wish to use the COM Script.
To install COM Script in your domain:
COM Script version 1 is now running in the zone in your domain!
See Also